

Ample Guitar uses carefully sampled real guitars to produce lifelike performances in your DAW. Version 4 adds Strum Note, making chord strumming and single-note programming more intuitive. This guide covers single-note playing in Main, pattern creation in Riffer, and chord strumming in Strummer, from the basics to more advanced techniques. Articulation keyswitches and Auto Legato Mode help make programmed performances sound natural.
From single-note phrases and chord strums to MIDI patterns
Ample Guitar is an instrument made from carefully sampled guitars, giving you the sound of a real guitarist in your DAW.
Version 4 adds Strum Note, making it easier to program chords and single-note phrases.
This article introduces the Ample Guitar series and explains chords, single notes, patterns, and the new features.
See the following site for the product lineup.
SONICWIRE (Ample Sound product lineup)
What is the Ample Guitar series?
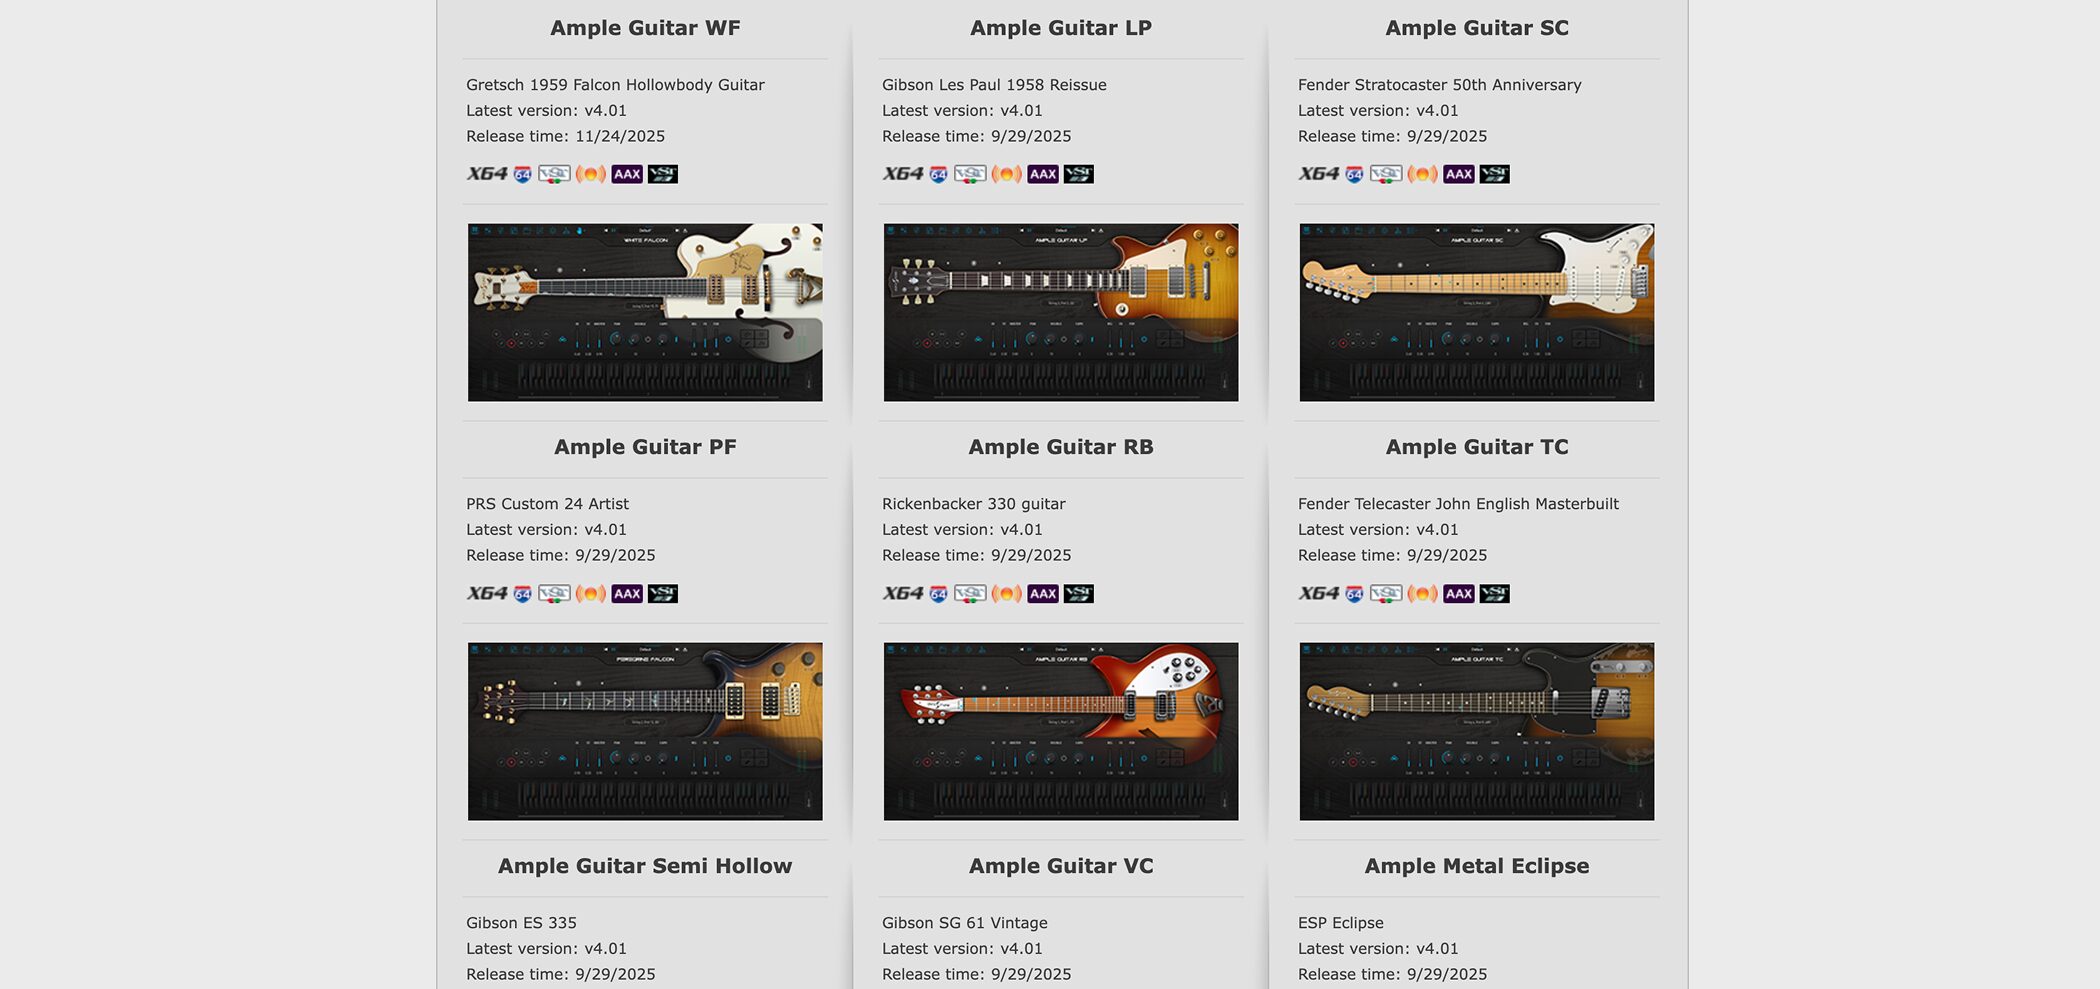
Developed by Ample Sound, the series includes a variety of electric guitars, acoustic guitars, basses, and other models.
Each reproduces the character of its source instrument, allowing lifelike programmed performances; choose a model to suit your music and sound.
Key features include:
- Switch between a wide range of articulations for expressive performances.
- Easily play and build chord-stroke and strum patterns in Strummer. A strum plays multiple strings together while holding a chord.
- Edit guitar-specific MIDI in Riffer.
Listen to the sound of Ample Guitar SC.
Ample Guitar SC demo
With just a preset selected, you can hear the wealth of ready-to-use sounds and phrases.
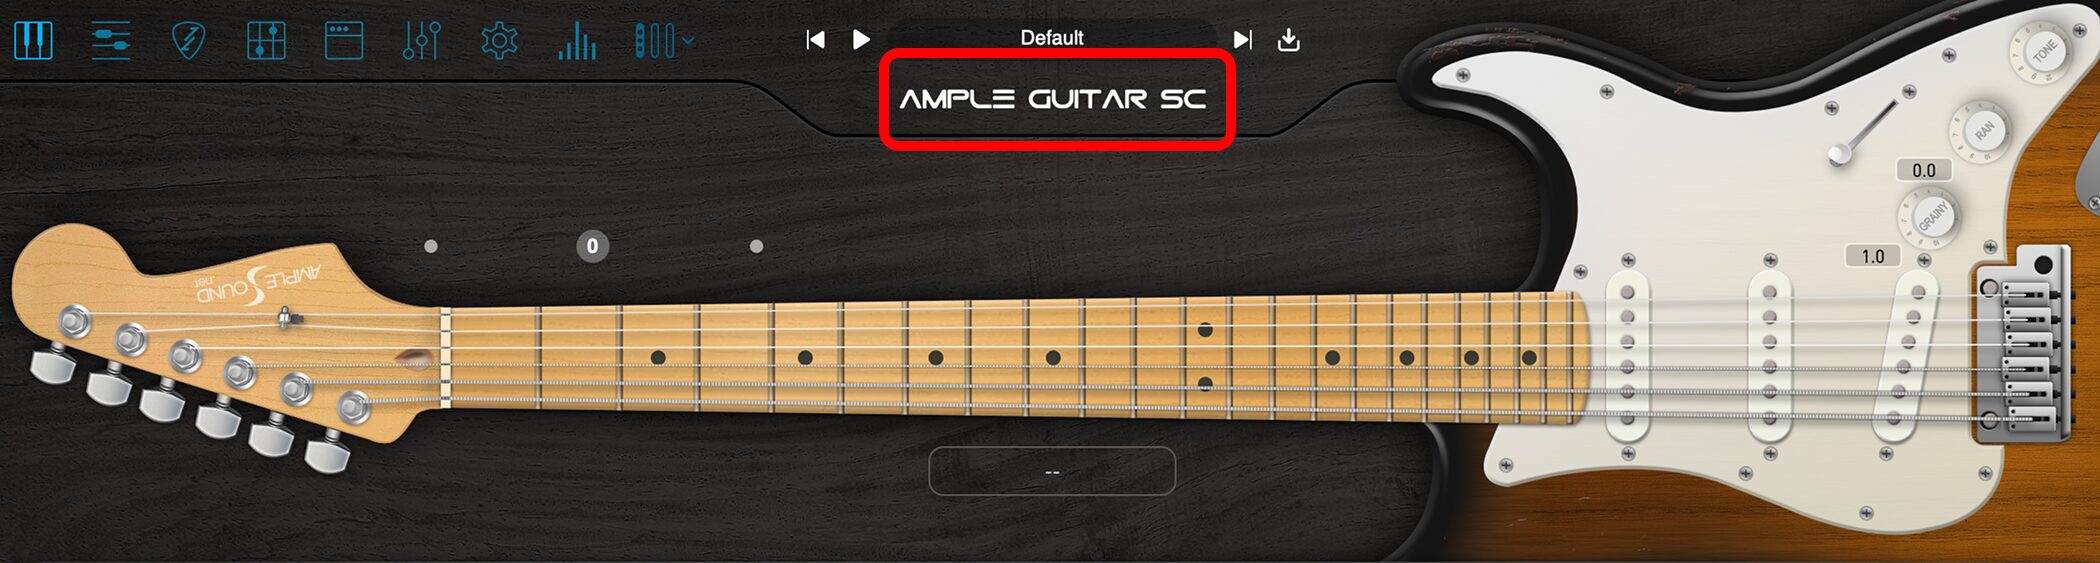
We'll use Ample Guitar SC for this tutorial.
Basic operation is common to other models, although keyswitch assignments and available articulations can vary by product.
Understanding the interface
When you open Ample Guitar, the main screen appears.
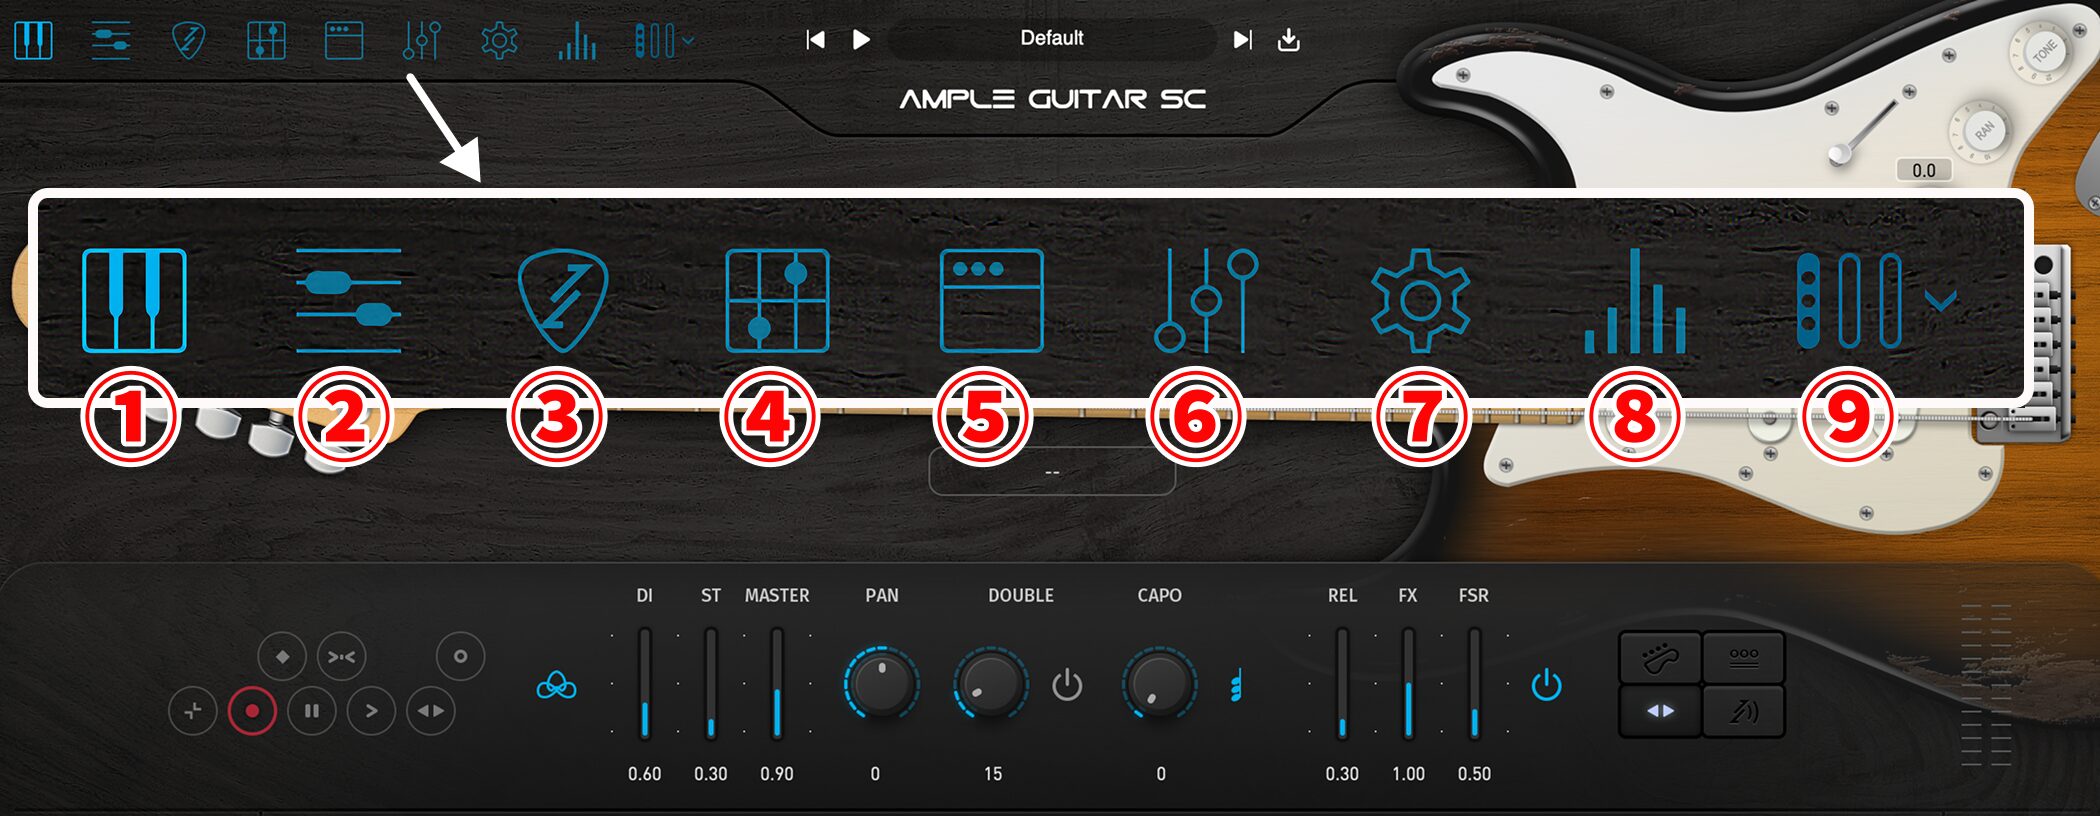
Tabs across the top switch between panels.
① Main: Play melodic and other phrases and switch articulations.
② Riffer: Create and edit MIDI patterns for single notes, chords, and strums, in piano-roll or tablature view.
③ Strummer: Play chord strokes.
④ Tab Reader: Load Guitar Pro tablature.
⑤ Amp: Set up amp heads and cabinets.
⑥ FX: Set effects.
⑦ Settings: Adjust various settings.
⑧ Sample Editor: Edit sample pitch and gain in a list.
⑨ Sample Library: Switch pickups, such as Neck, Neck+Mid, Mid+Bridge, and Bridge.
Single-note basics: Main panel
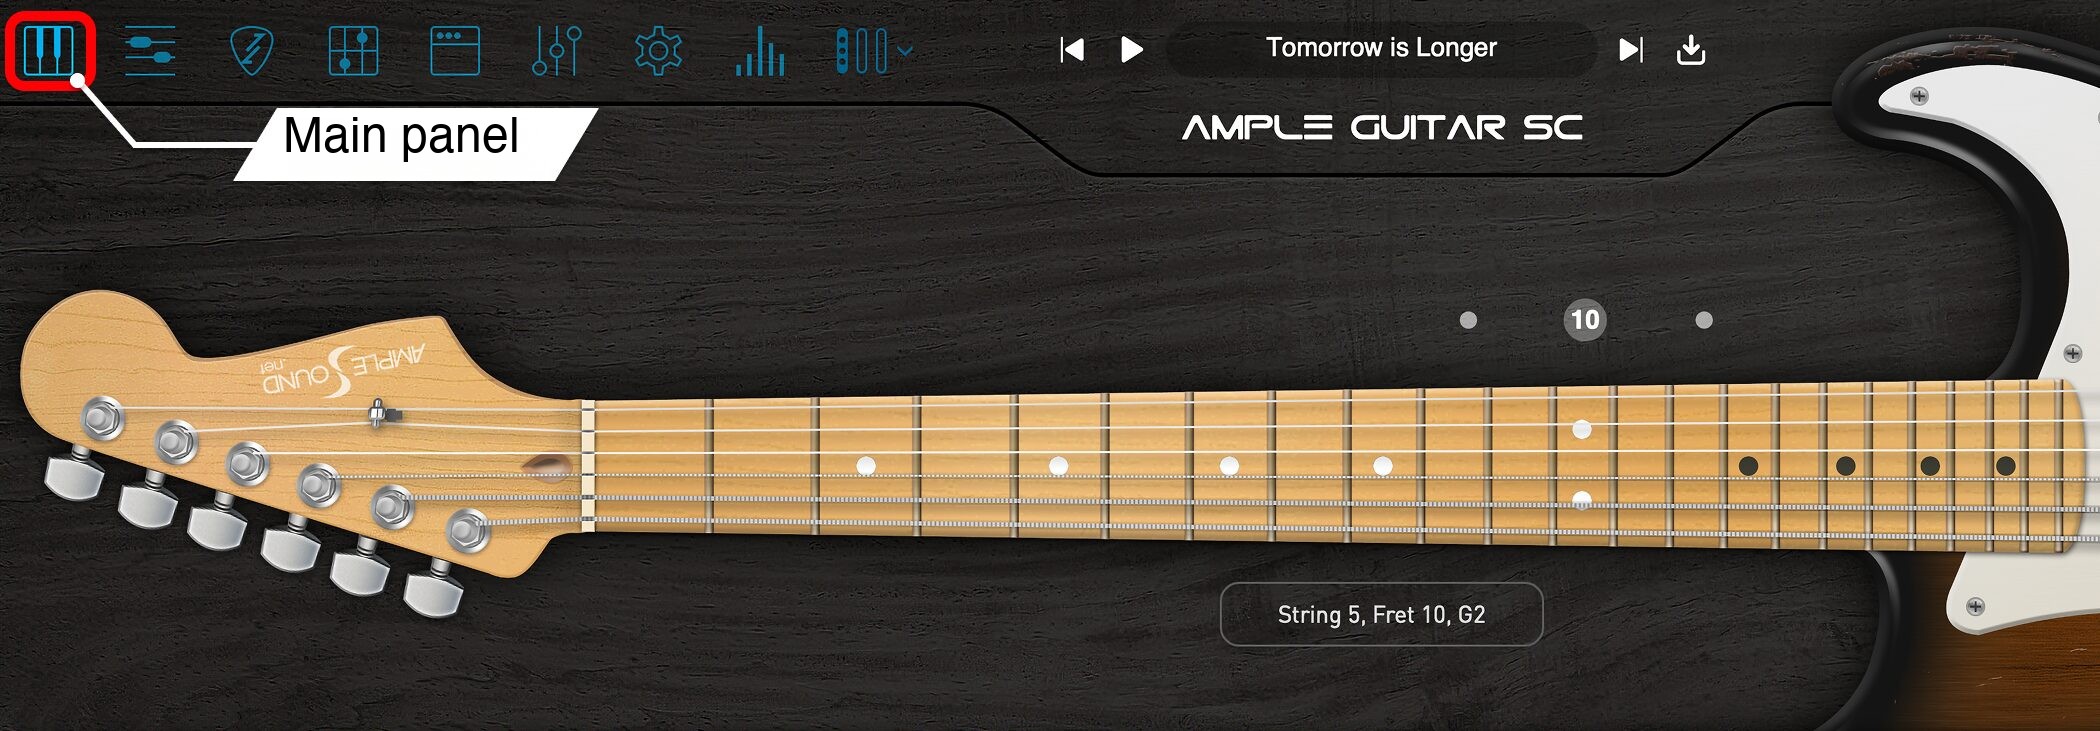
The Main panel is used primarily to play melodies and other phrases and switch articulations.
You can play while changing guitar techniques with keyswitches.
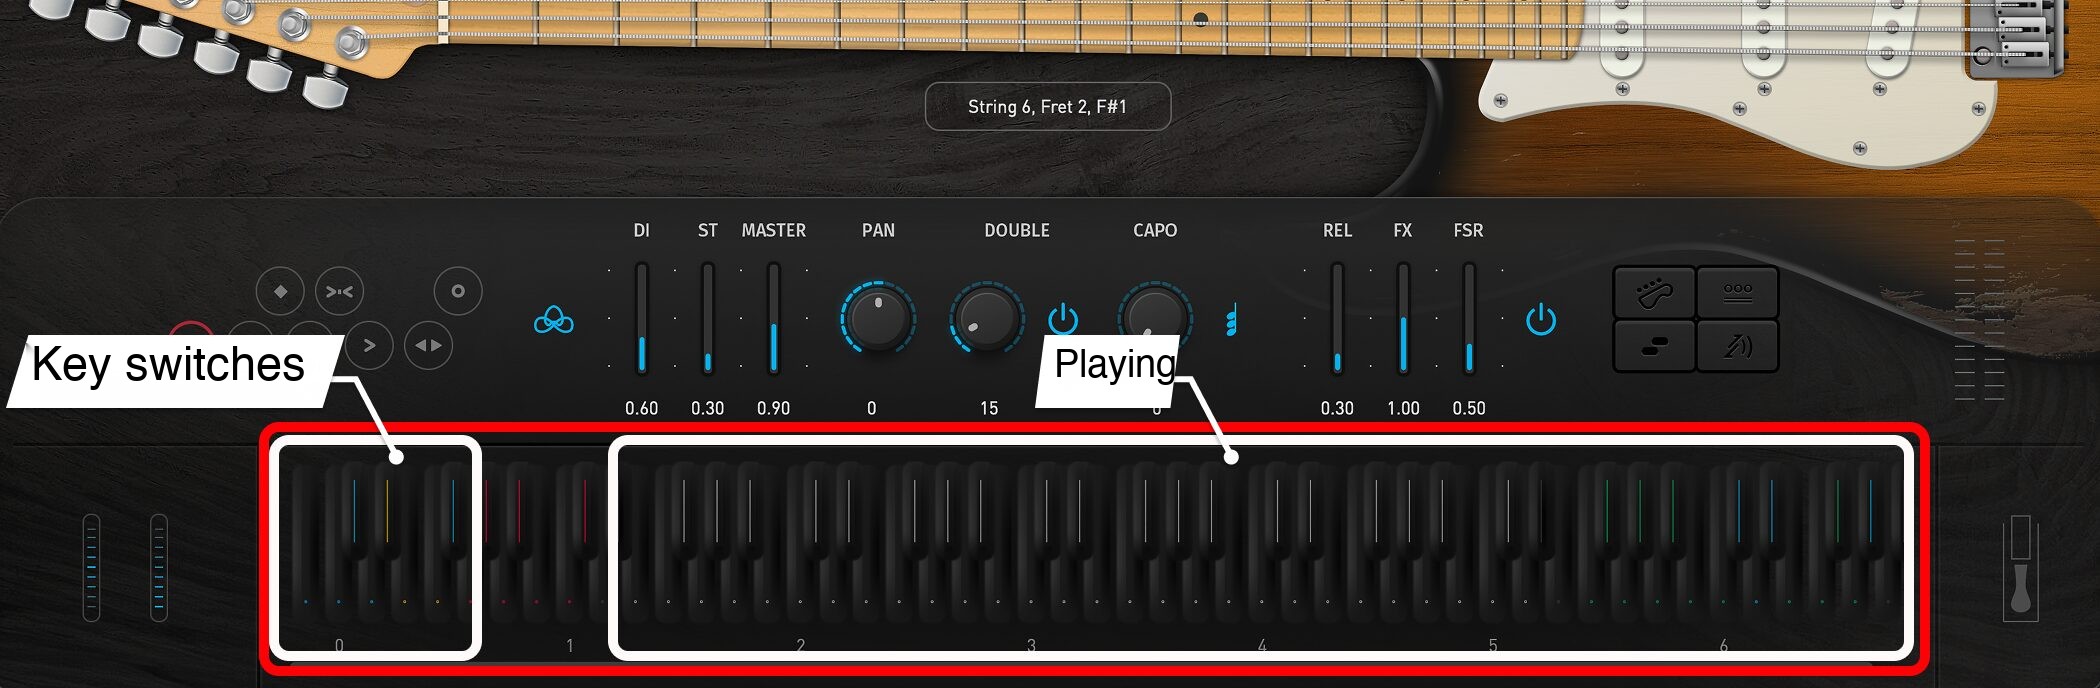
Use the keyswitches in the lower keyboard range to select an articulation, then play the phrase in the regular playing range.
Keyboard layout and playing
In the Main panel, the keyboard is divided into the following ranges:
- Keyswitches (B-1–F#0): Select an articulation before a note to change how it is played.
- Playing range (E1–D5): Play a MIDI keyboard or enter MIDI notes here to produce guitar sounds.
- FX sounds (F5–G6): Trigger effects such as scratches and slaps.
In other words, choose a technique with a keyswitch, then play notes in the playing range.

In your DAW, enter the keyswitch at the same time as or slightly before the playing note to change articulation.
Keyswitch octave labels can differ between DAWs

Octave numbers shown in articulation hints and on the keyboard, such as C0, may differ depending on your DAW.
If a keyswitch does not work as expected, check the DAW's octave settings or play the keys to find the correct position.
Switching articulations
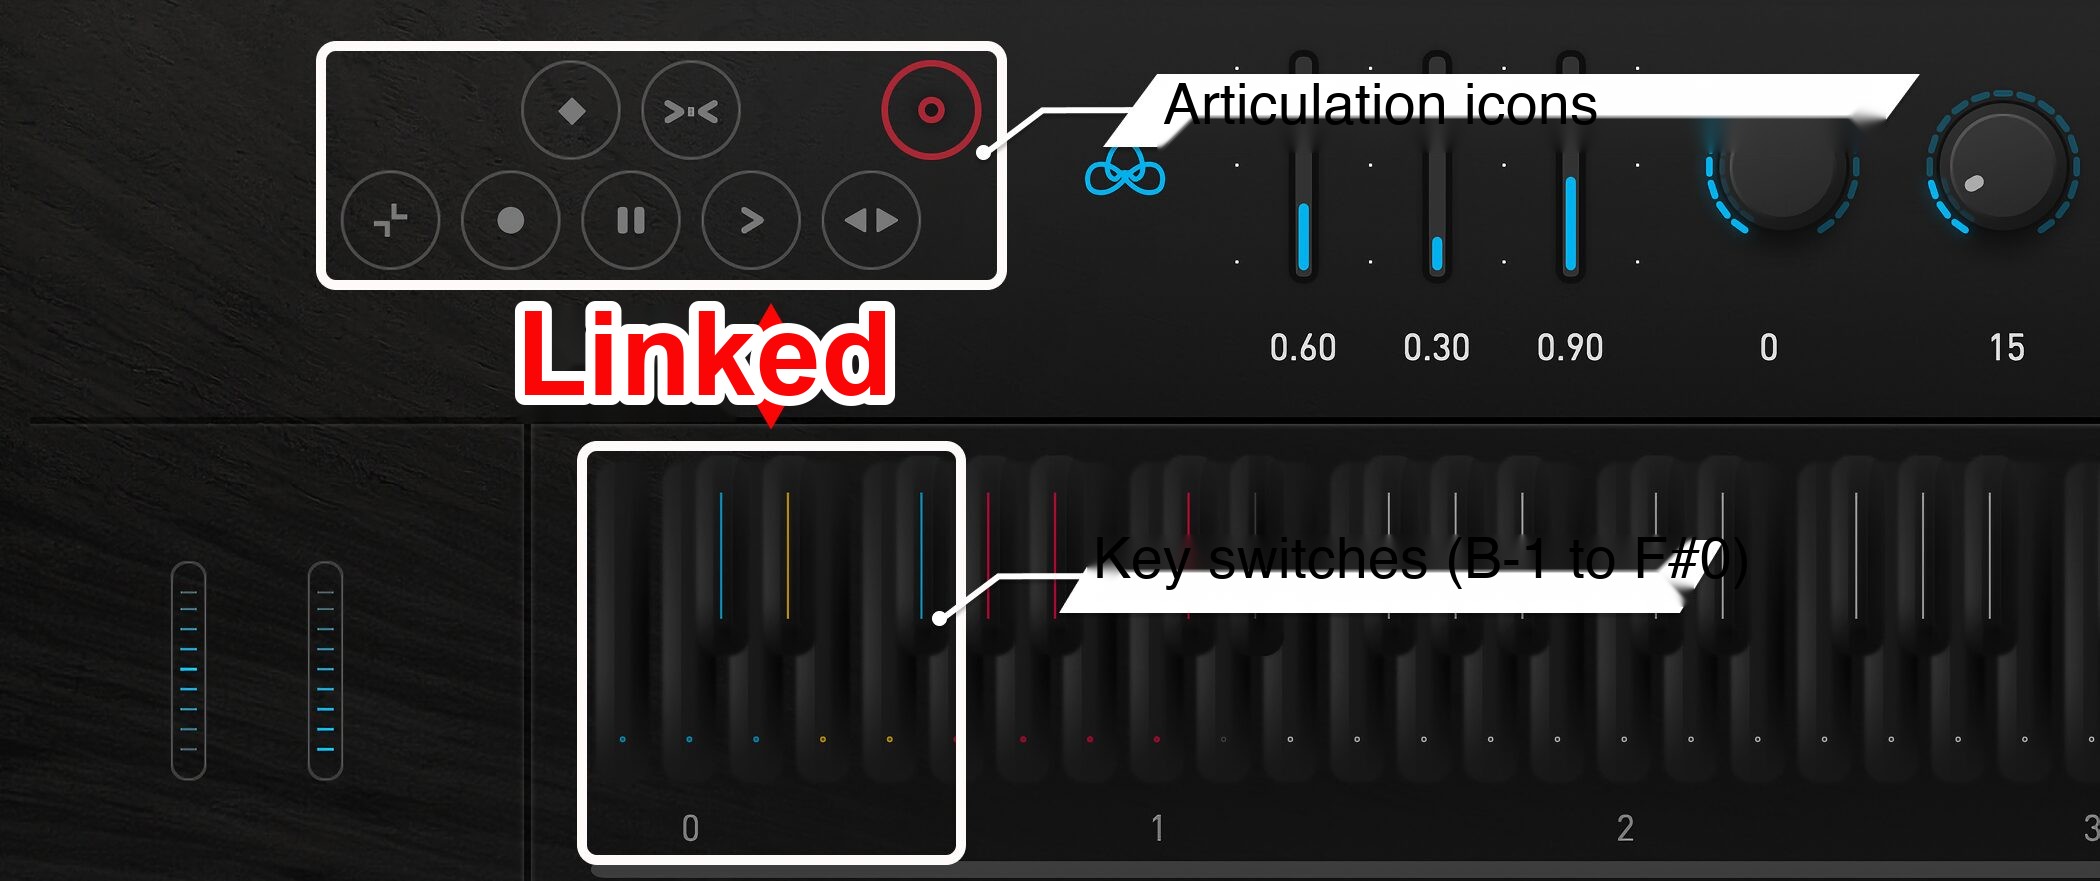
The selected articulation appears in the icon at the upper left of the Main panel.
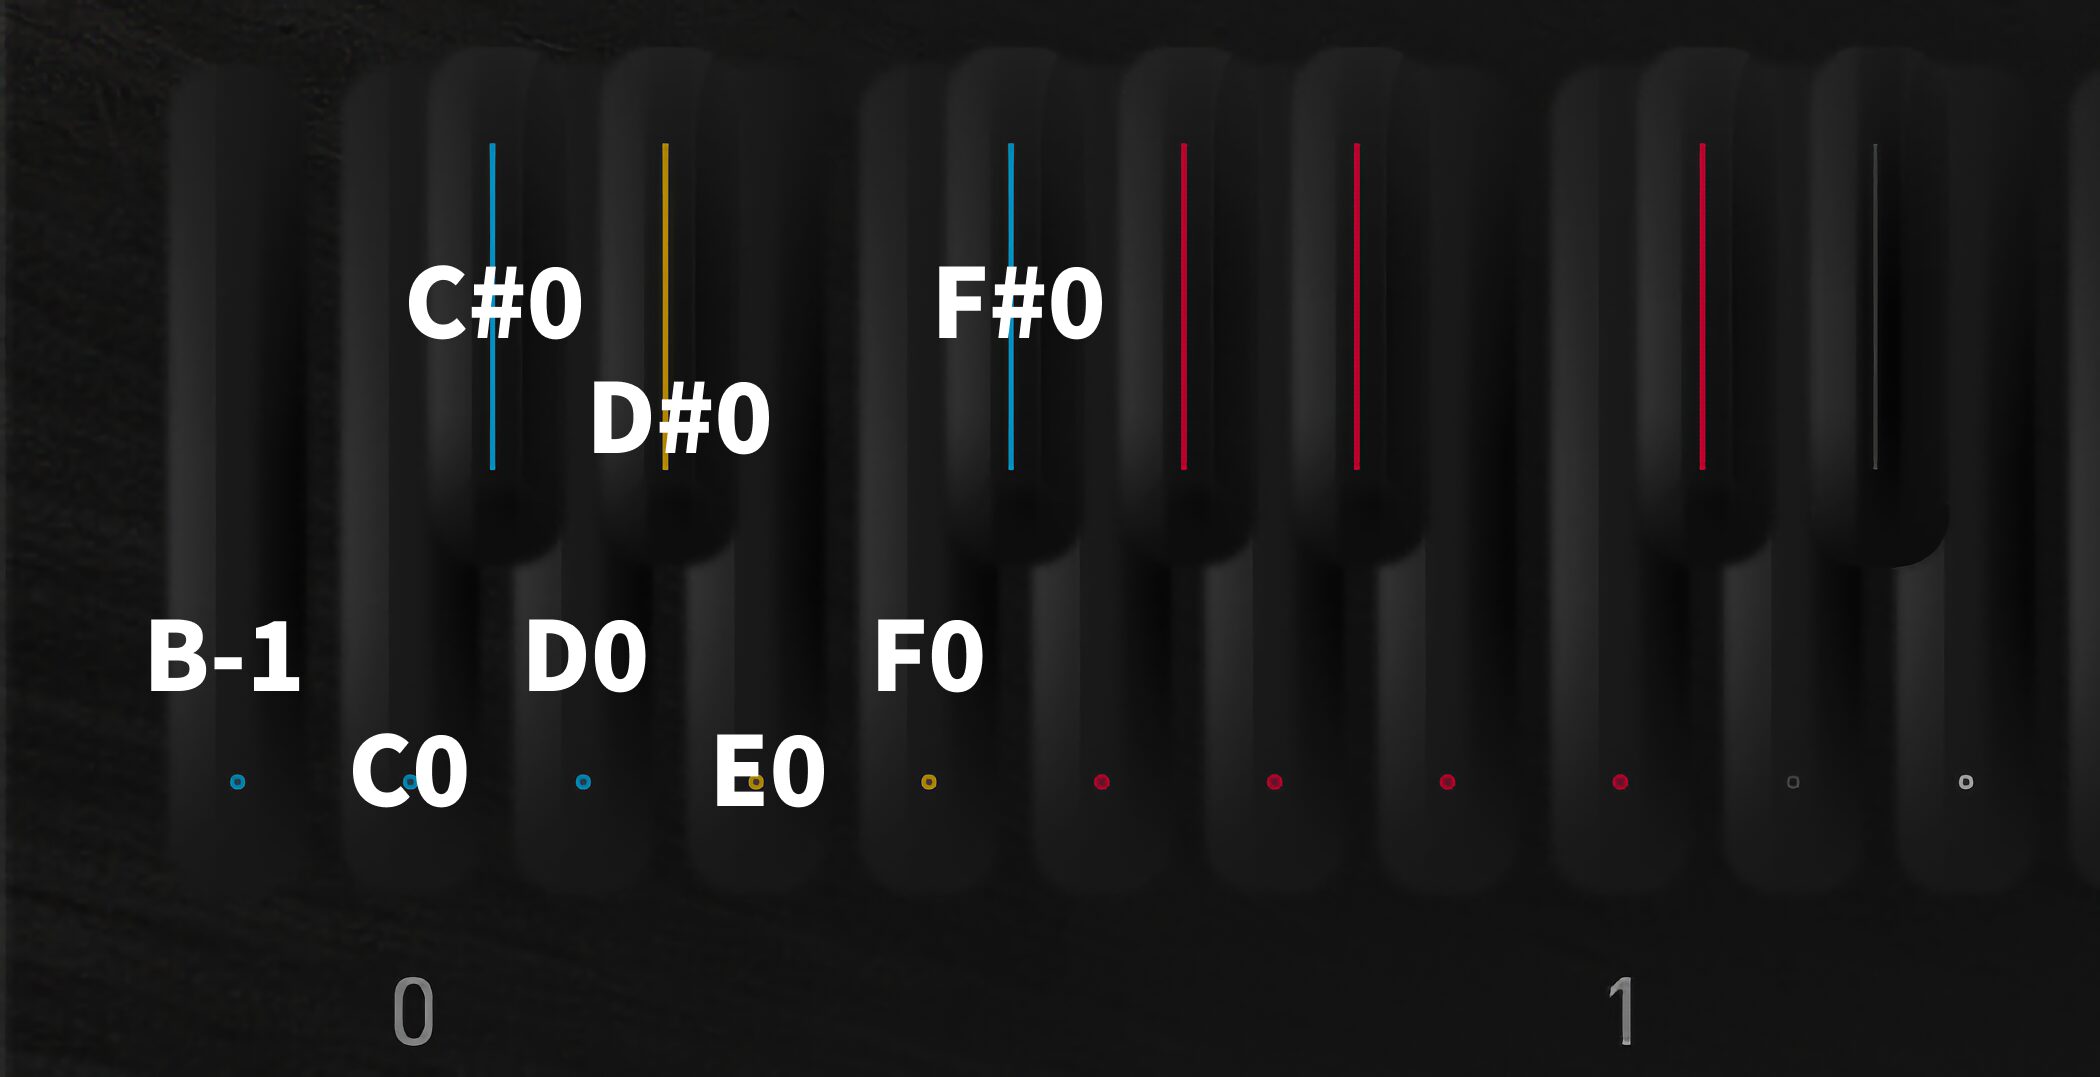
The main articulations are:
(B-1) Pinch Harmonic: Produce a harmonic with pick and finger.
(C0) Sustain & Pop: Normal picking; at maximum velocity it switches to a strongly plucked Pop or Pinch Harmonic.
(C#0) Natural Harmonic: Lightly touch a string to produce a harmonic.
(D0) Palm Mute: Play while muting the strings near the bridge.
(D#0) Slide In / Slide Out: Add a slide at the beginning or end of a note.
(E0) Legato Slide: Move between pitches with a legato slide.
(F0) Hammer-On / Pull-Off: Produce legato notes with the fretting fingers.
(F#0) Slide Guitar: Reproduce slide-guitar playing.
Legato
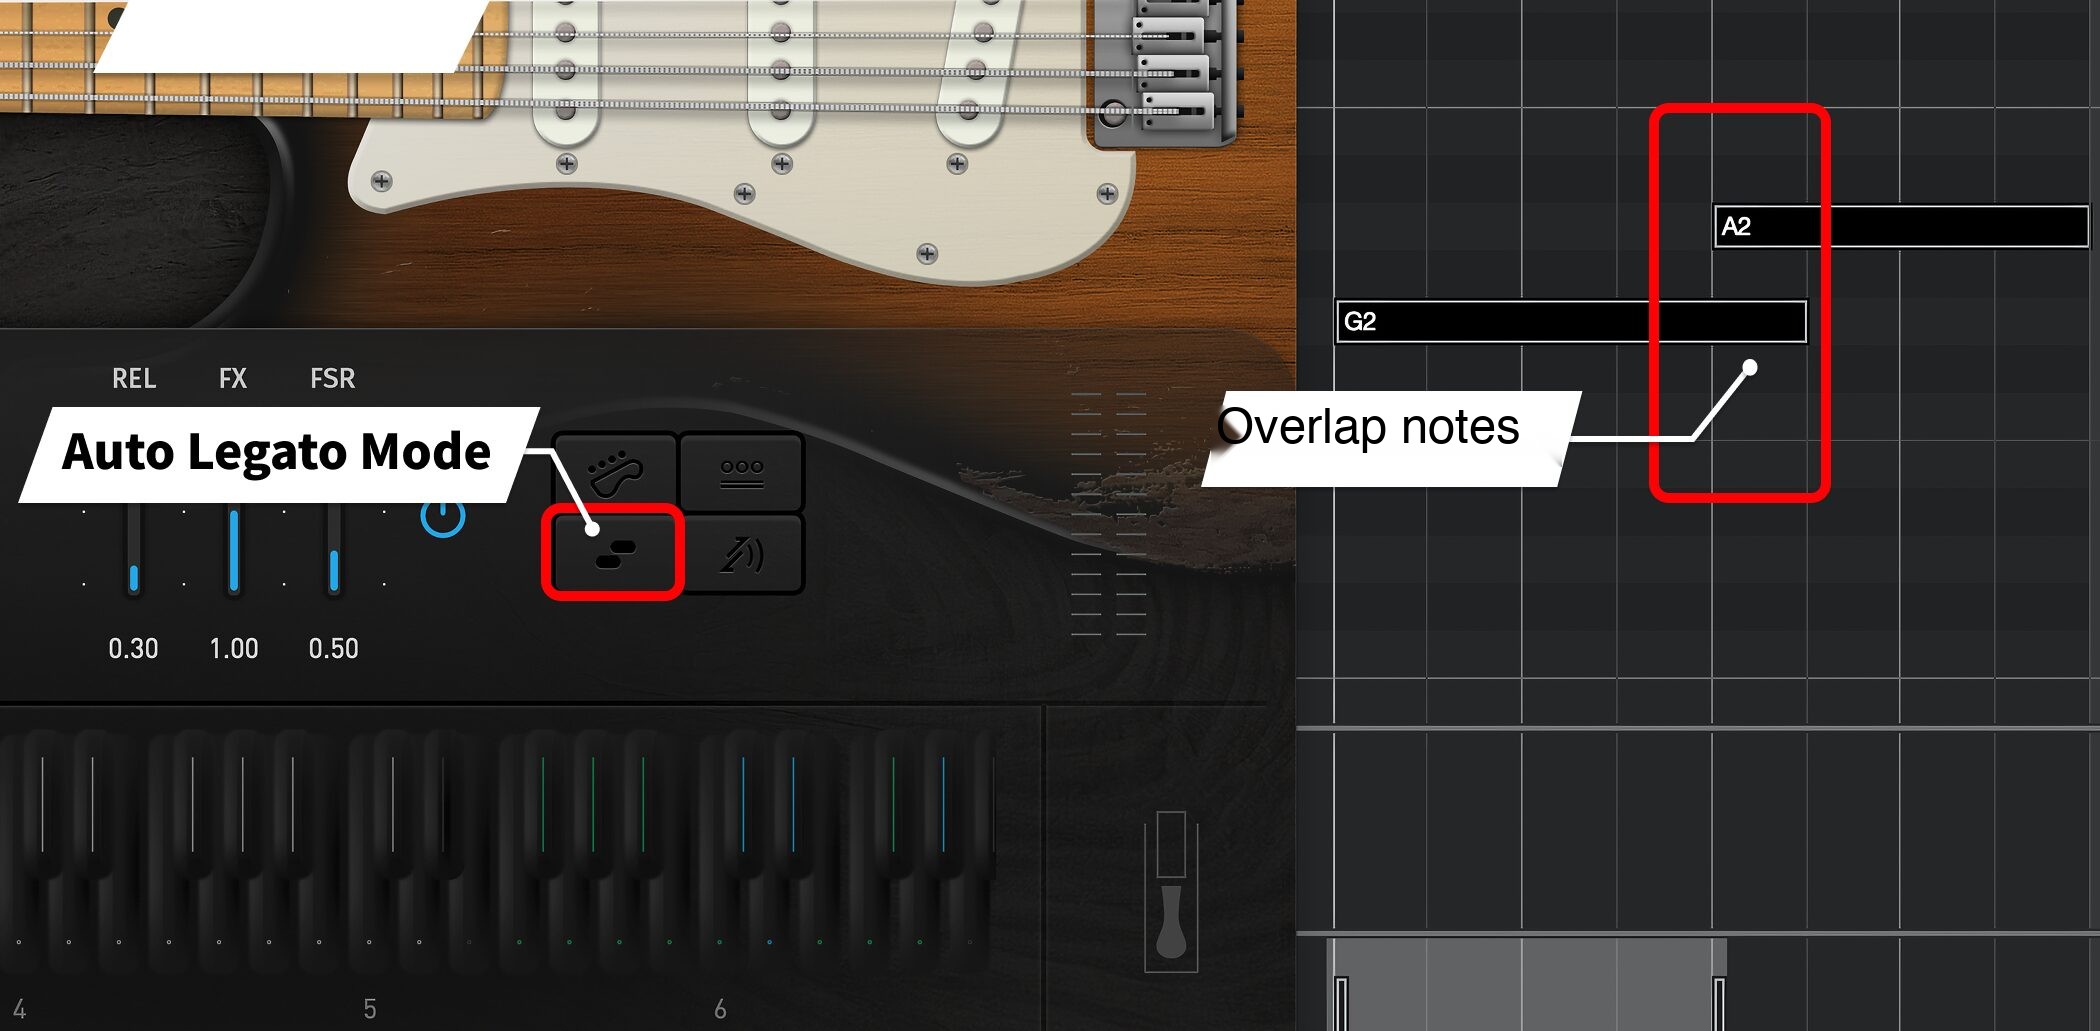
Enable Auto Legato Mode to automatically apply legato when overlapping notes are played on the same string.
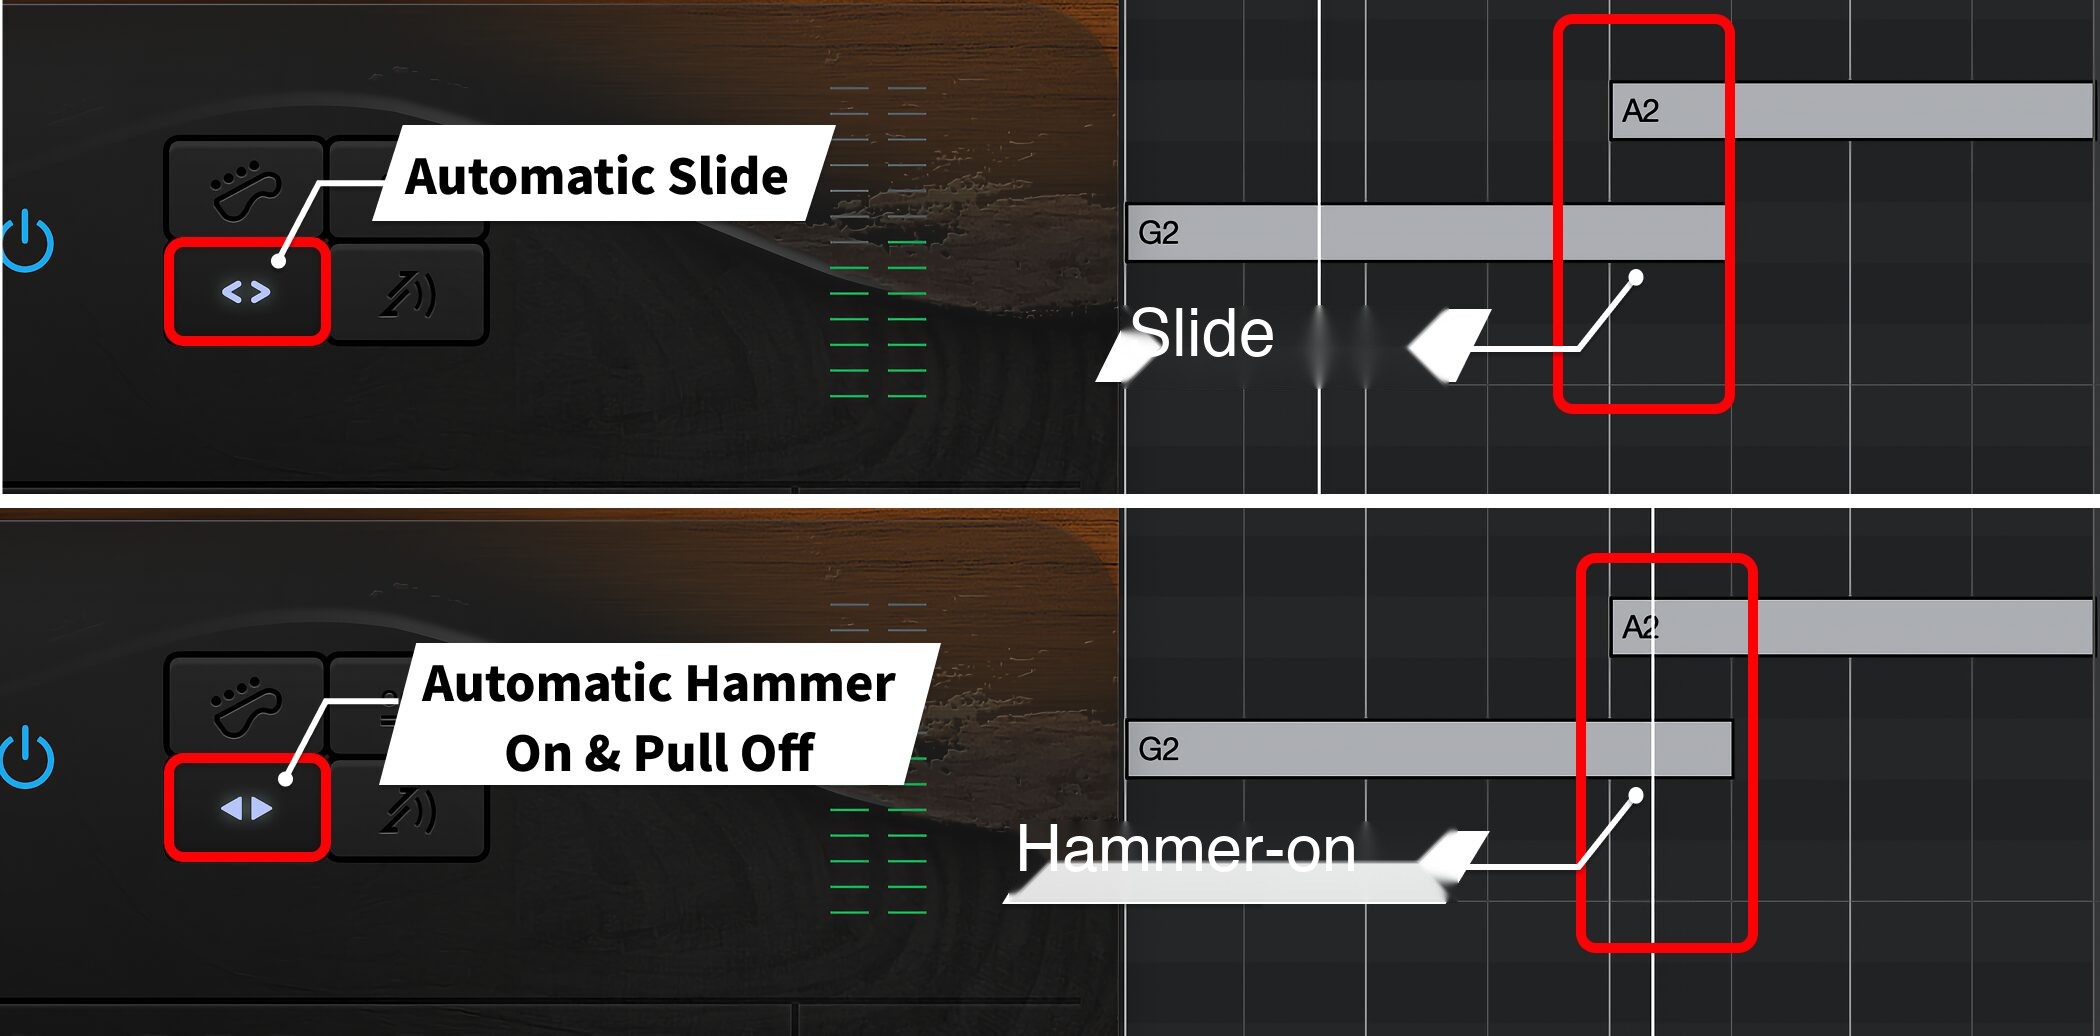
Click Auto Legato Mode to cycle through its modes.
Legato slide example
▶ Automatic Hammer On & Pull Off: Automatically applies hammer-ons and pull-offs.
Automatic hammer-on and pull-off example
When the indicator is off, Auto Legato Mode is disabled.
This makes it easier to create natural legato without setting every keyswitch manually.
Choosing a playing mode
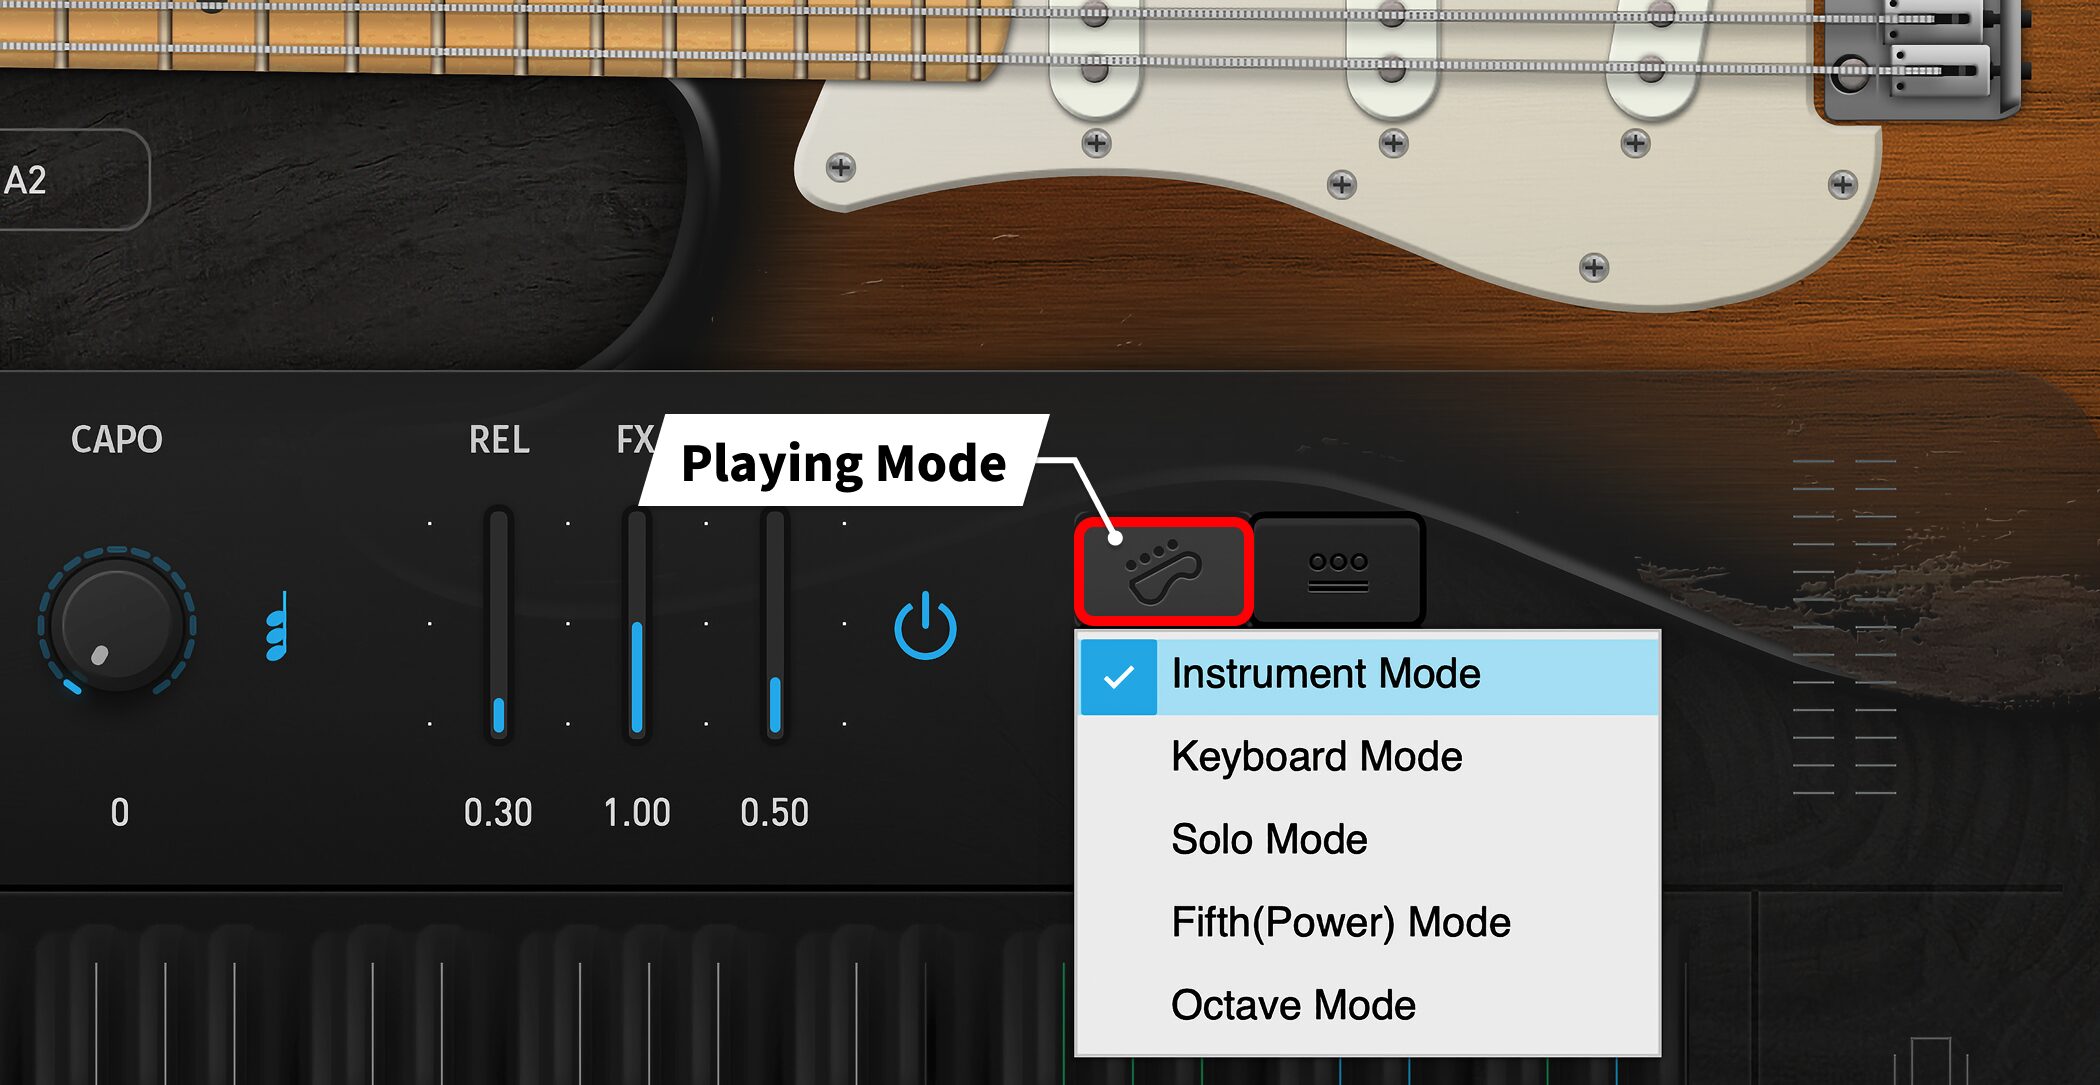
Playing Mode changes how the instrument behaves:
- Instrument Mode: Simulates strings and fretboard positions for realistic guitar playing.
- Keyboard Mode: Plays freely without string restrictions, including chords impossible on a real guitar.
- Solo Mode: Plays one note at a time, useful for guitar solos.
- Fifth (Power) Mode: Plays the root and fifth together for easy power chords.
- Octave Mode: Plays the root and its octave together.
Other settings
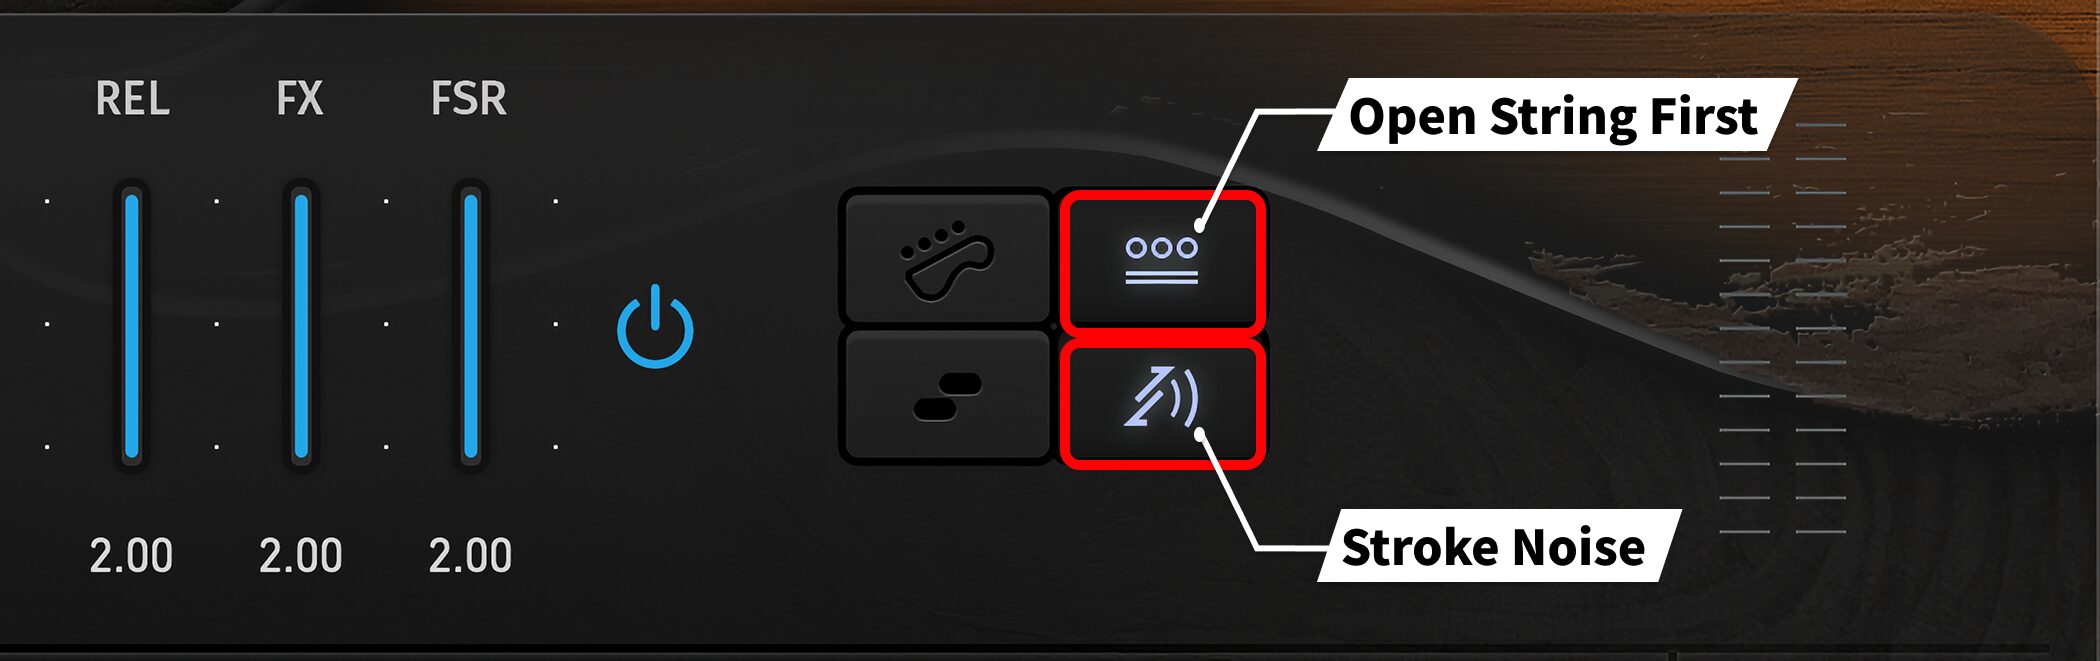
Additional settings include:
- Open String First: Prioritizes open strings for notes playable on them (E1 / A1 / D2 / G2 / B2 / E3).
- Stroke Noise: Automatically adds strumming noise when playing chords for greater realism.
Sound settings

The center of the Main panel contains a range of sound settings.
① Sound Mode (icon): Select output. Use Stereo directly or DI with an external amp simulator.
② DI / ST / MASTER: Adjust the volume balance.
③ PAN: Adjust left-right balance.
④ DOUBLE: Add thickness resembling two guitars playing together.
⑤ CAPO: Set capo position to transpose without changing fingering.
⑥ Position Mode (icon): Switch between positions suited to melody and chord playing.
⑦ REL: Adjust the release noise heard when a note stops.
⑧ FX: Adjust the volume of effects such as scratches.
⑨ FSR: Adjust fret-noise volume.
Playing chord strokes: Strummer panel

The Strummer panel is used mainly for chord strokes. Enable it to select chords and play or create strumming patterns easily.

When enabled, the keyboard switches to the Strummer-specific layout.
To play melodies or other material in Main, make sure it is turned off.
Specifying chords

There are two chord modes: Select Mode recalls preconfigured chords, and Detect Mode recognizes chords from incoming MIDI notes. Switch them with the Switch Chord Mode button (keyboard icon).
Select Mode
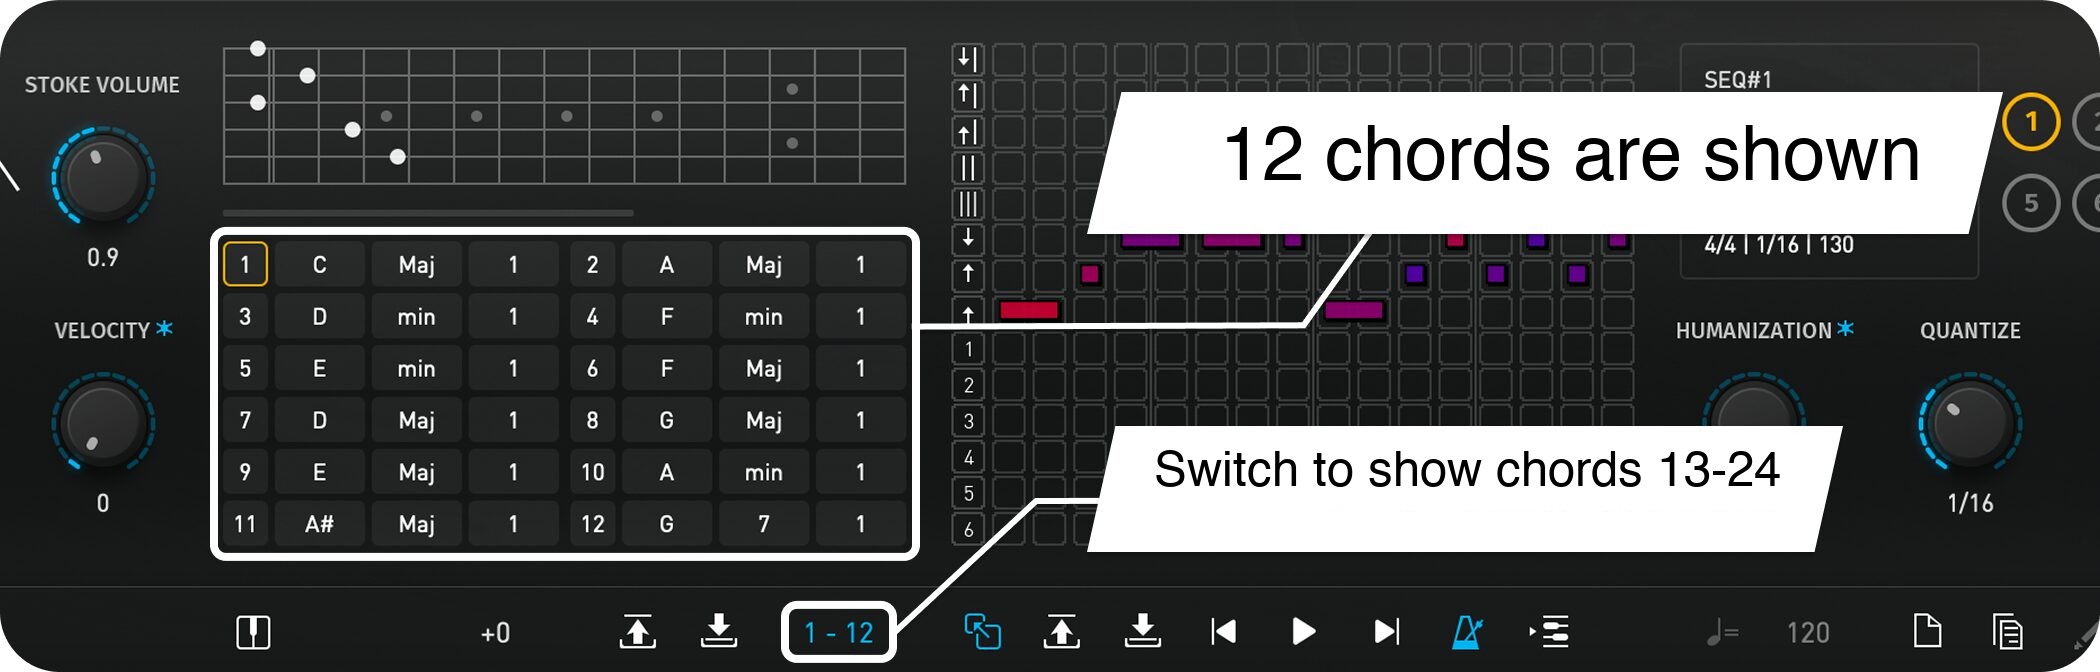
Store chords in up to 24 slots and recall them with keyswitches.
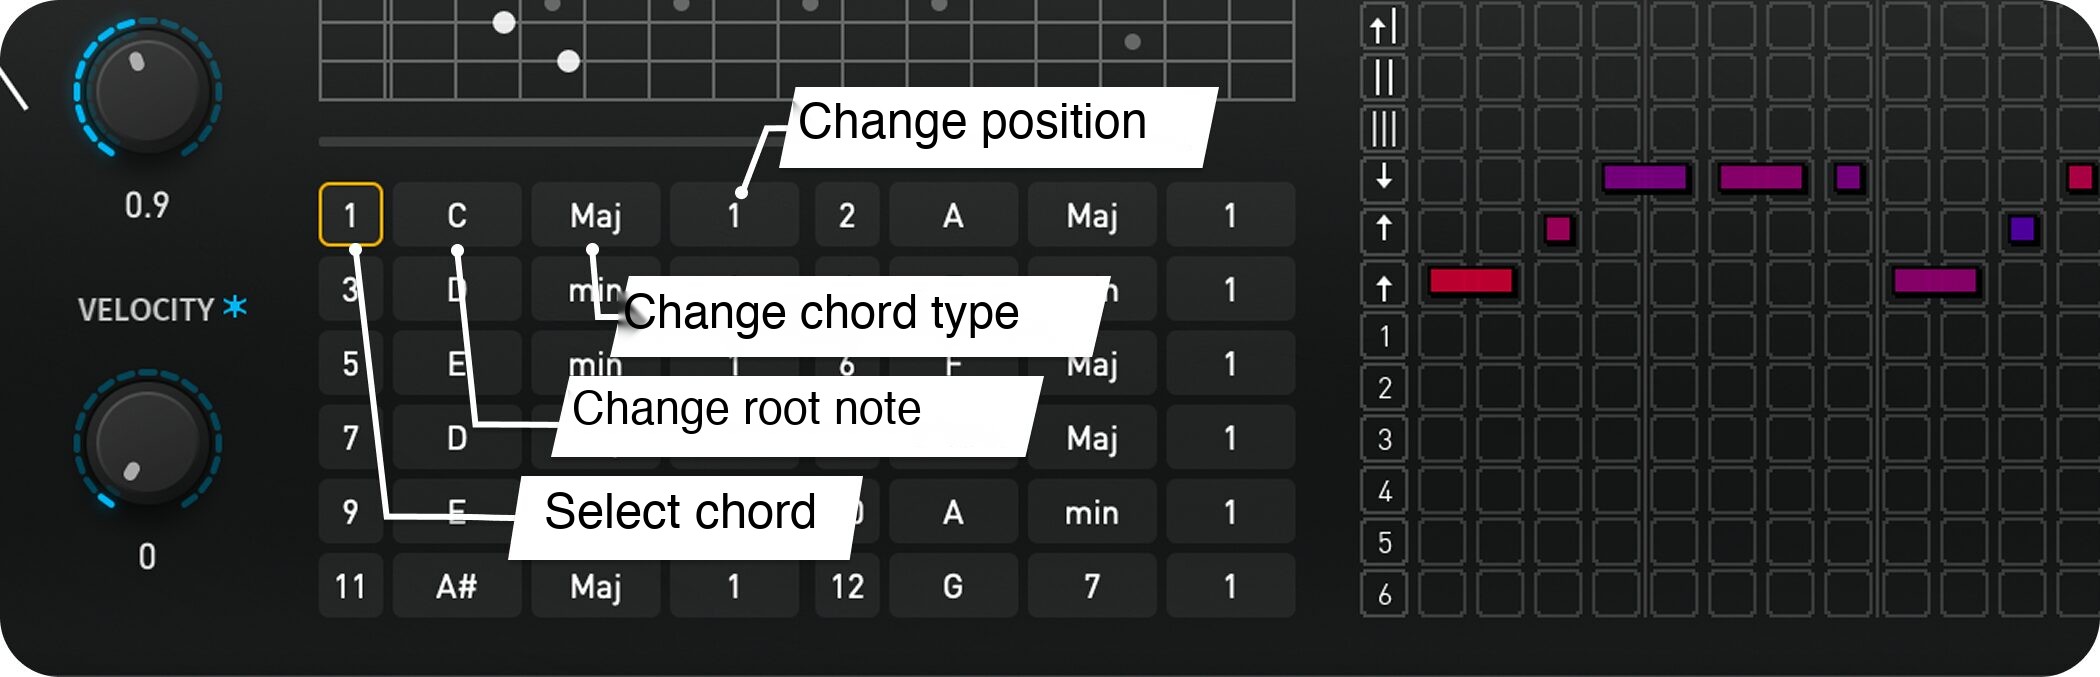
For each chord you can change the root, chord type, and position or variation, creating a set for your song.
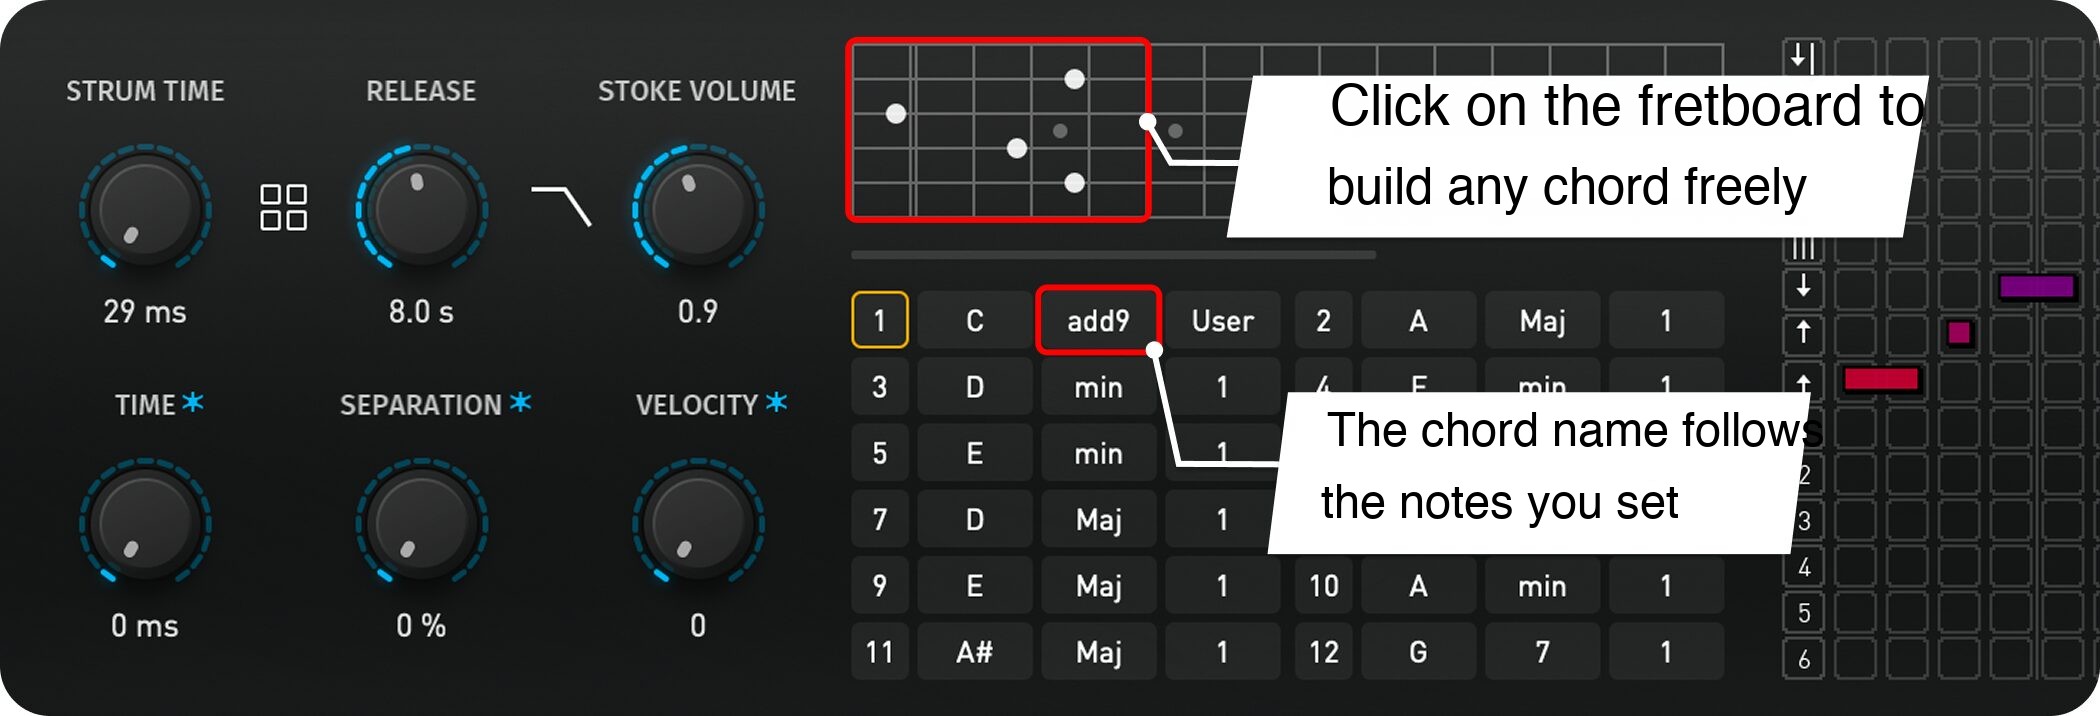
To specify a voicing in detail, click the fretboard in the window and choose the positions yourself.
The chord slot updates and displays the chord name, making it accessible even if you are unfamiliar with guitar.

Transpose shifts all chord slots together.
This is useful when changing the key of an entire song.
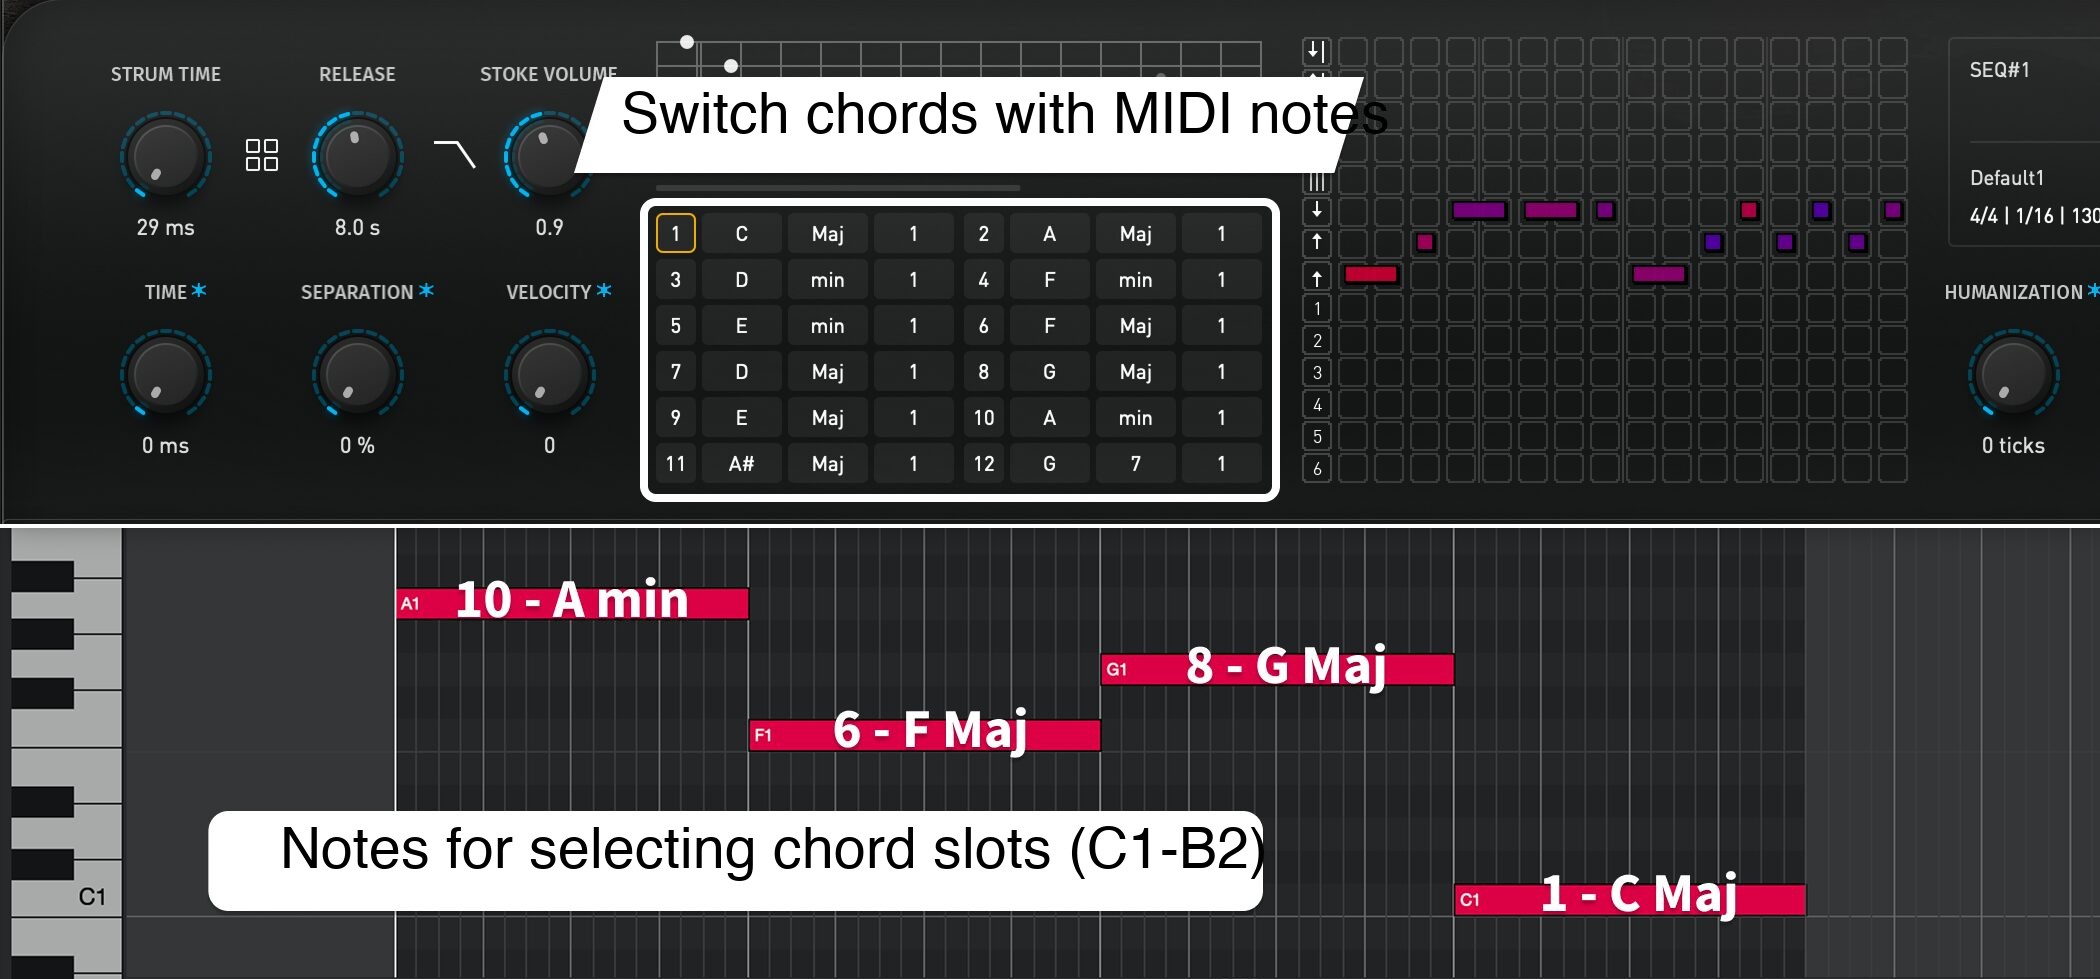
To switch chords in a DAW, enter notes from C1 to B2.
The 24 keys correspond to slots 1–24; entering a note recalls its assigned chord.
For example, C1 is slot 1, C#1 is slot 2, and B1 is slot 12.
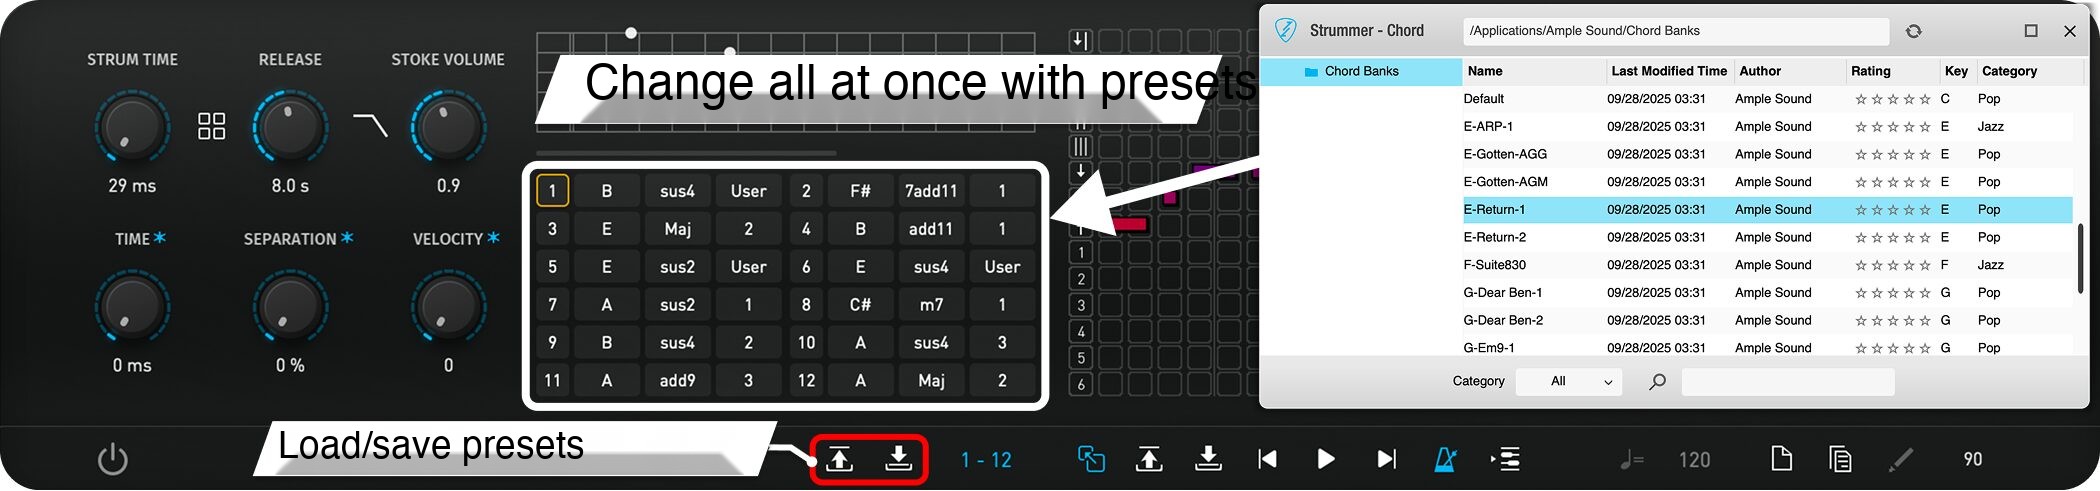
Chord-slot setups are managed as presets. Load presets for different styles or save your own chord combinations.
Detect Mode
This mode automatically recognizes incoming notes as a chord.
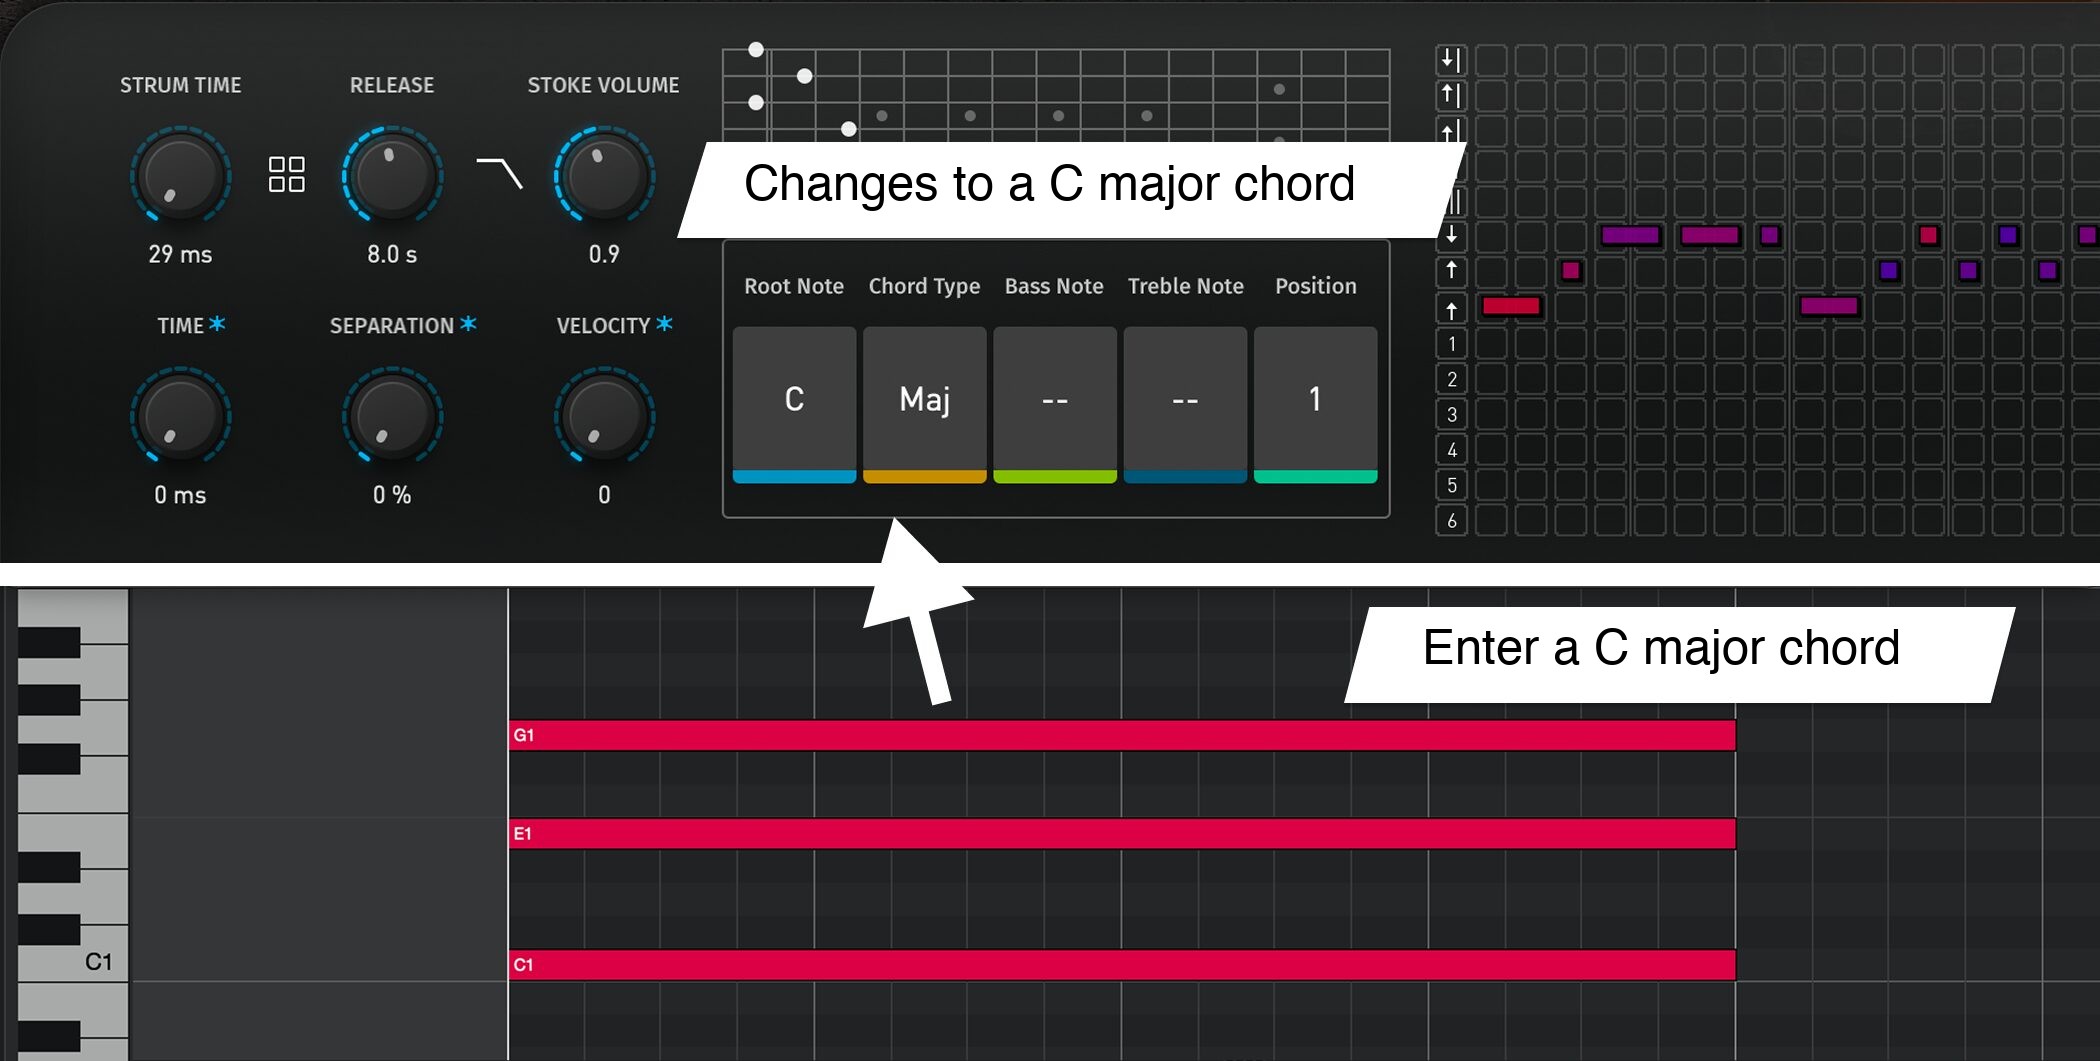
Enter chord notes from C1 to B2 and the chord changes immediately, making this mode suitable for those comfortable playing or programming chord voicings.
The root must be within C1–B1.

Inversions such as E–G–C are recognized, with different inversions assigned to different fretboard positions.
Setting strokes

With a chord selected, play keys C4–B4 to perform strokes.
Velocity changes the strength of the stroke.
(C4) All-string downstroke: open at low velocity, muted at high velocity.
(D4) Downstroke on the higher strings.
(E4) All-string upstroke.
(F4 / F#4) Muted brushing stroke.
(G4) Muted all-string downstroke.
(A4) Muted downstroke on the higher strings.
(B4) Muted all-string upstroke.
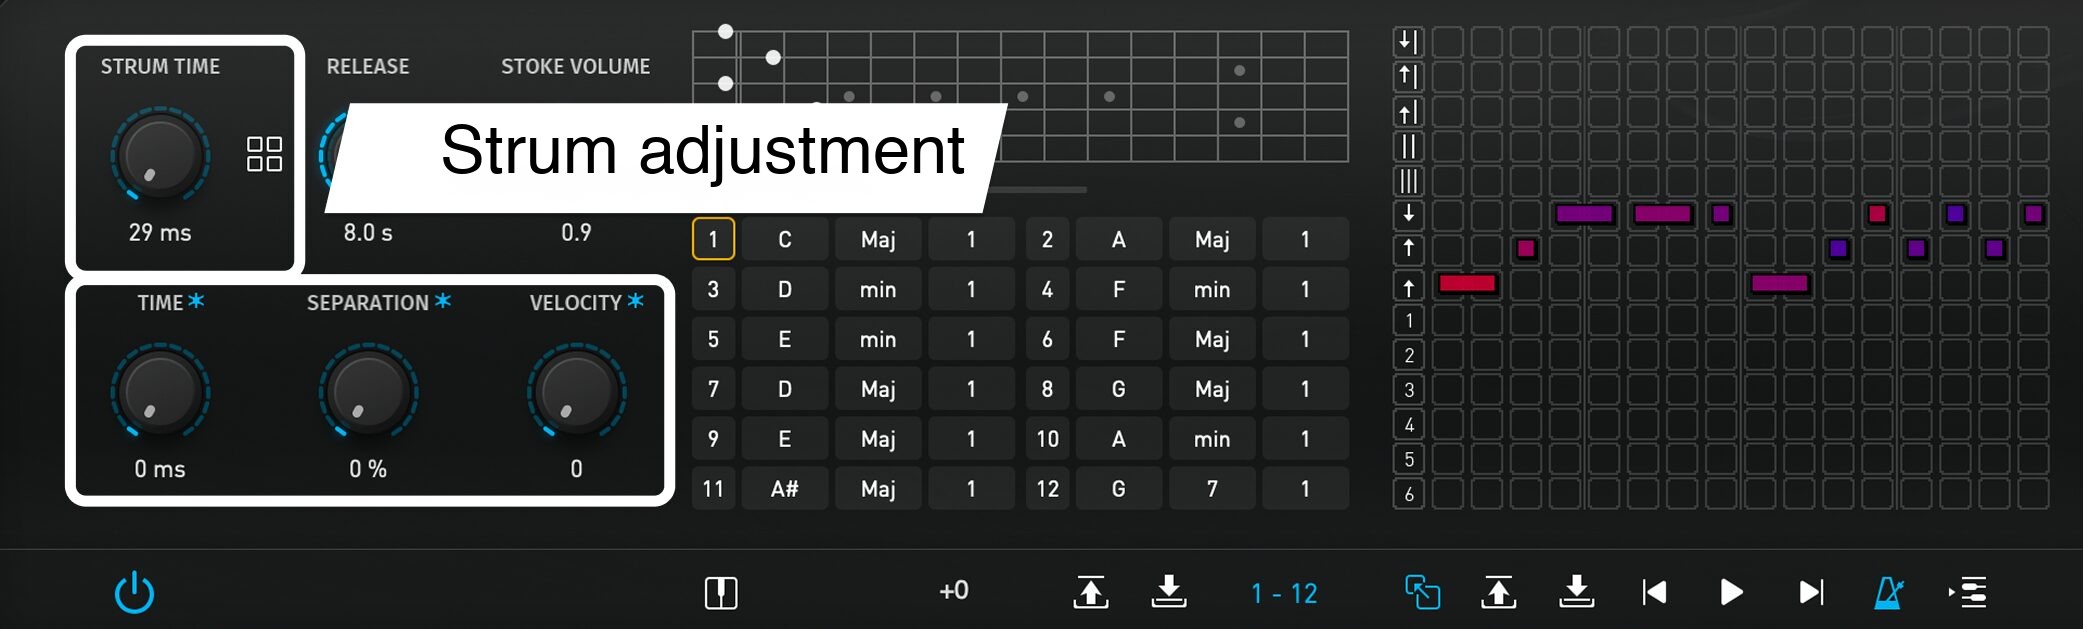
You can also adjust stroke speed and the variation in timing between strings.
- Strum Time: Set the interval from the first to the last sub-note.
- Time / Separation / Velocity: Add random timing and velocity variation.
Adjusting Strum Time in the key editor

Use the velocity of the C#5 keyswitch note to set Strum Time.
Strum Time example
Combine articulation keyswitches with chord-selection keys to apply different techniques during a strum.
- Strum Legato (hold E0 / F0): Connect chords with slides or hammer-ons.
- Slide In Strum (D#0): Apply a slide-in strum.
- Harmonic Strum (C#0): Natural harmonic strum, available only at frets 3 / 5 / 7 / 9 / 12.

Outside the stroke functions, the white keys from D4 to B4 can also play individual strings of the chord.
This allows arpeggio performances.
Arpeggio example
Creating patterns
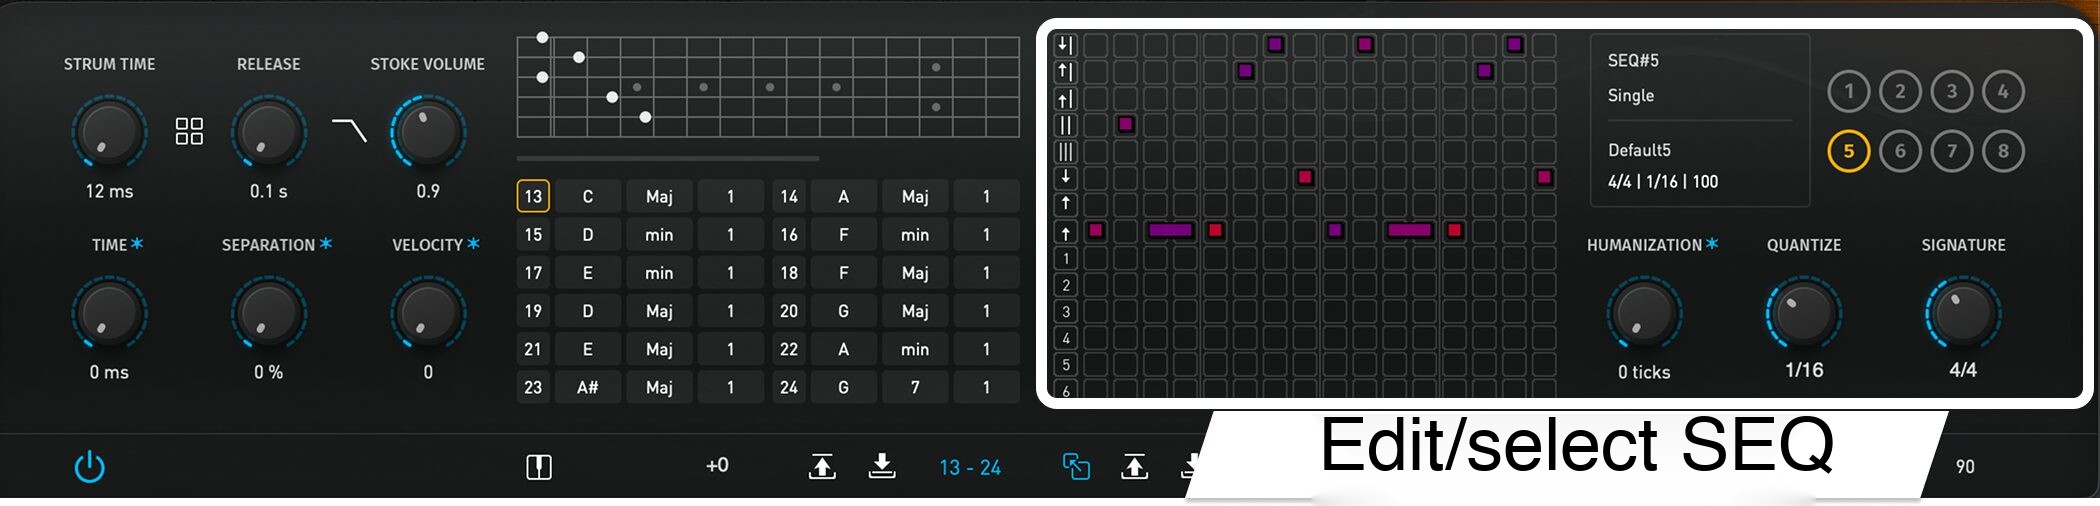
In the Chord Play & SEQ Edit section at the bottom of Strummer, you can create strumming patterns.
Create one- or two-bar patterns and loop them.
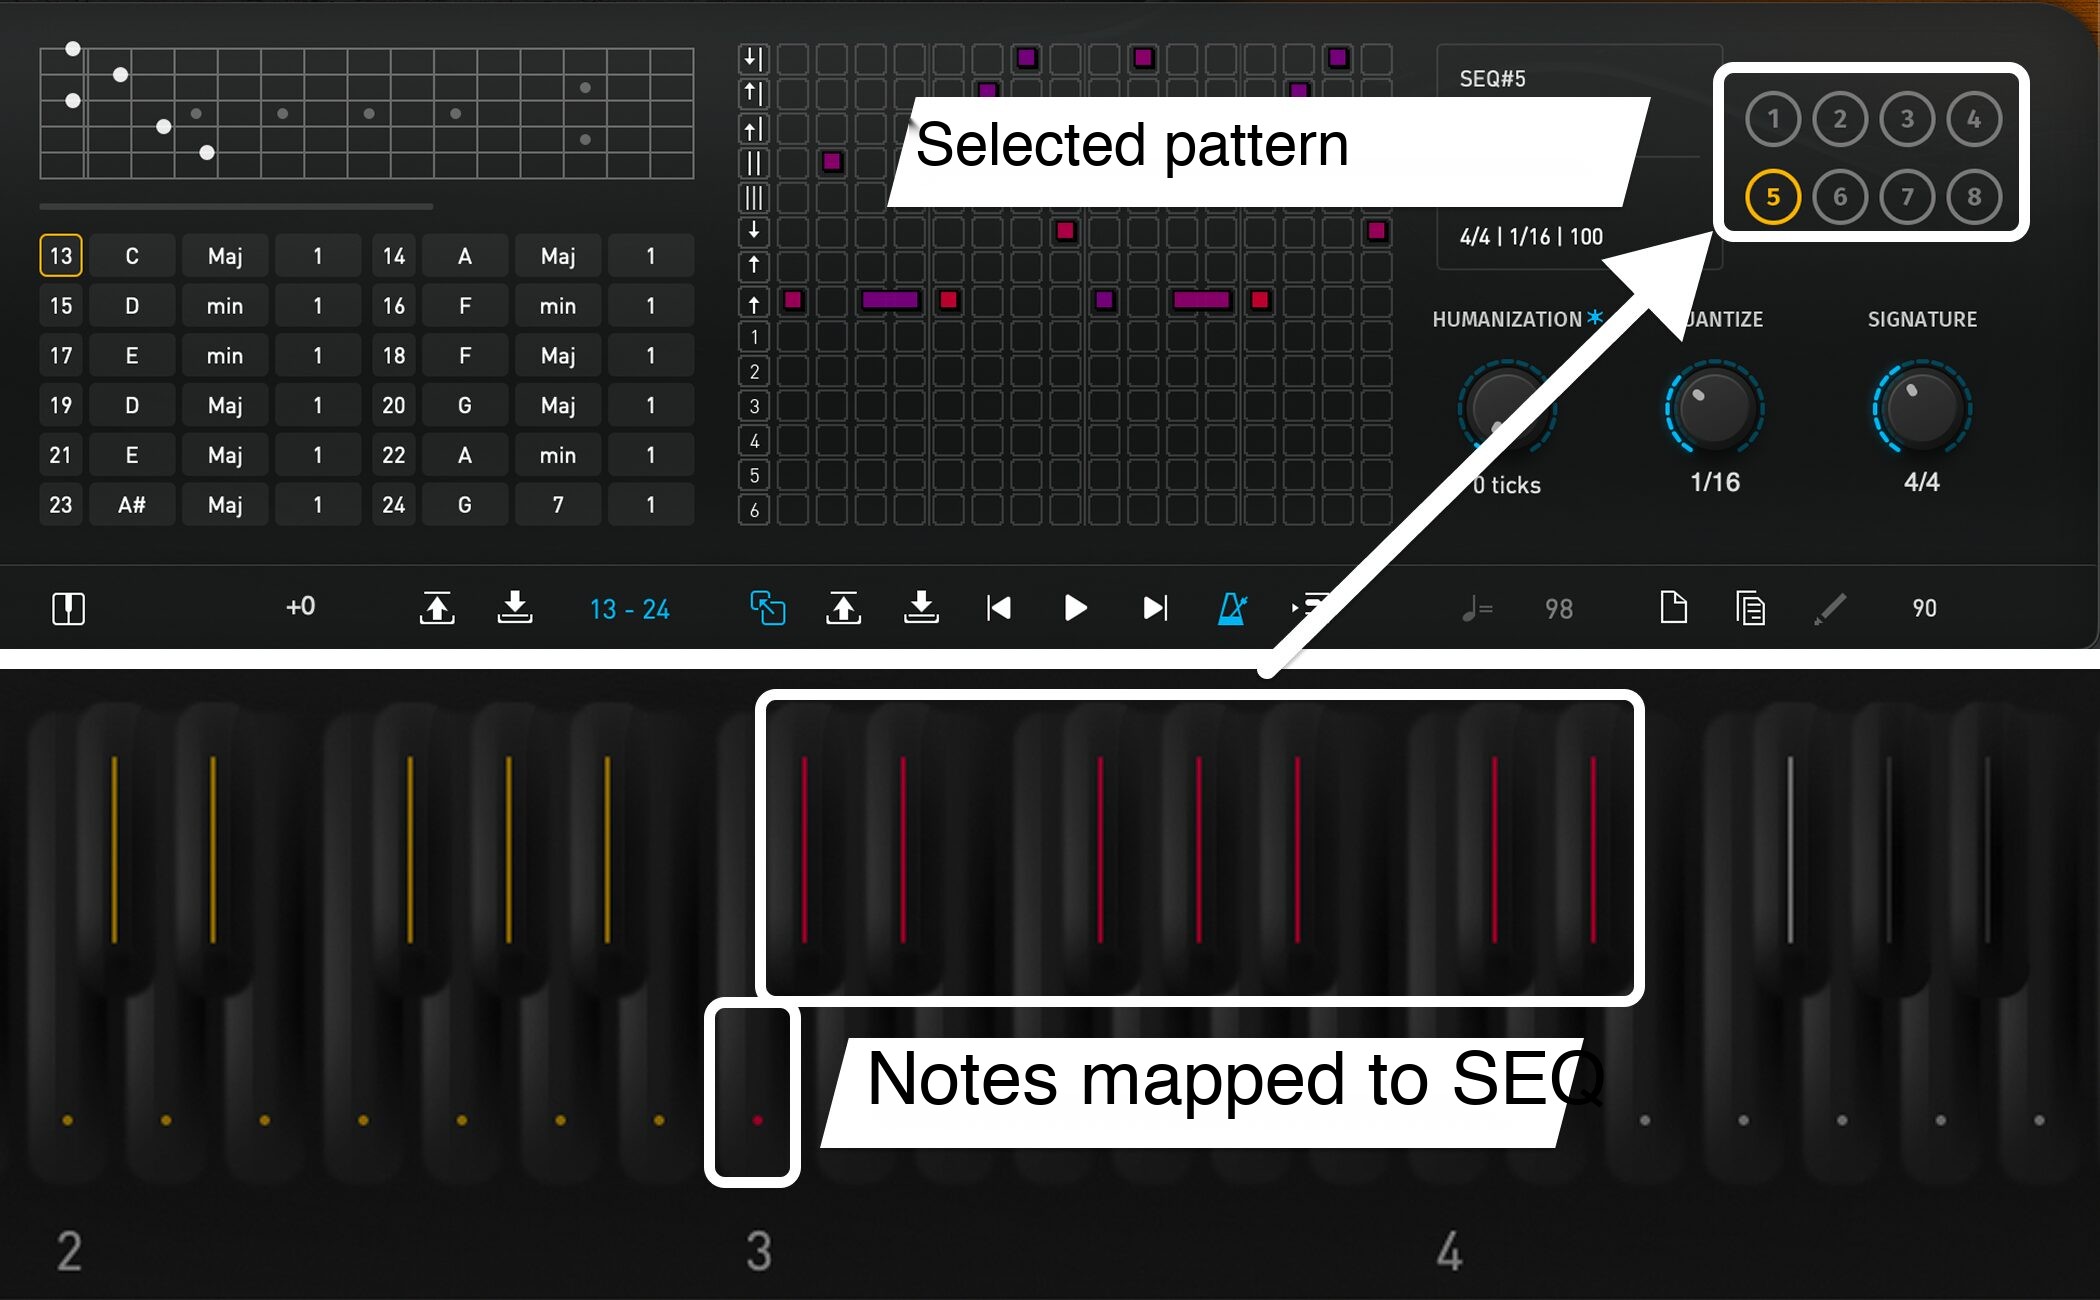
Eight SEQ slots are available. The SEQ triggers C3 / C#3 / D#3 / F#3 / G#3 / A#3 / C#4 / D#4 play the corresponding slot patterns.
SEQ pattern example
In addition to the supplied patterns, use the editor to create and edit your own.
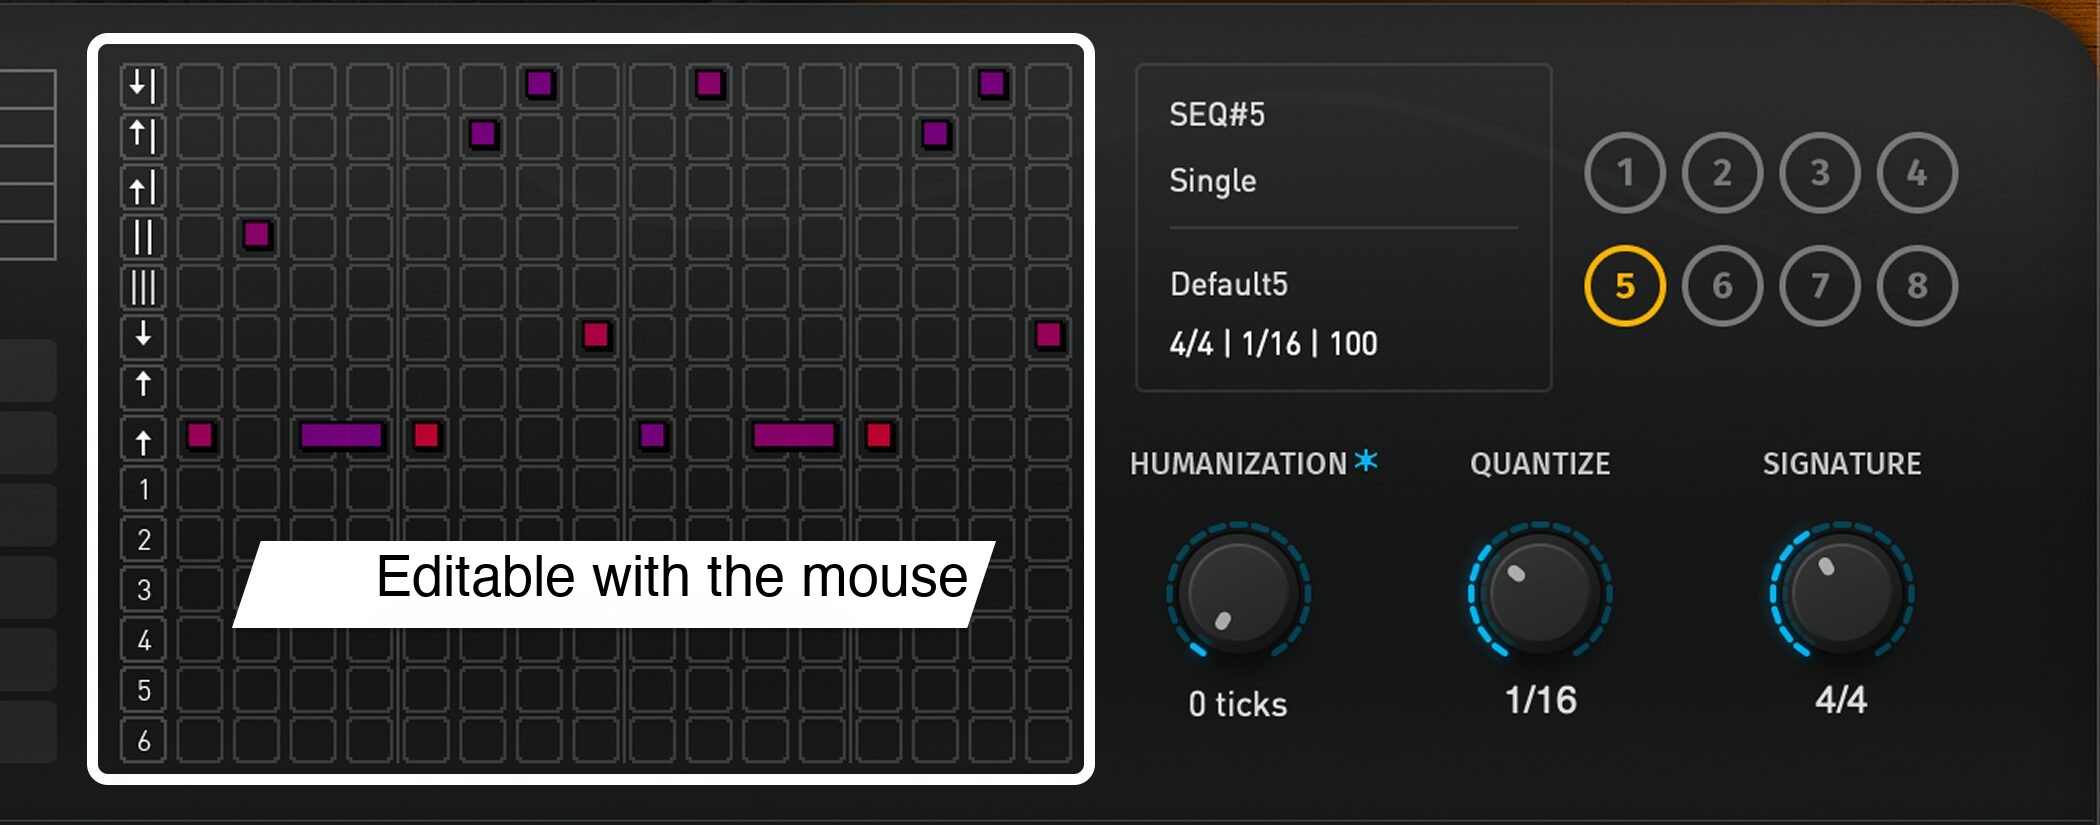
Click to enter a note, double-click to delete it, and drag to adjust velocity or length.
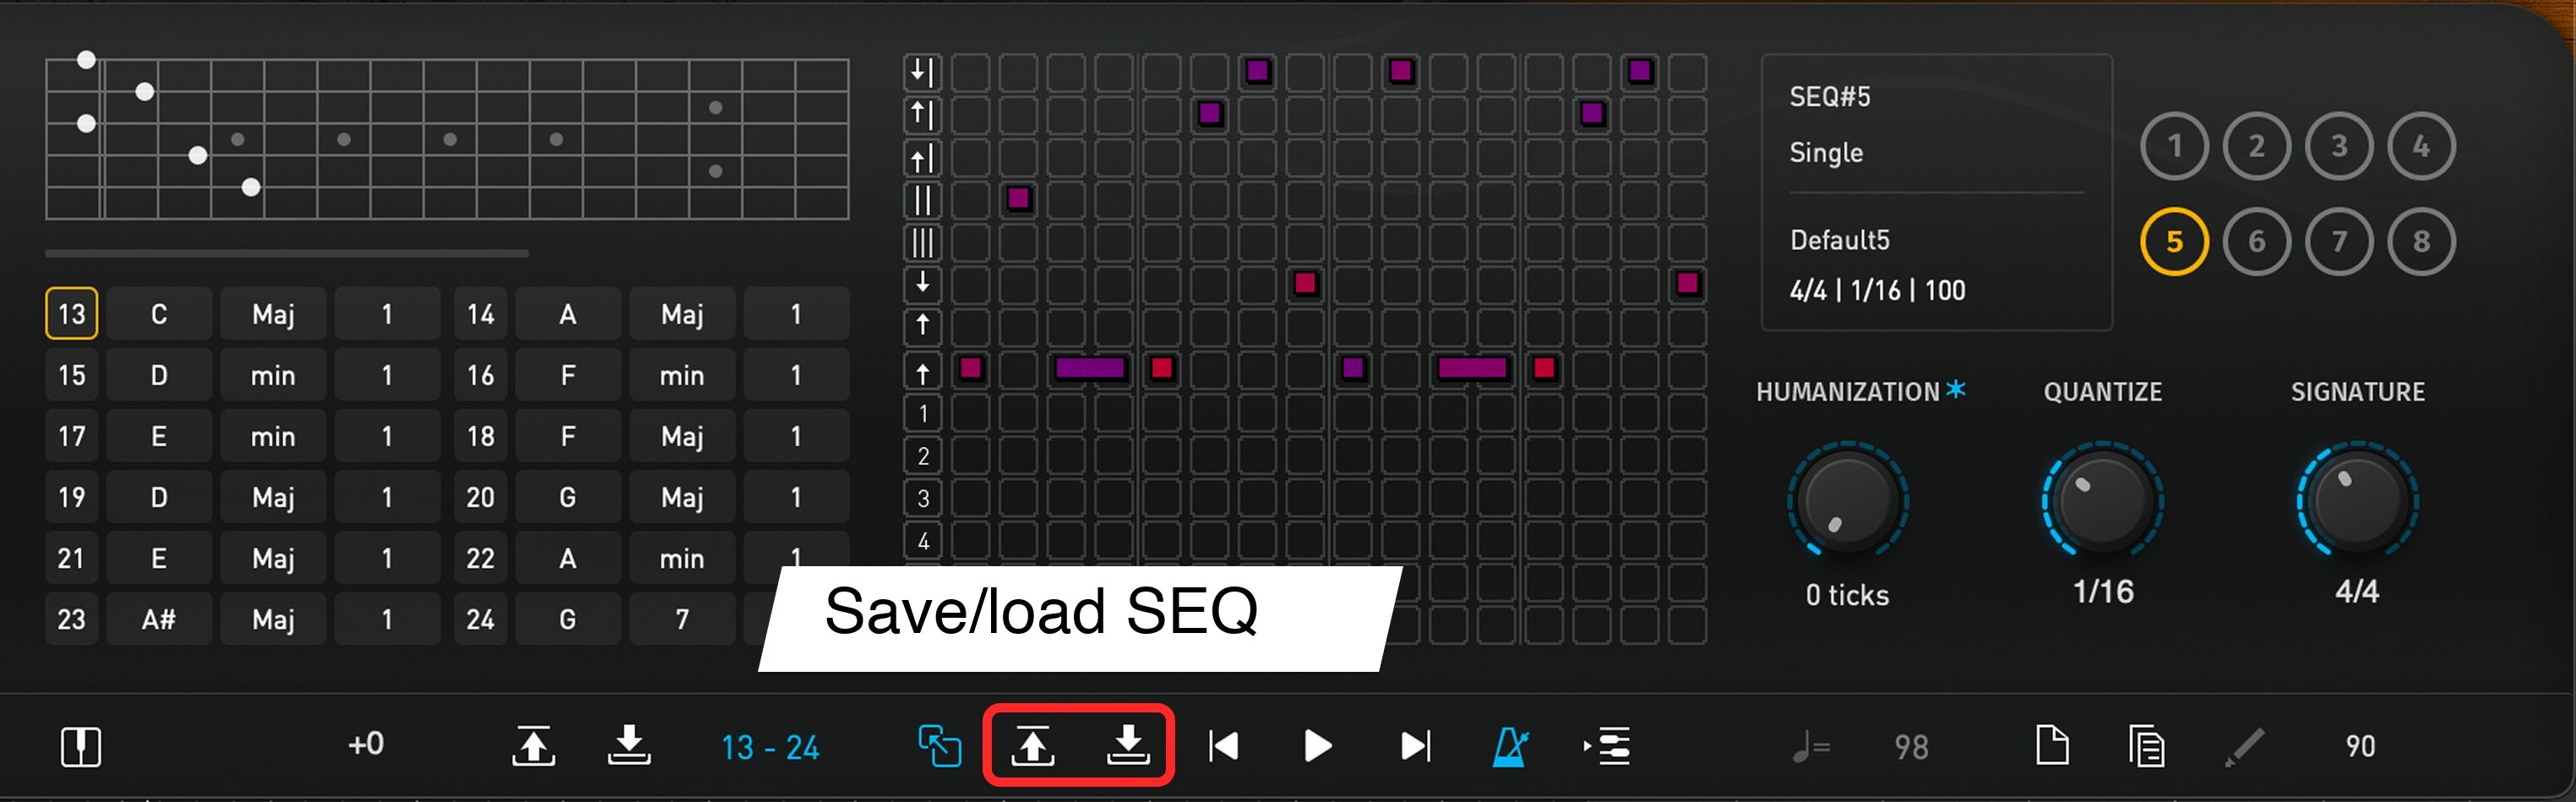
Use Save to save a pattern and Load to recall it.
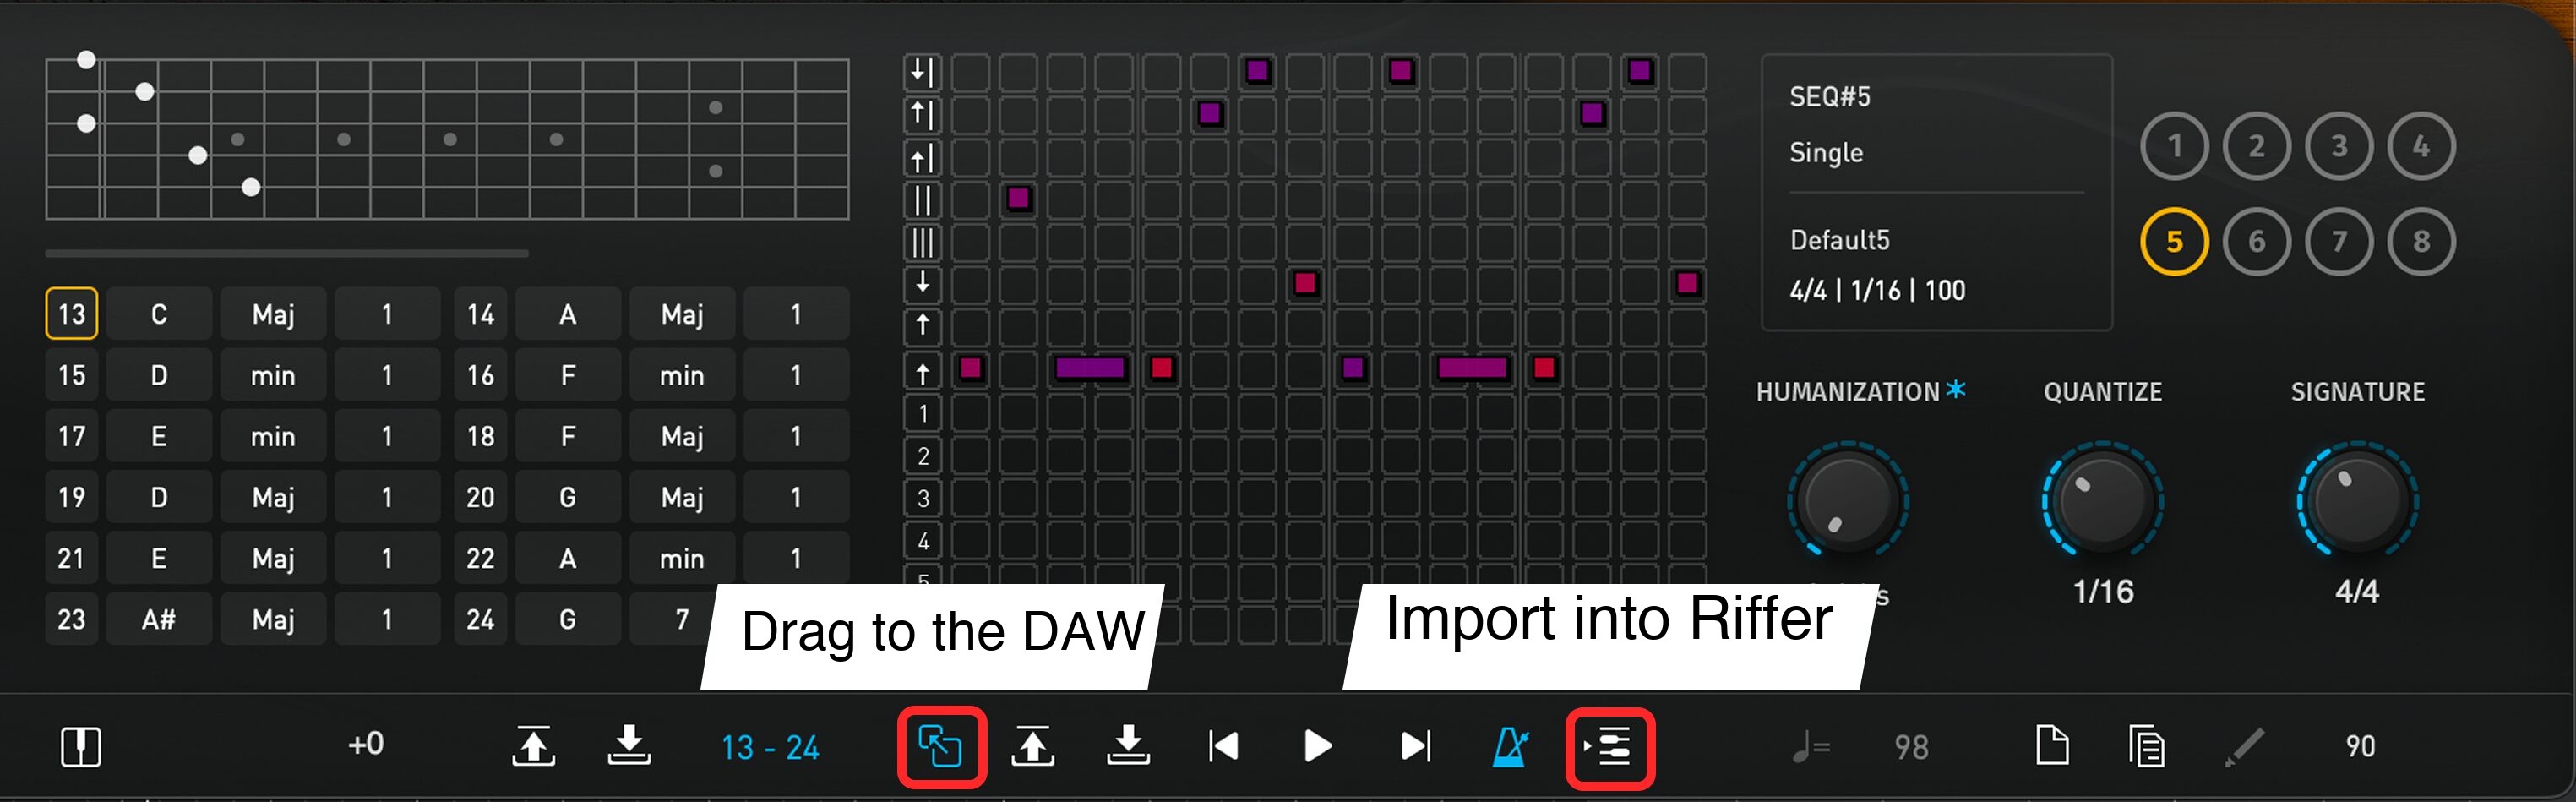
You can also drag the Drag to Host button into your DAW to export MIDI data.
Convert Pattern to Riffer converts the current rhythm pattern and chord into Riffer data.
Creating MIDI patterns: Riffer panel

Riffer is a guitar-specific MIDI editor for single-note phrases, chords, and strums.

Use Piano Roll / Tab Mode at the upper right to switch between piano-roll and tablature views.
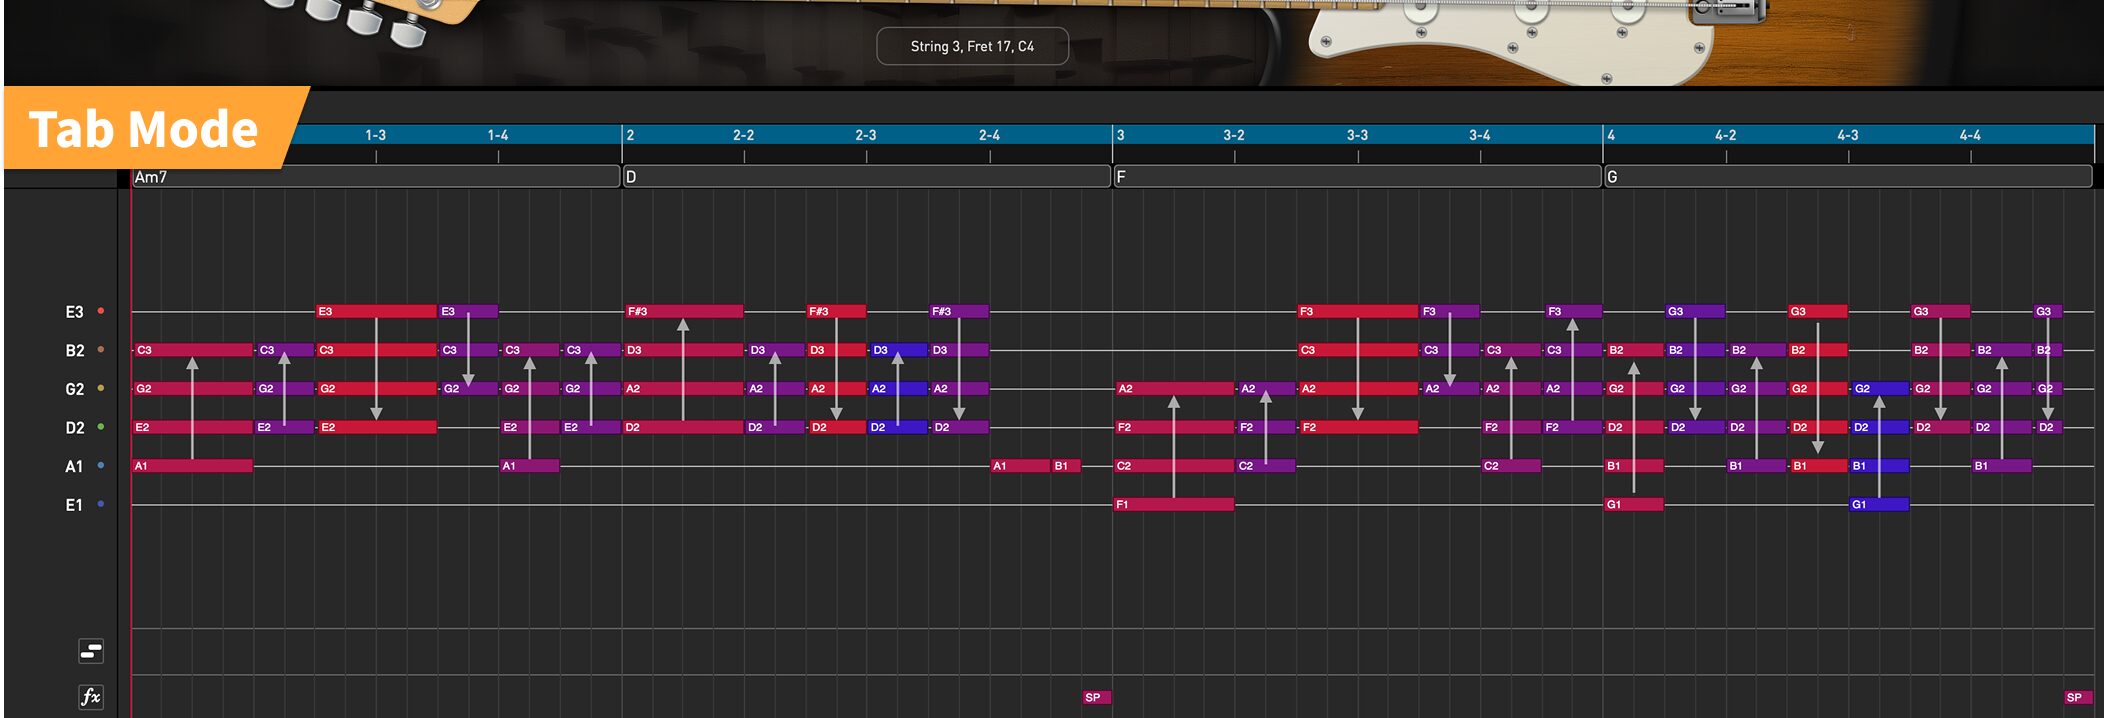
Tab view lets you edit in a format familiar to guitarists, making it accessible to those with guitar knowledge.
We'll mainly use the piano-roll view added in V4.
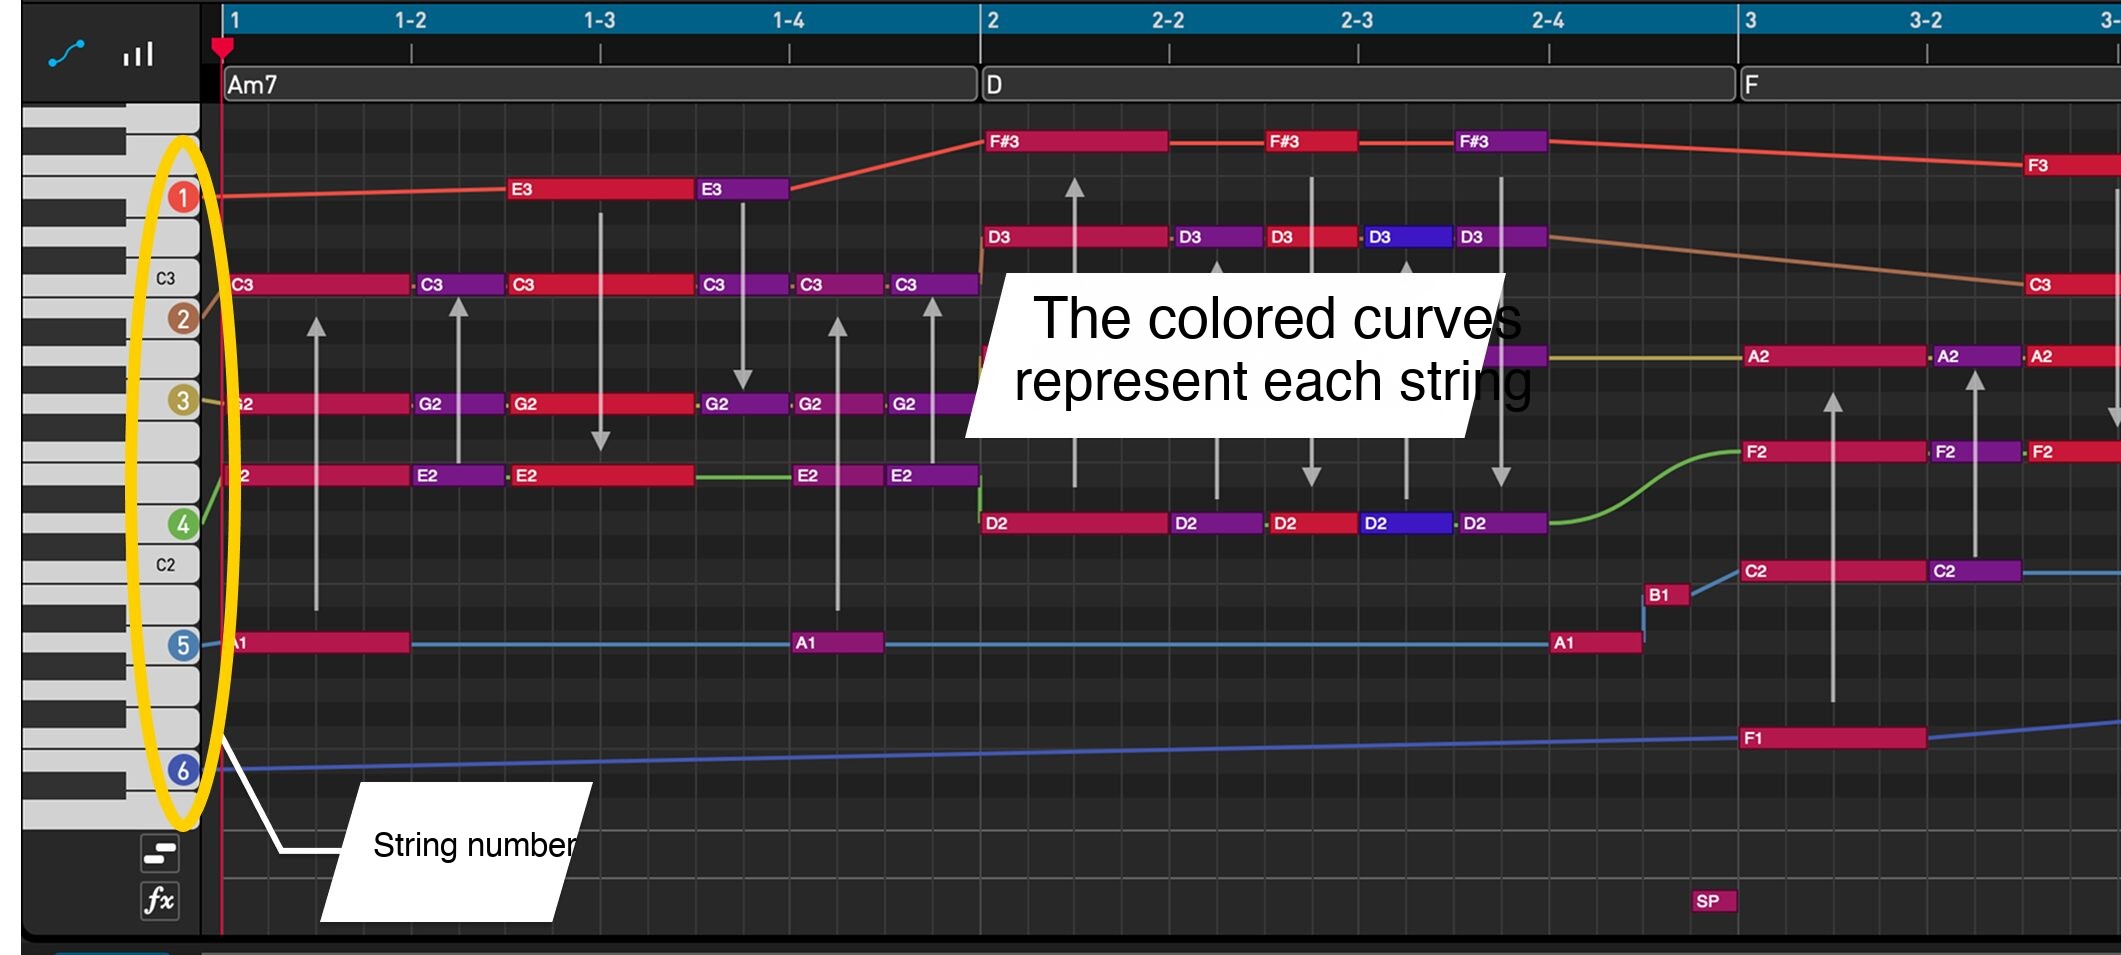
String numbers ①–⑥ appear on the keyboard at the left, showing which string plays each note.
Colored curves passing through the notes represent the strings, making fingering movement visible.
Chord track
When creating chord strokes in Riffer, it is useful to set the progression on the chord track first.

Double-click the chord track above the note editor to open Chord Settings.

Set the root and chord type, including major, minor, and extensions, and choose position 1–3 at the upper right.
You can also click the fretboard directly to set a position.
Use the play button to audition the chord.
When finished, click OK to enter it.
Strum Note
The Strum Note feature added in V4 lets you create chord strokes in Riffer.
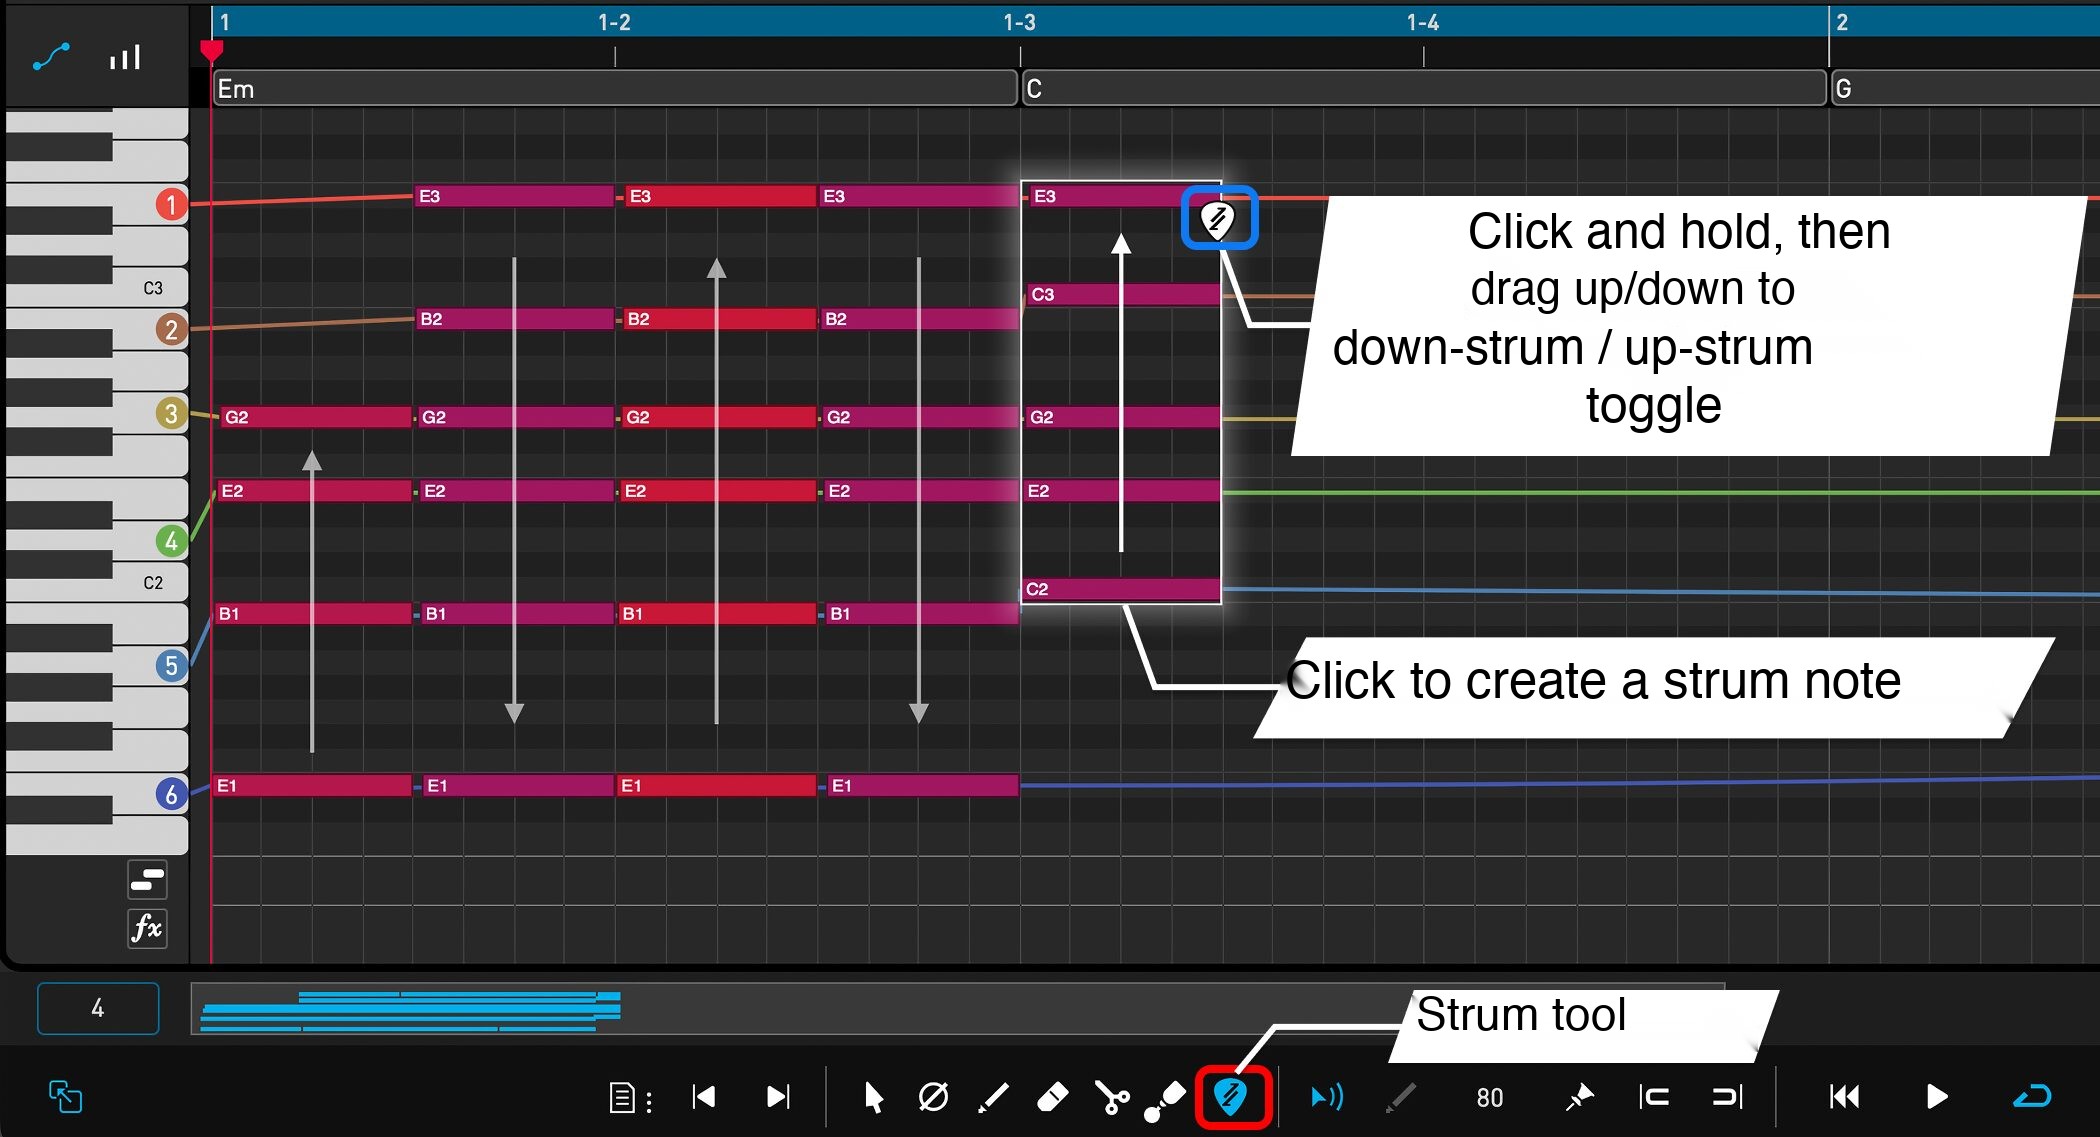
Select the Strum tool at the bottom and click in the editor to create a strum note.
Drag from bottom to top for a downstrum, or from top to bottom for an upstrum.
A strum note is a special note grouping multiple notes—two to six—like a chord.
Instead of editing every note separately, adjust the representative note to change the length, velocity, timing, and other properties of all its notes together.
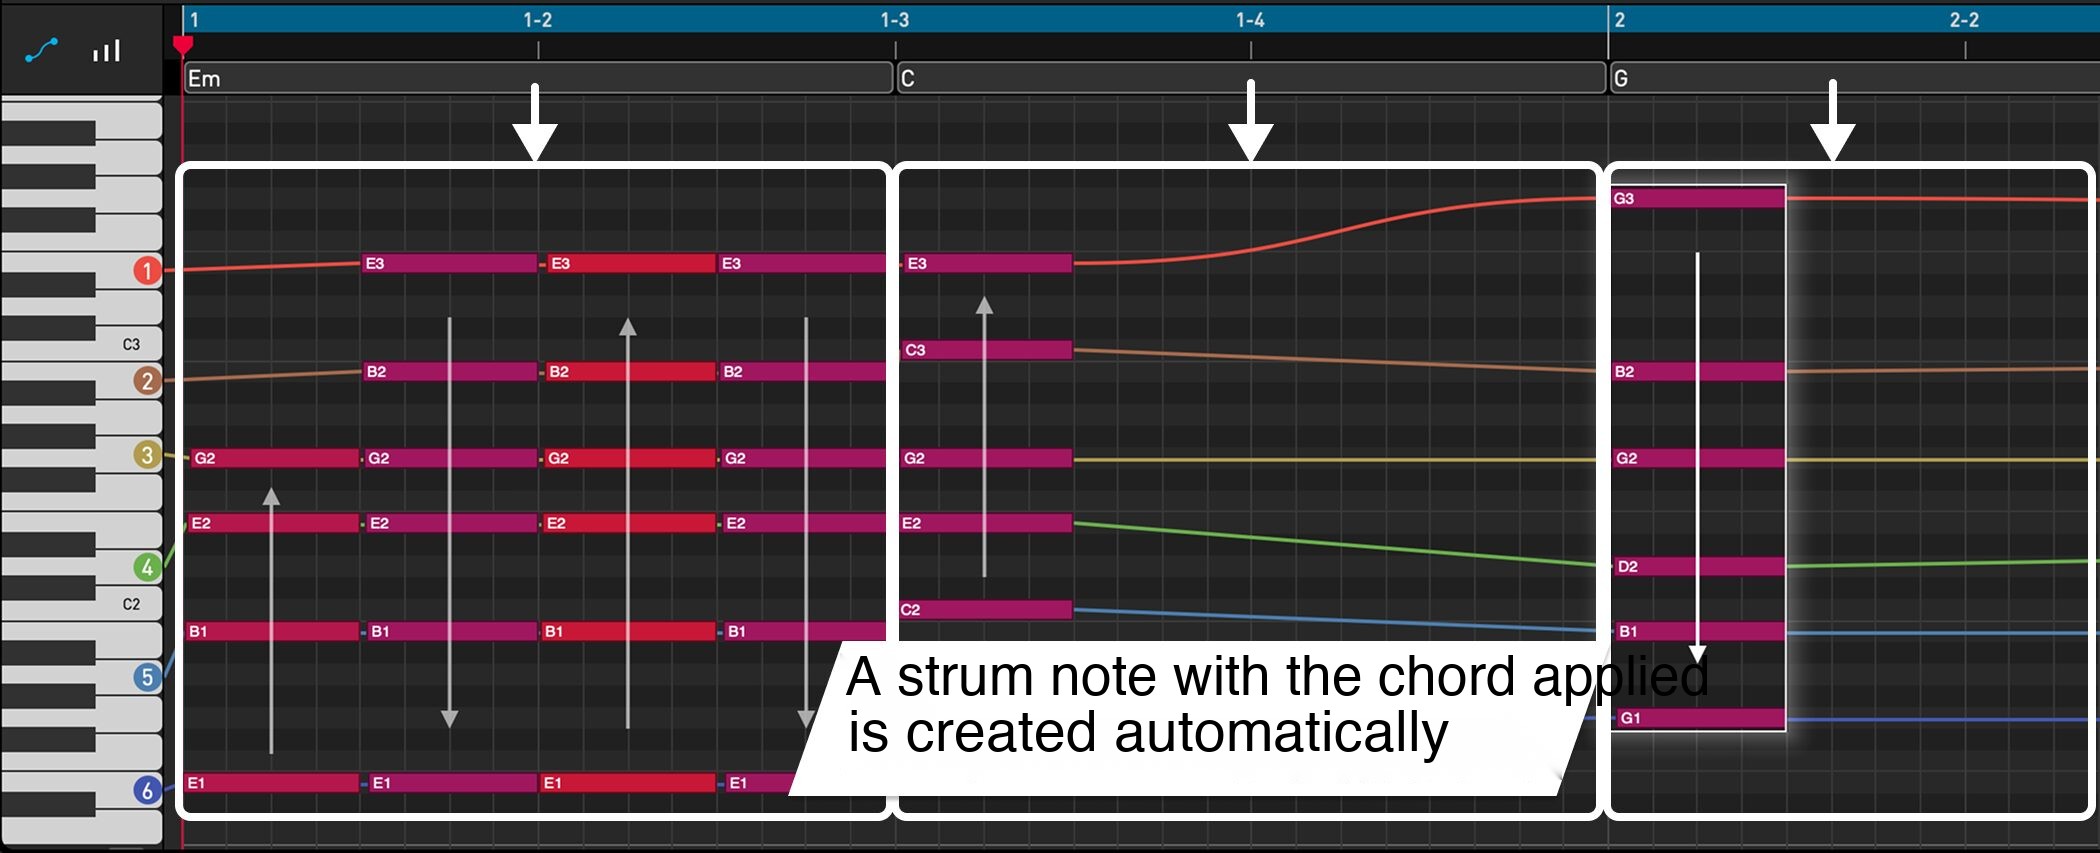
If you set a progression on the chord track, entering a strum note automatically applies that chord.

Select a strum note with Select; drag its left or right edge to change length, or its upper or lower edge to change the number of strings.

Moving a strum note into a different chord range automatically applies the destination chord.

The same applies when copying and pasting, so you can efficiently create backing that follows the progression.
- Copy: Ctrl+C on Windows or Cmd+C on Mac.
- Paste: Ctrl+V on Windows or Cmd+V on Mac.
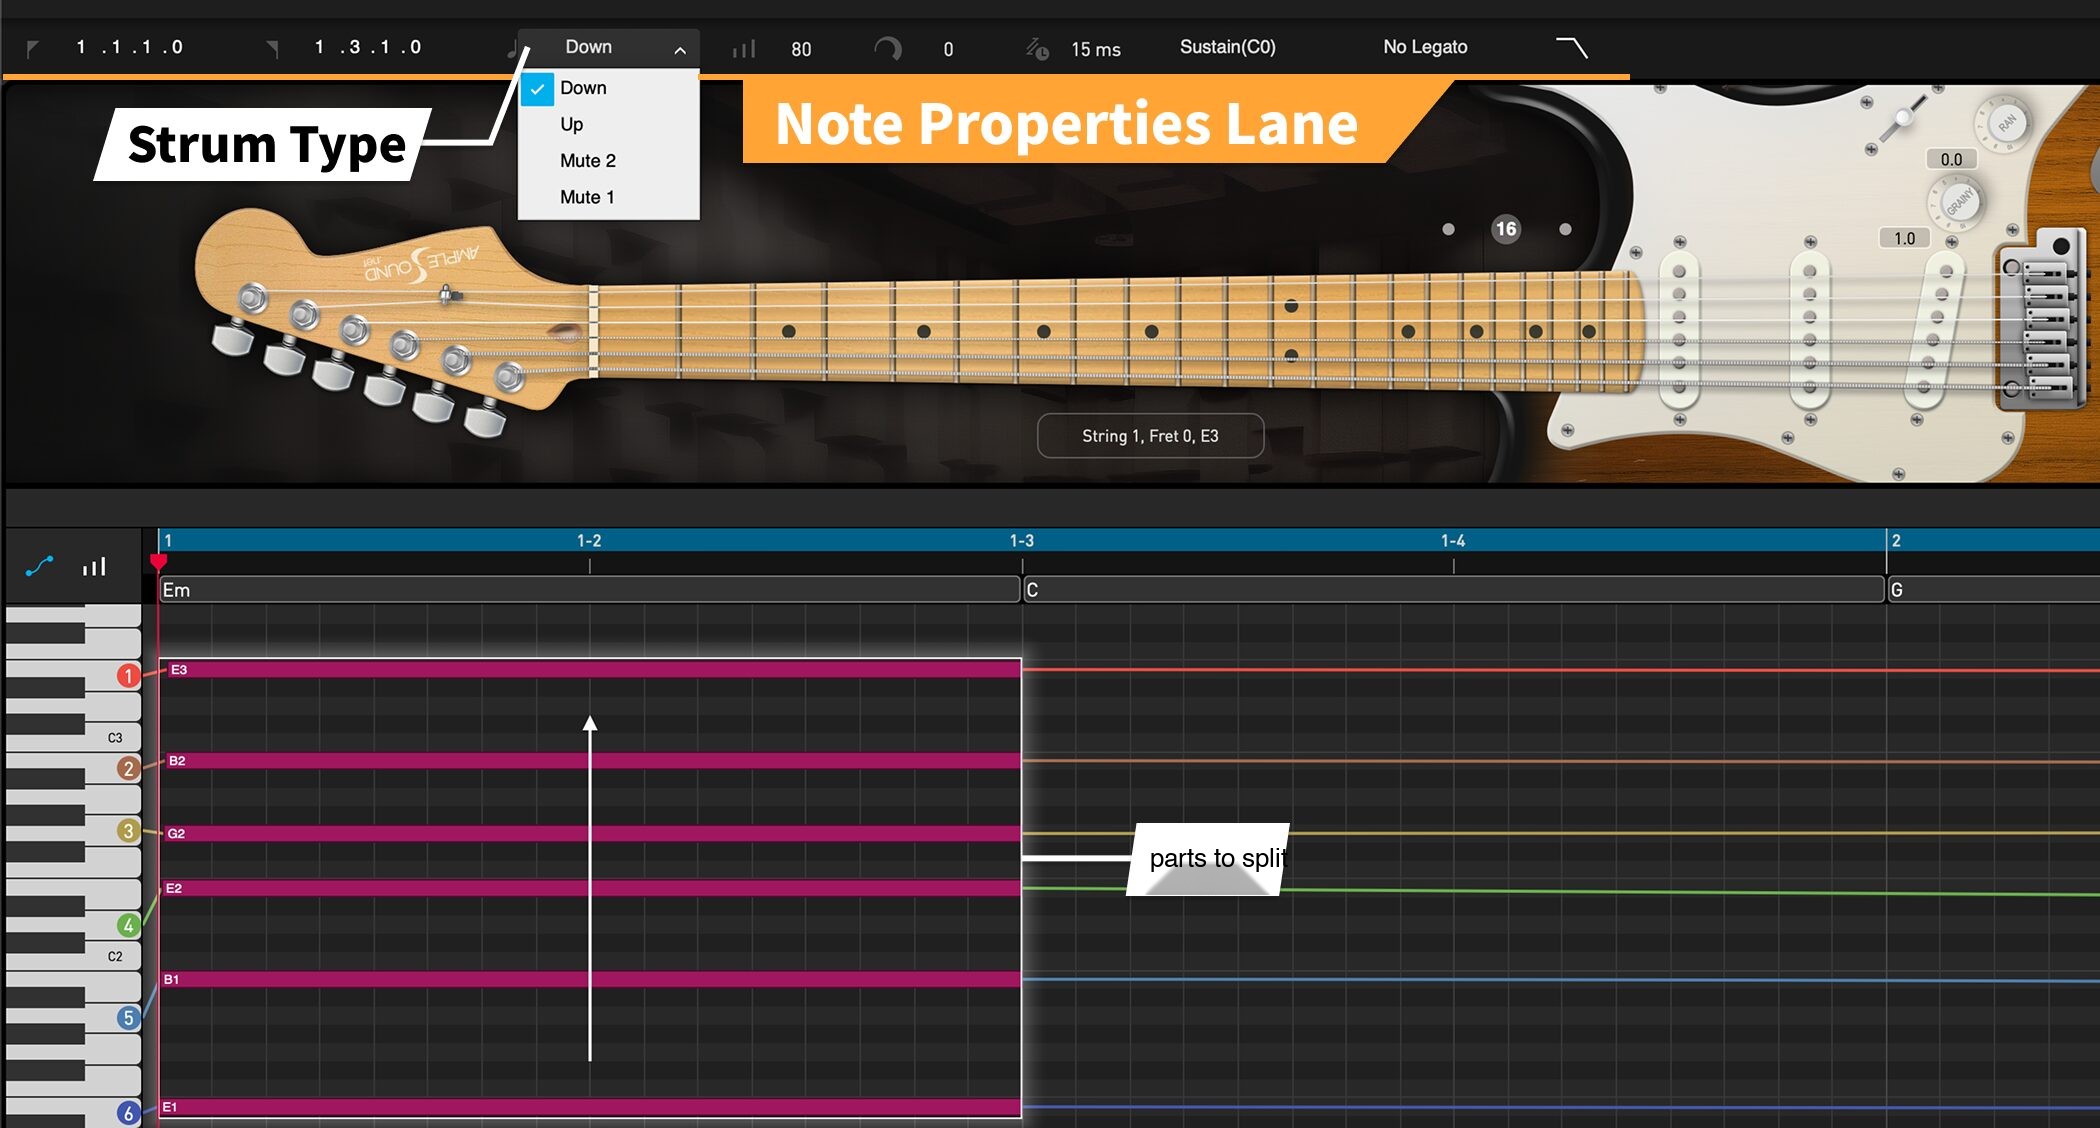
Select a strum note to display strum-specific settings in the Note Properties Lane at the top.
Strum Type switches between downstroke, upstroke, and muted playing.

Strum Time controls stroke speed.
Smaller values produce faster strokes; larger values spread the timing across the strings.

Other settings are:
① Velocity: Adjust strum strength.
② Velocity Gradient: Adjust velocity variation across strings.
③ Articulation: Select the technique.
④ Strum Legato: Set legato playing.
⑤ Release Type: Specify release behavior.
Entering and editing single notes
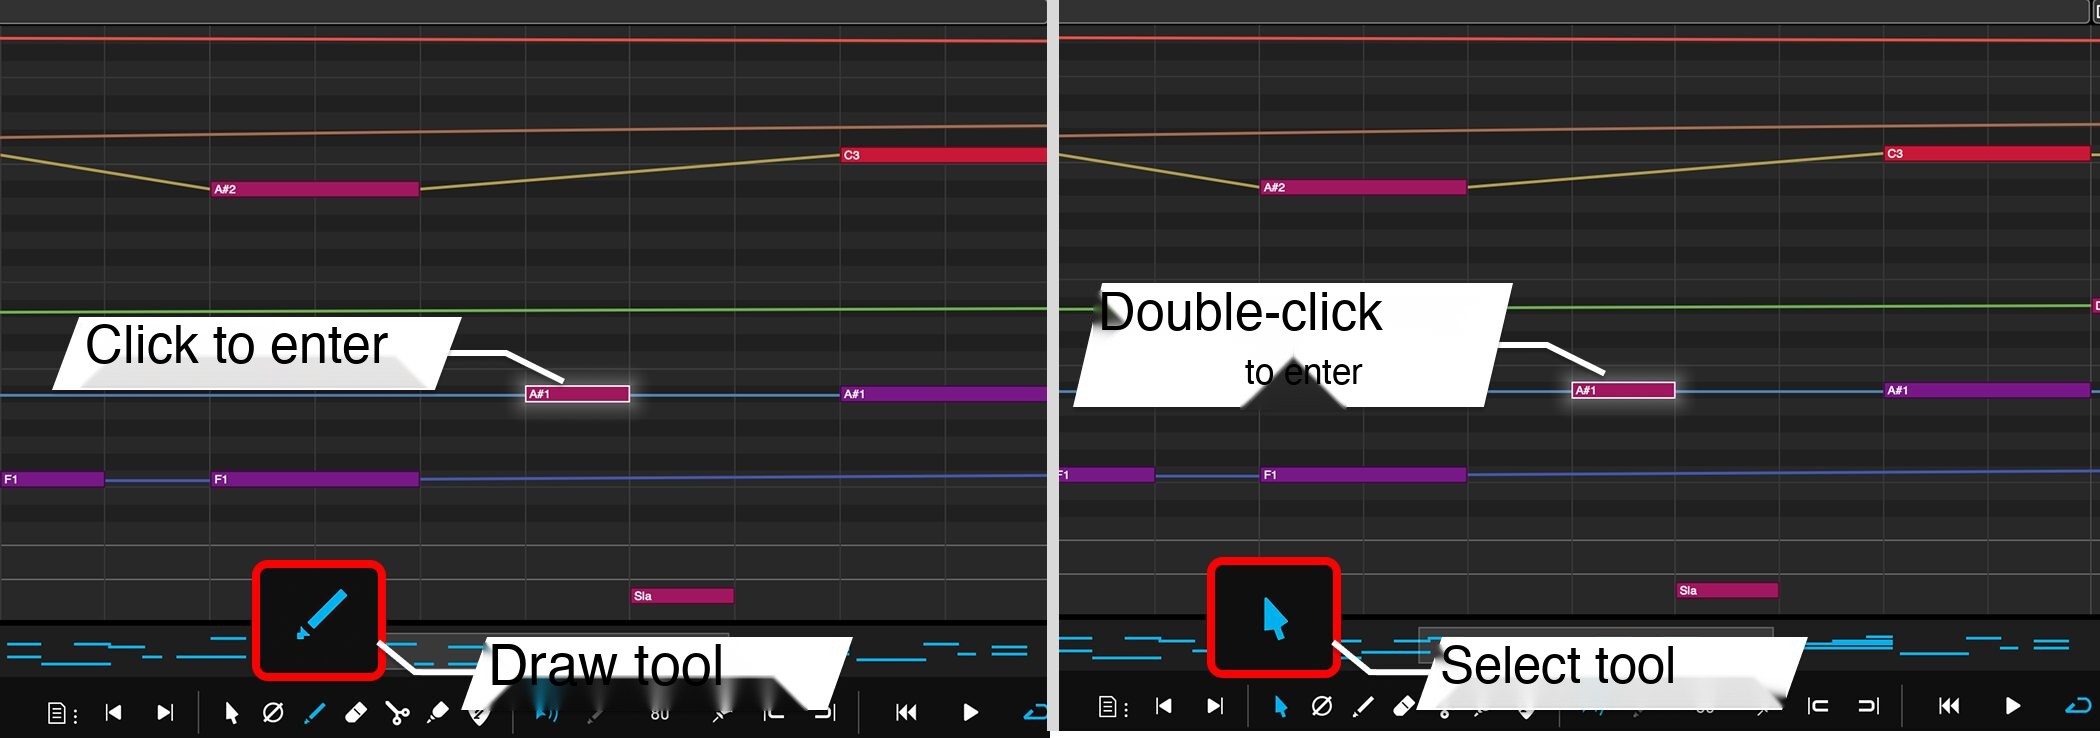
With Draw, click in the editor to enter individual notes.
You can also double-click with Select.
Use this to create riffs, arpeggios, and guitar solos.

For single notes, Note Properties Lane includes Velocity, Articulation, Legato, and Release Type as with strum notes; String lets you select the string for each note.
The same pitch has a different tone on different strings, allowing more realistic expression.
Legato and slides must be played on the same string, so change the string assignment if the notes are on different strings.
Other features: presets, key changes, and CC Editor
Riffer also includes presets for various genres.

Open the preset window with File → Load at the lower left.
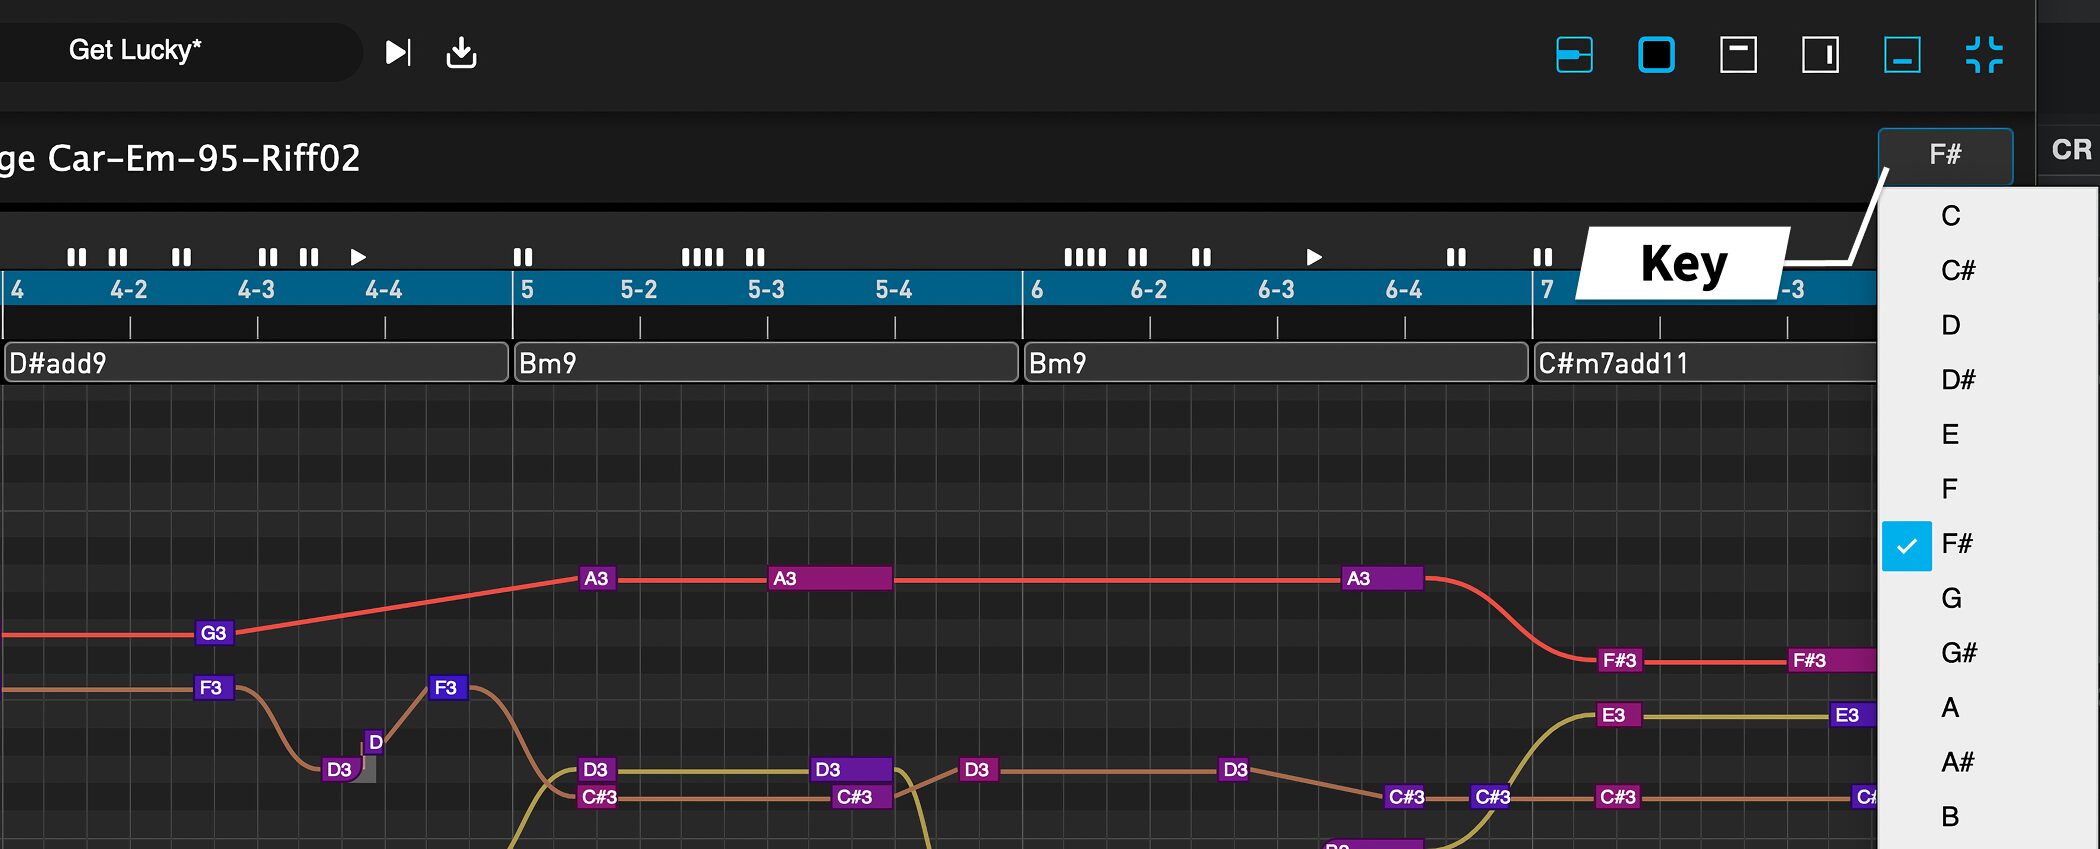
Key changes the key of the entire score and transposes every chord and note to match your song.
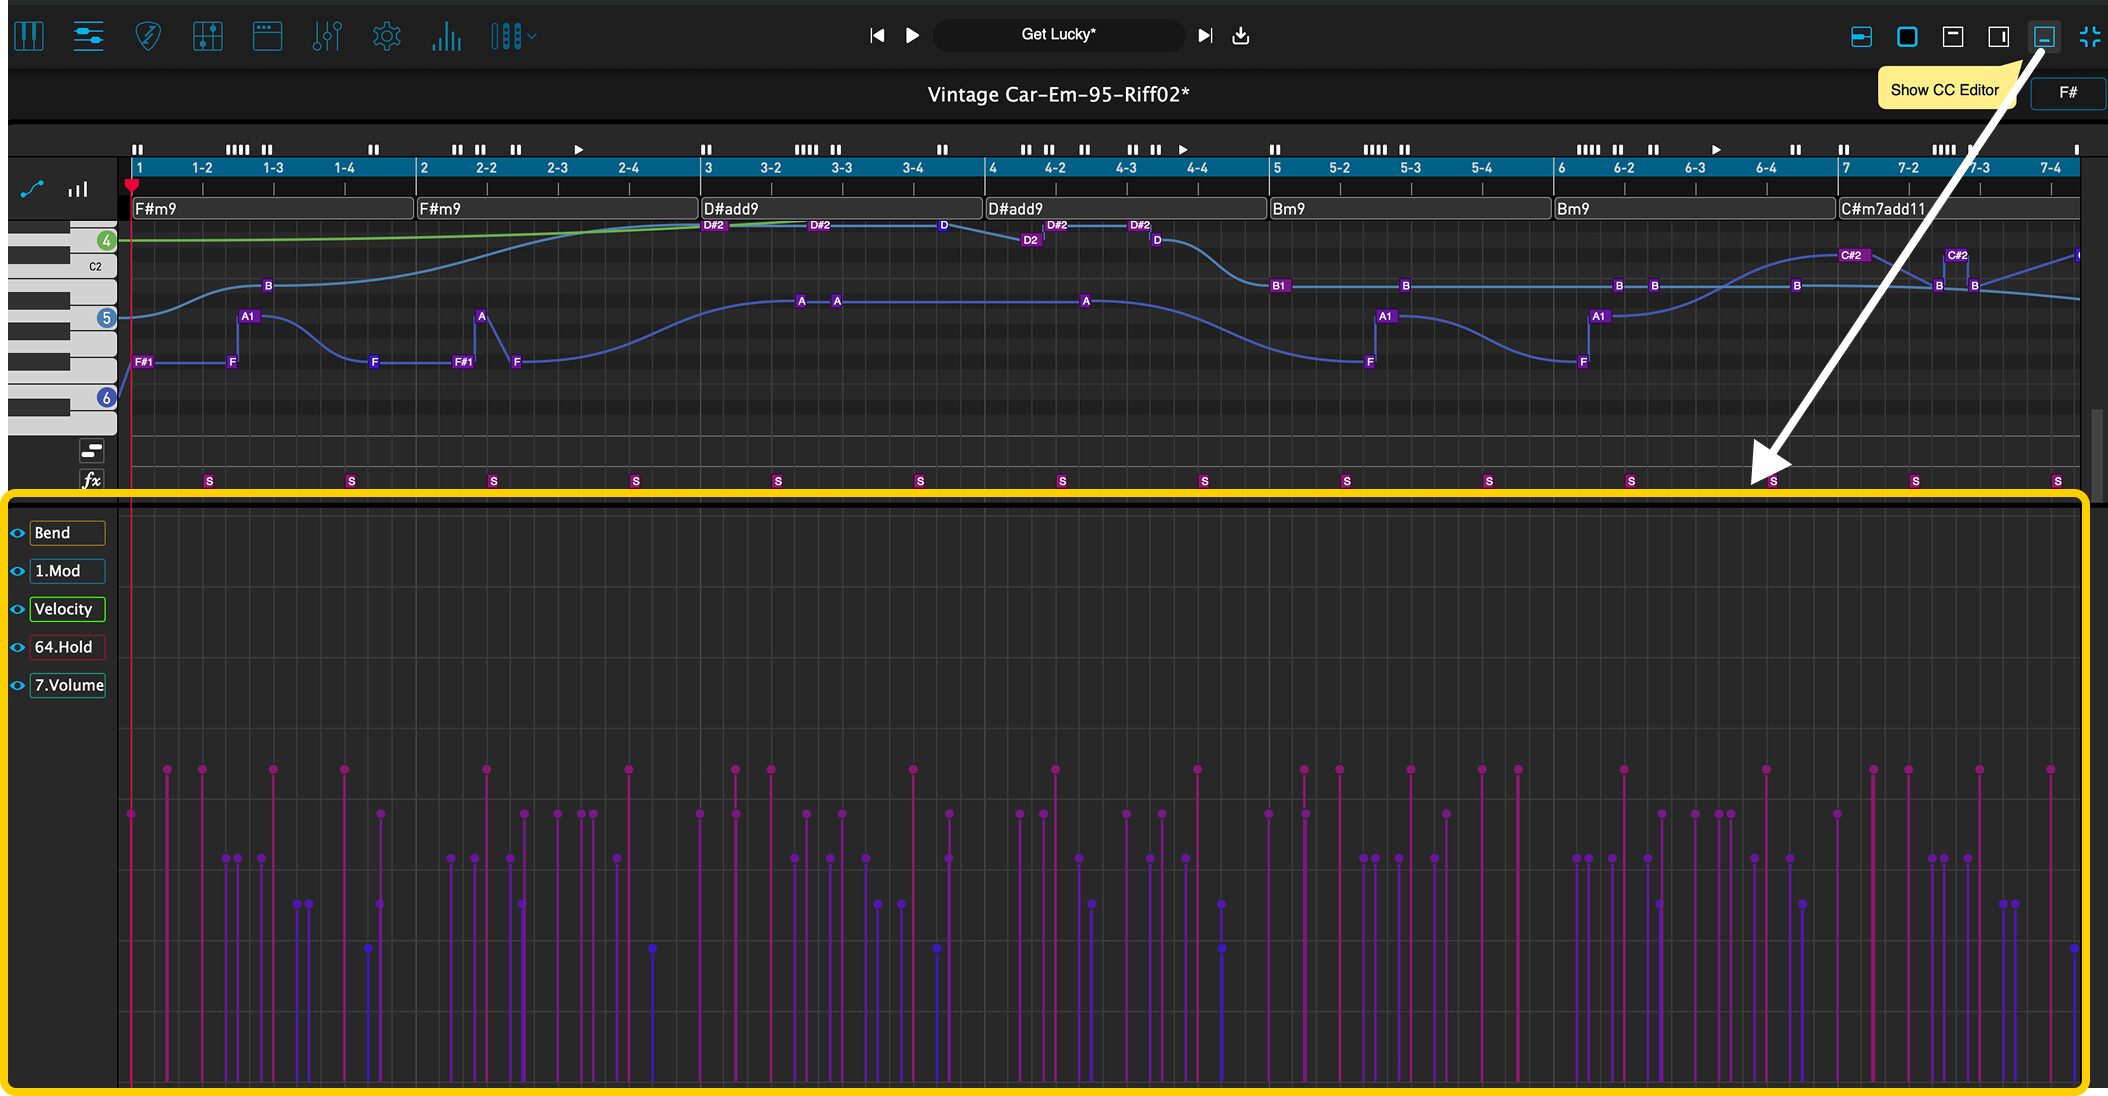
CC Editor lets you edit controller information such as pitch bend and modulation.
You can also adjust velocity visually here.
Playback and MIDI input/output
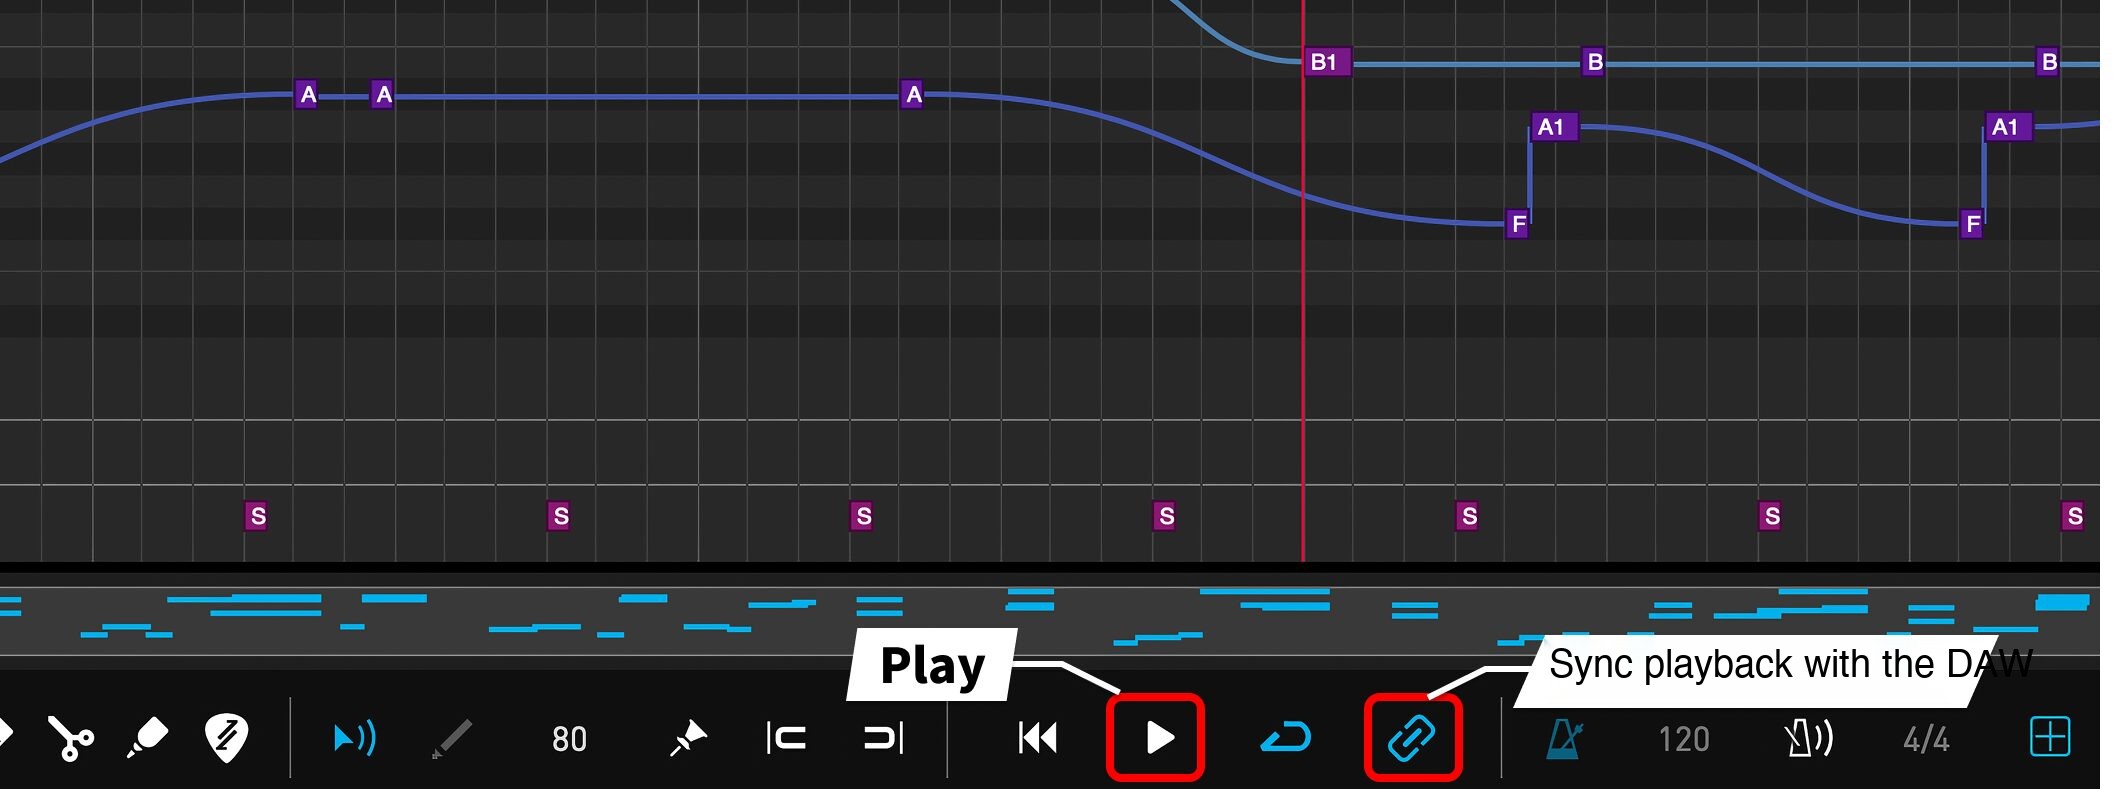
Play your phrase with the Play button at the bottom.
Enable Sync to play in sync with the DAW transport.
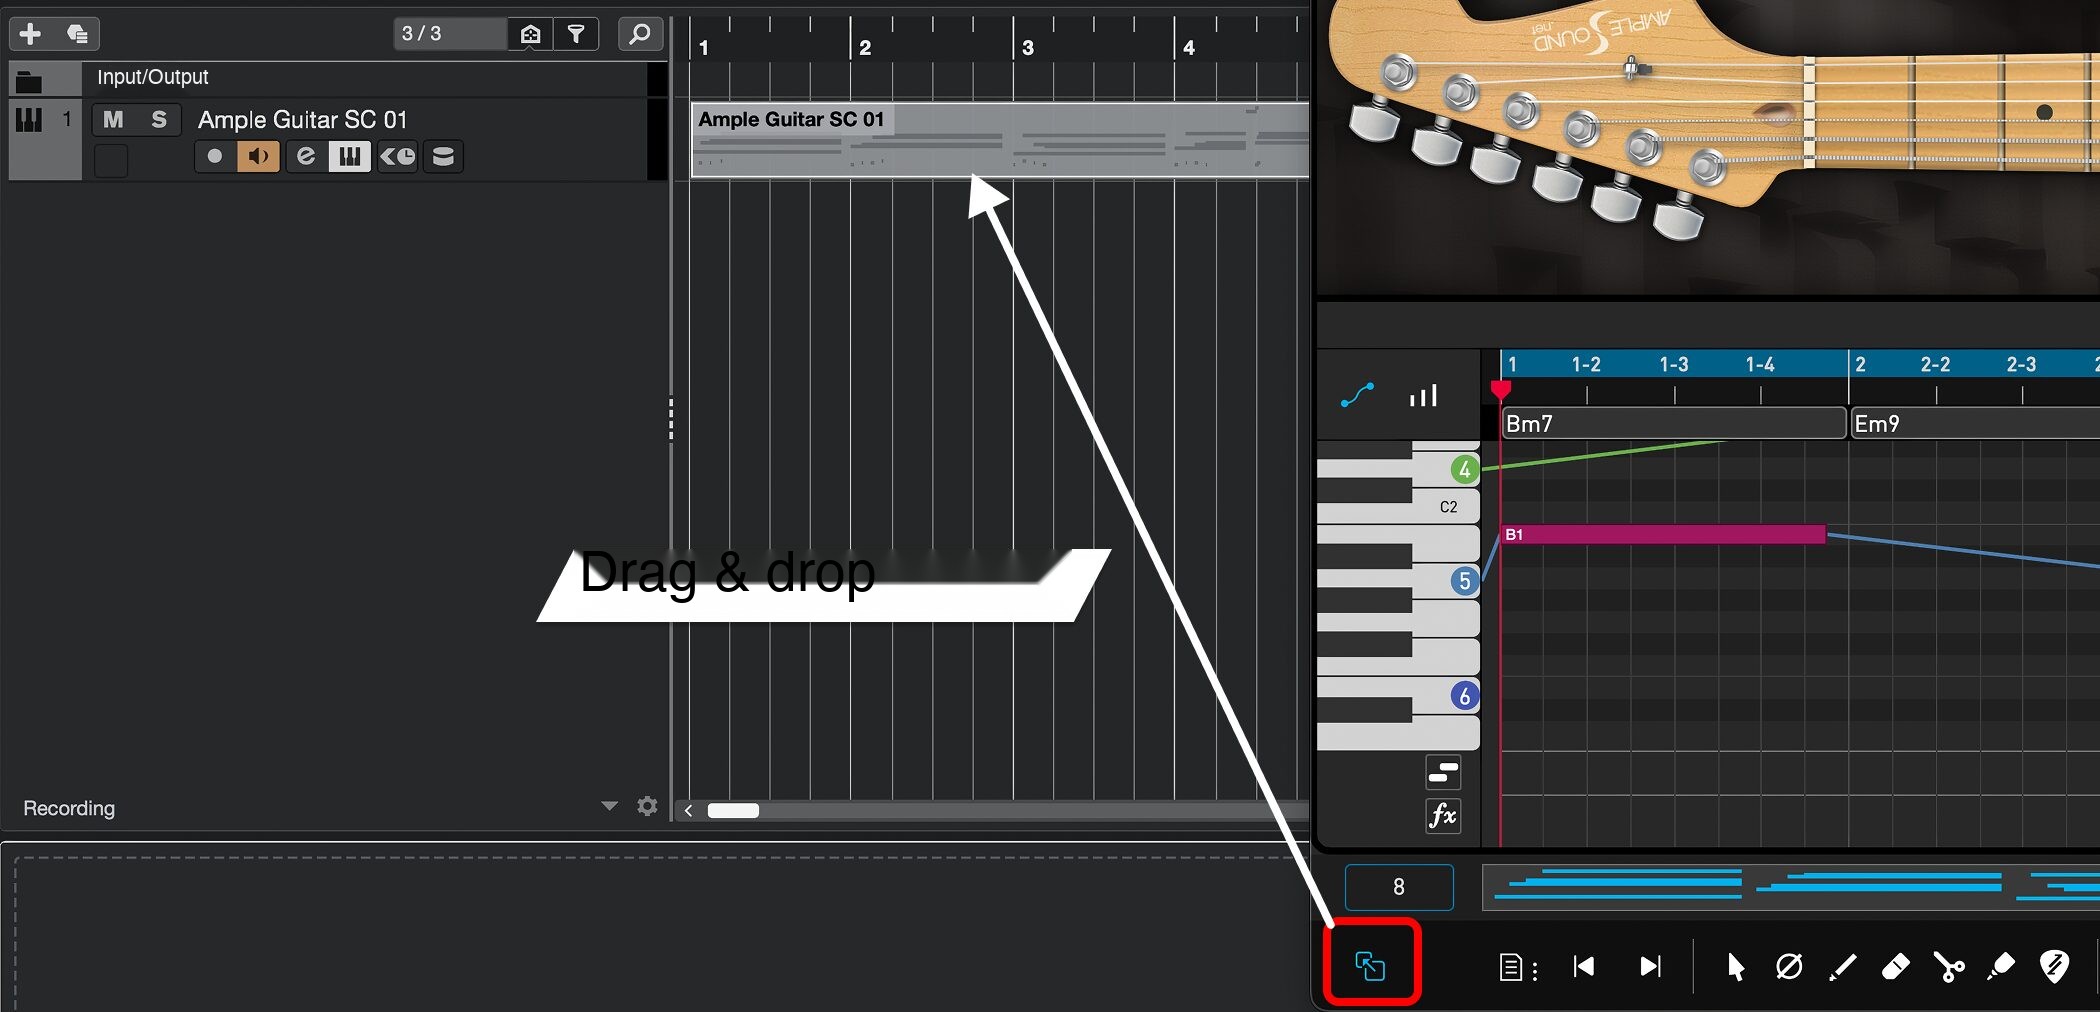
Drag Drag MIDI to Host from the lower left into the DAW to export a Riffer pattern as MIDI.
Sound design: FX and Amp panels
Use the Amp and FX panels to shape your sound.
Amp panel
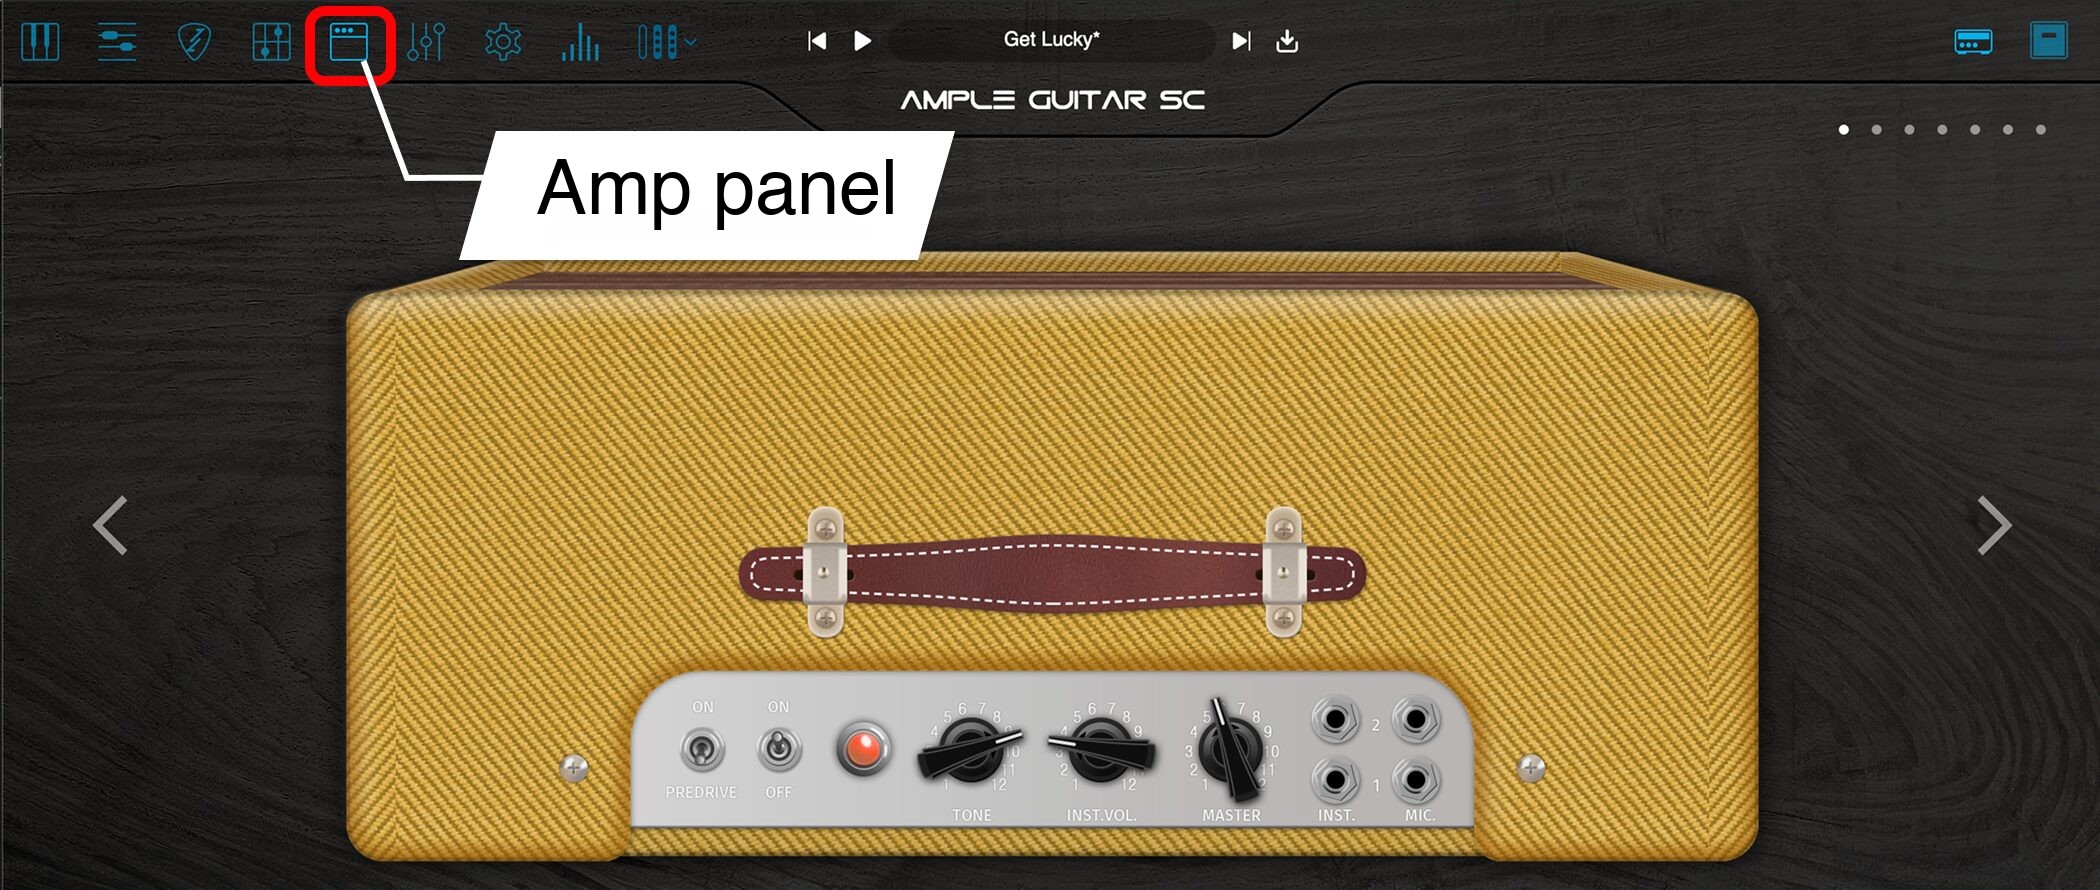
The Amp panel configures the amp simulator.
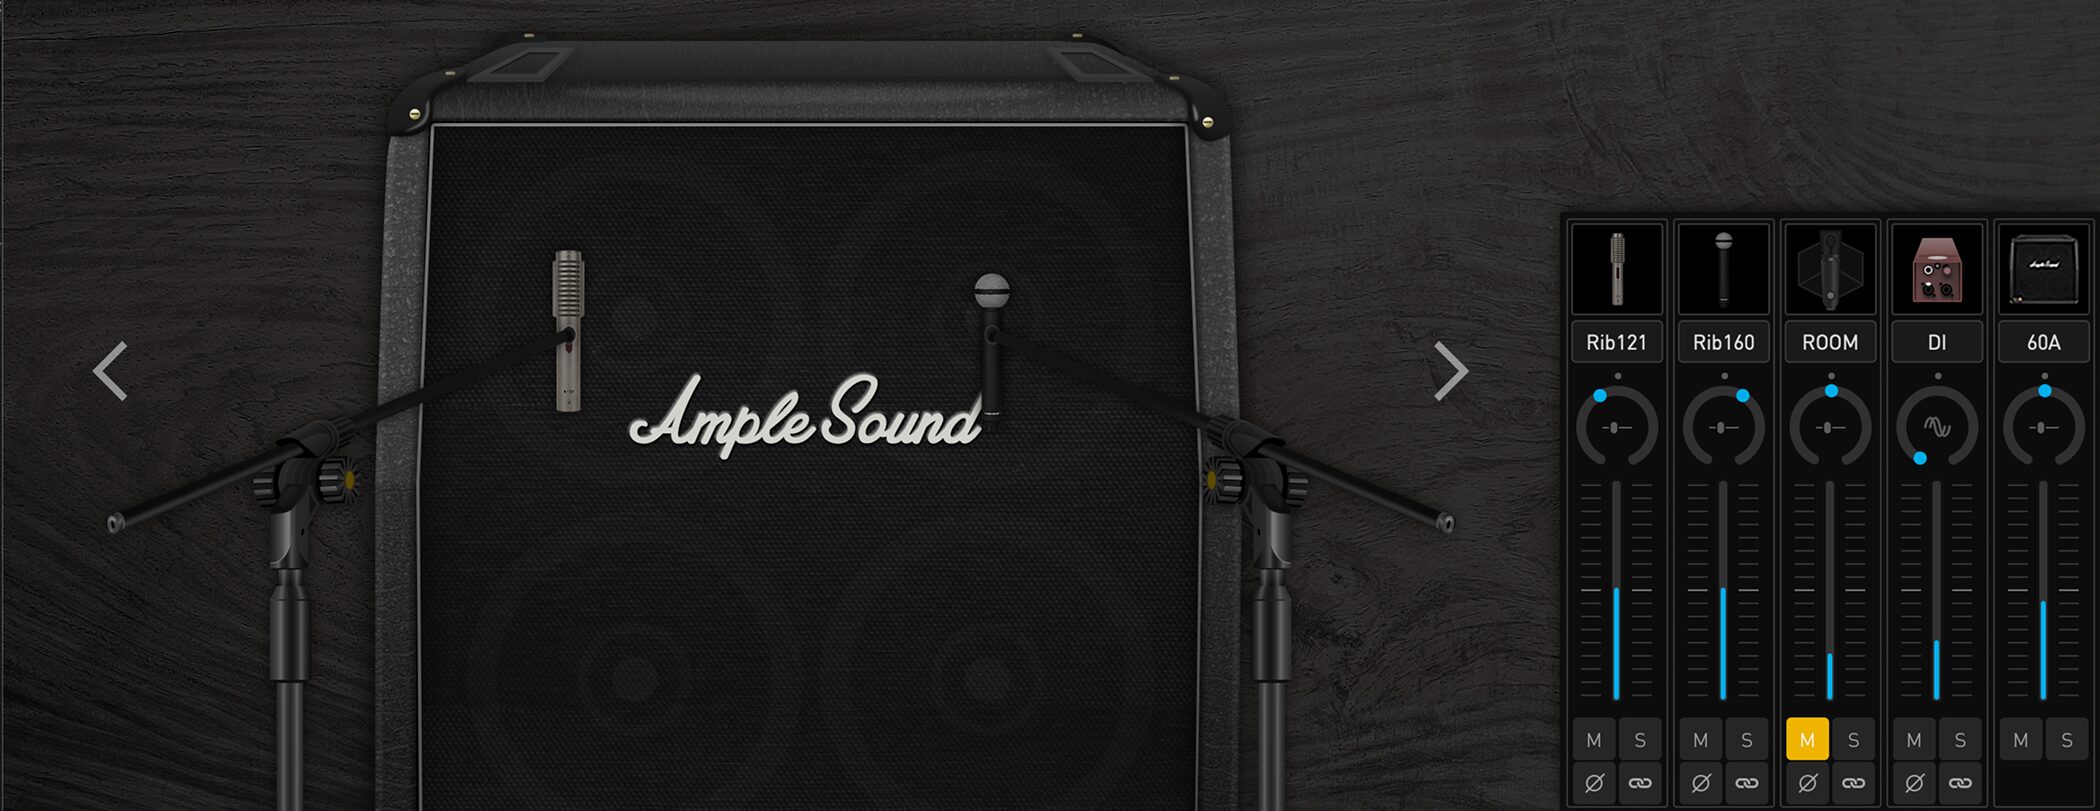
Ample Guitar provides multiple amp heads and cabinets.

① AMP Head Switch arrows on either side change amp heads.
② Turn power on or off.
③ Save and load presets.
④ Switch amp heads and cabinets.
FX panel
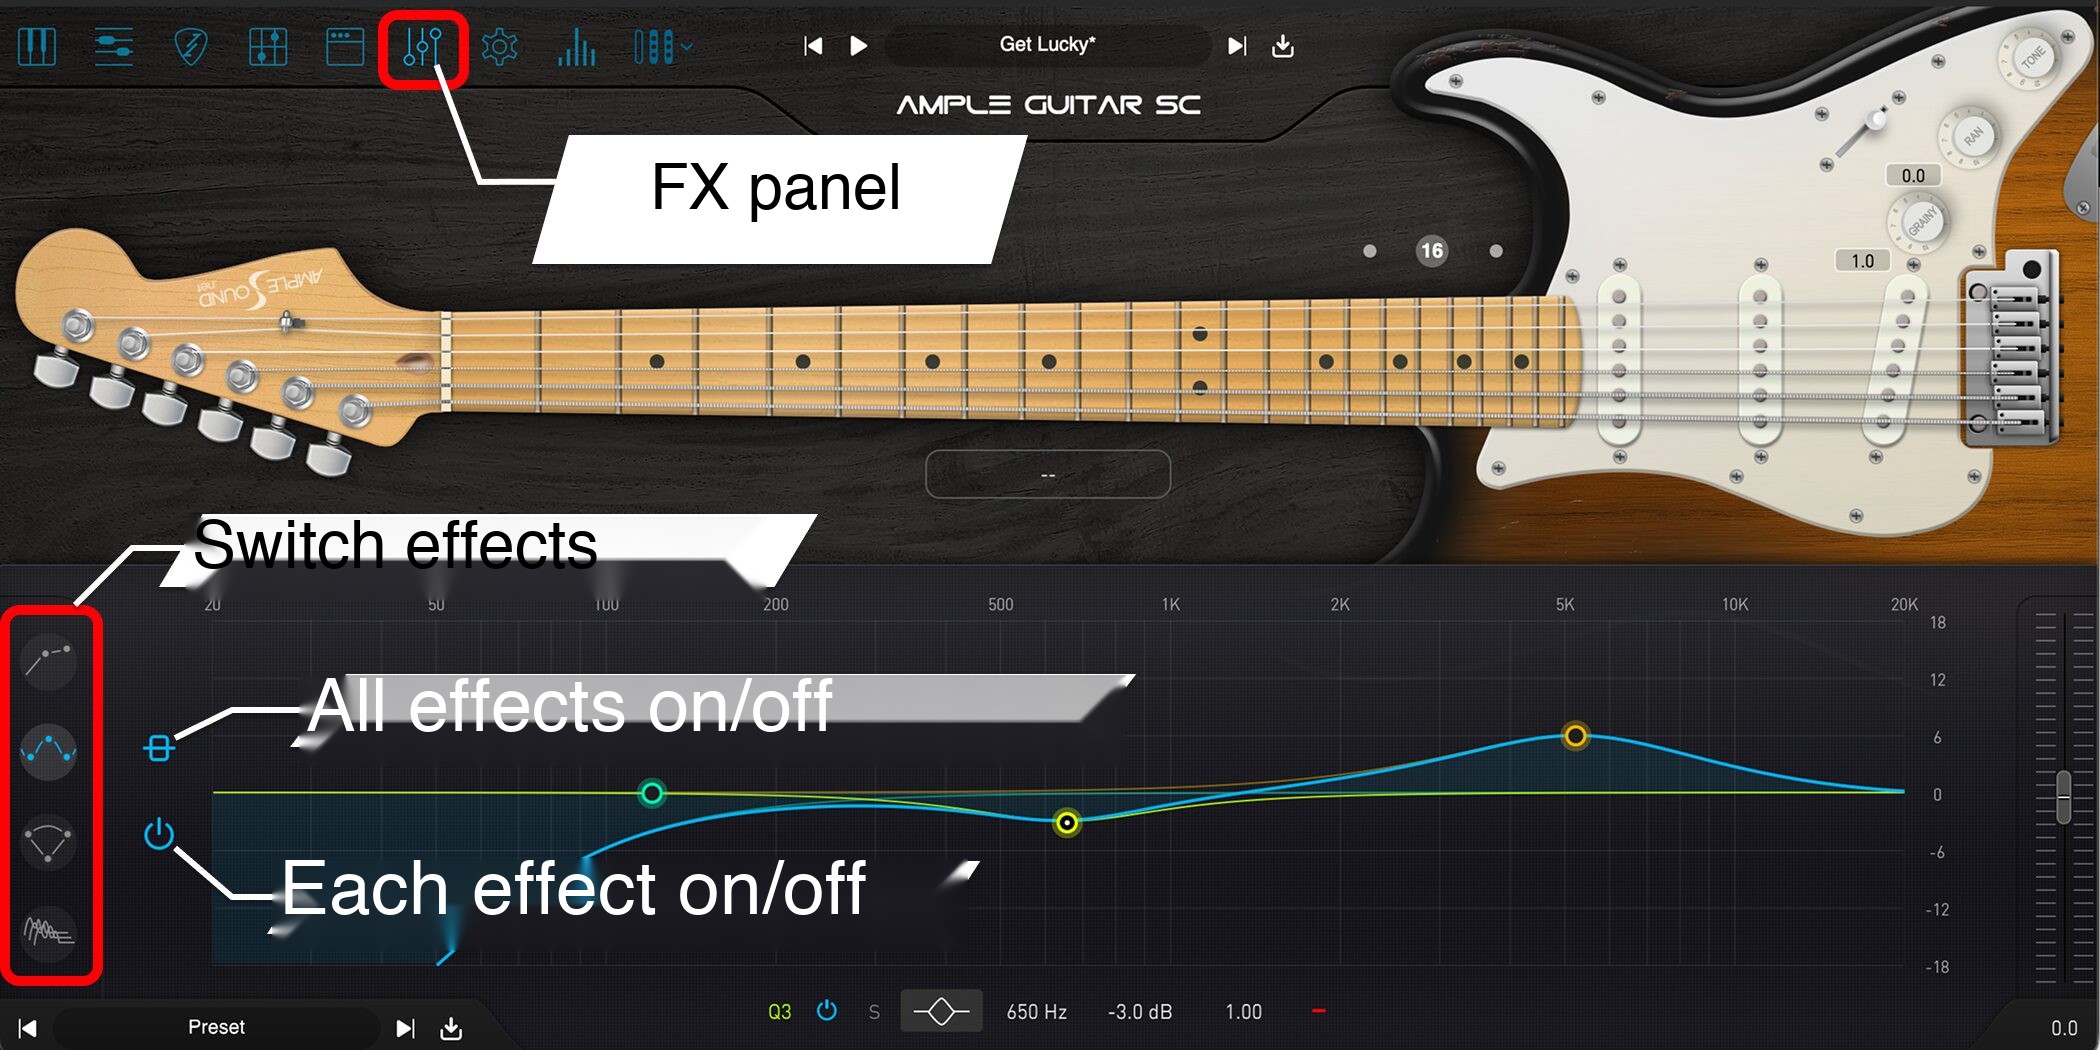
Combine effects such as compression, EQ, delay, and reverb in the FX panel to shape the tone.
Switch effects on or off and adjust their parameters to taste.
Presets: saving the overall setup
Finally, presets let you save and recall the complete Ample Guitar setup.
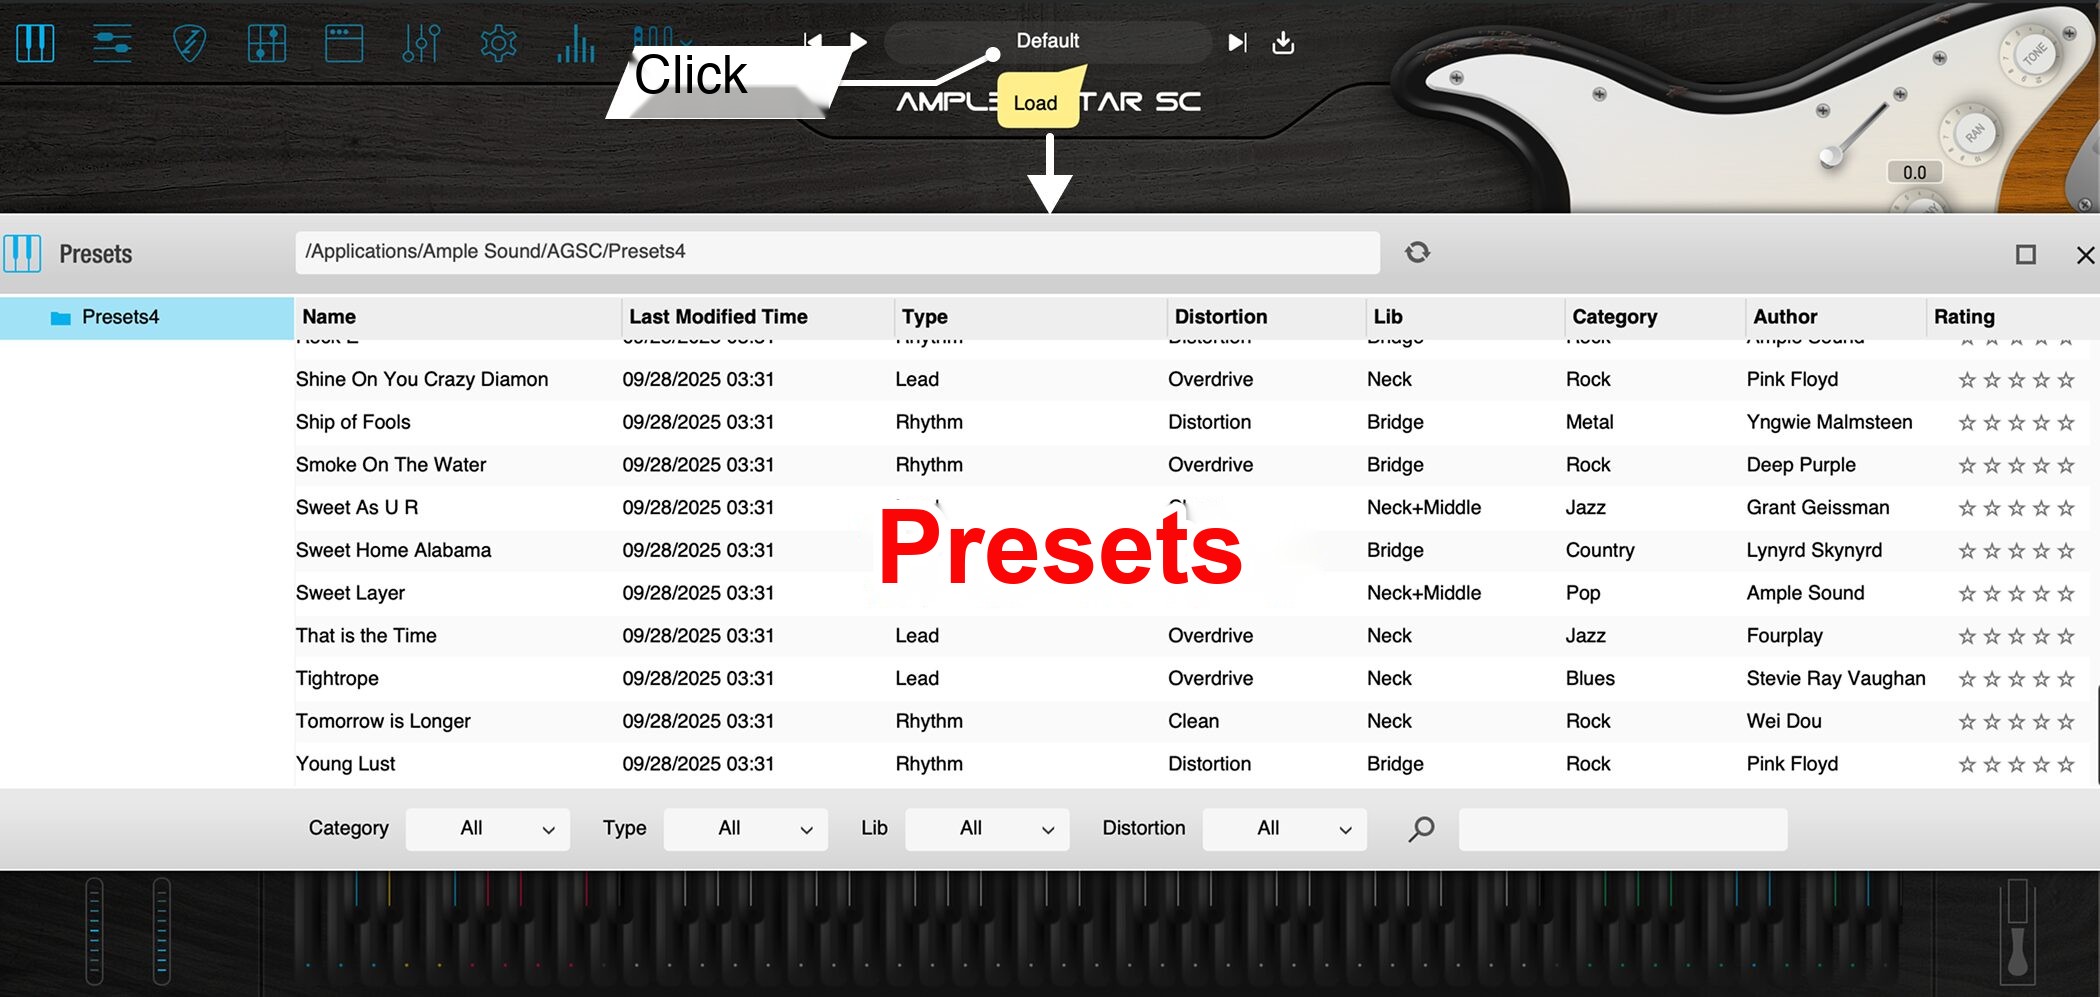
Click the preset bar at the top center to open the preset file list.
Presets recall sound and performance settings together, making it quick to switch to a suitable sound.
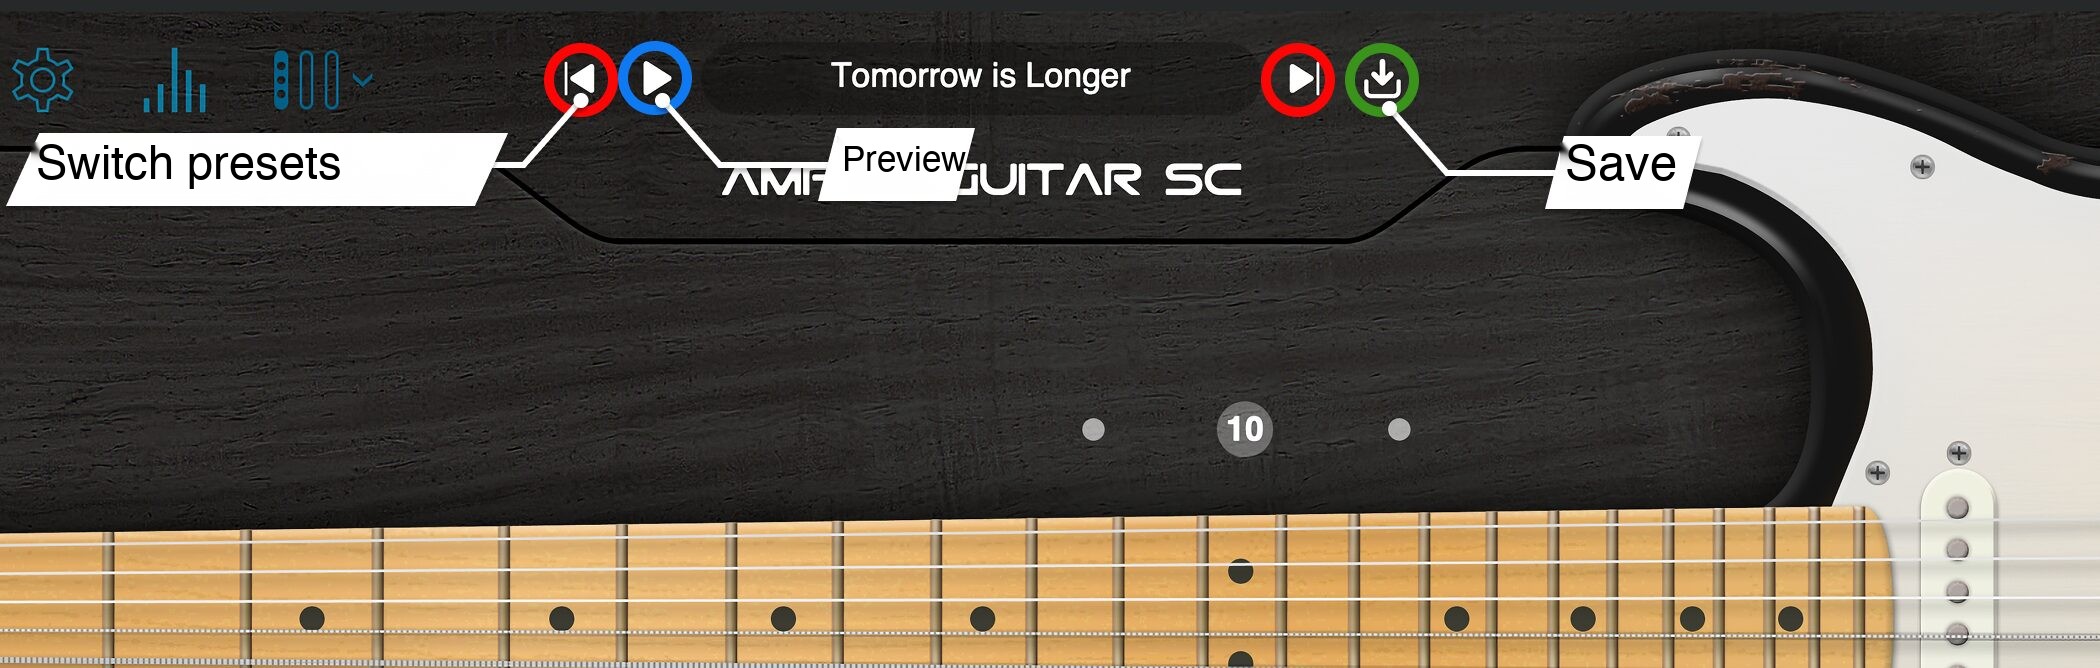
Use Previous (◀) and Next (▶) on the preset bar to switch presets, Play to audition, and Save to save current settings.
System requirements

Windows
OS: Windows 7–11, 64-bit
Formats: VST2, VST3, AAX, standalone
Mac
OS: macOS 10.15 or later
Formats: VST2, VST3, AU, AAX, standalone
Both platforms
CPU: Intel i5 or better recommended
Storage: at least 20 GB free; SSD recommended
Trial version
The Ample Guitar series offers a seven-day trial.
All features can be tried during the trial without a key code or serial number.
If you have not purchased a product, you can download trials of Ample Guitar M or Ample Guitar LP from the following page without creating an account.
Ample Sound official trial download page
Try the sound and workflow for yourself.
Note: AMPLE SOUND and its Japanese distributor SONICWIRE do not provide support for installing or using the trial.
Frequently asked questions
Q1. What genres is Ample Guitar suitable for?
The lineup includes electric guitars, acoustic guitars, basses, and more for genres such as rock, pop, jazz, and acoustic music. Choose a model to suit your track; each reproduces the character of its source instrument.
Q2. Why do keyswitch positions differ between DAWs?
DAWs may label octaves differently. If a keyswitch does not work as expected, check the DAW's octave settings or play the keyboard to find the correct position.
Q3. What is the benefit of Auto Legato Mode?
It automatically applies legato techniques such as slides or hammer-ons to overlapping notes, making natural guitar expression easier without detailed keyswitch programming.
Q4. What should beginners do first?
Start by learning the keyswitch layout in Main and playing single-note phrases while switching articulations in the lower range. Then move on to pattern creation in Riffer and chords in Strummer.
NEW ARTICLES
Latest English Articles











